What you will have at the end
By the end of this series you run your own DNS: an authoritative server that answers for a zone you control, a caching resolver in front of it, the zone signed with DNSSEC, and a toolkit to debug a DNS resolution failure in minutes instead of guessing.
This first chapter is about resolution itself, the walk a name takes from the root down to the server that owns the answer, because you cannot run a name server well until you can read what one is doing. It shows you the destination on a live Ubuntu 24.04 slice, installs the two daemons from a bare box, then teaches you to read a lookup the way a resolver does.
- The series destination: a zone you started with no server for ends up answered by your own authoritative BIND, and a
digagainst it returns theaaflag that means the answer is yours, not a cached copy. - On a new slice there is no name server at all.
apt install bind9 unboundis the real first step, and it puts the authoritative daemon, the resolver and the query tools on the box together. - An authoritative server holds a zone and answers with
aa; a recursive resolver owns no zone, walks the tree for you, and answers withra. You will run one of each. digis the one tool that shows the header flags, the record types and the delegation walk, so it is how you read your own work and someone else's failure alike.
- One Ubuntu 24.04 slice reached over SSH, where you hold sudo and no name server runs yet.
- Every query in this series points at a server on loopback with
dig @127.0.0.1 -p PORT, so the demo zone never touches public DNS and you break nothing while you learn. - No public firewall change is needed yet, because port 53 stays on the loopback address until you decide to serve the internet.
- Enough comfort to read a
digheader, the handful of flags and sections it prints, which is the single skill the whole series leans on.
See the destination first
Here is where this series ends, on one screen. This is dig asking your own authoritative server, running on the loopback address on port 5301, for the start-of-authority record of boxlab.space, the demo zone you build in chapter two.
dig @127.0.0.1 -p 5301 boxlab.space SOA
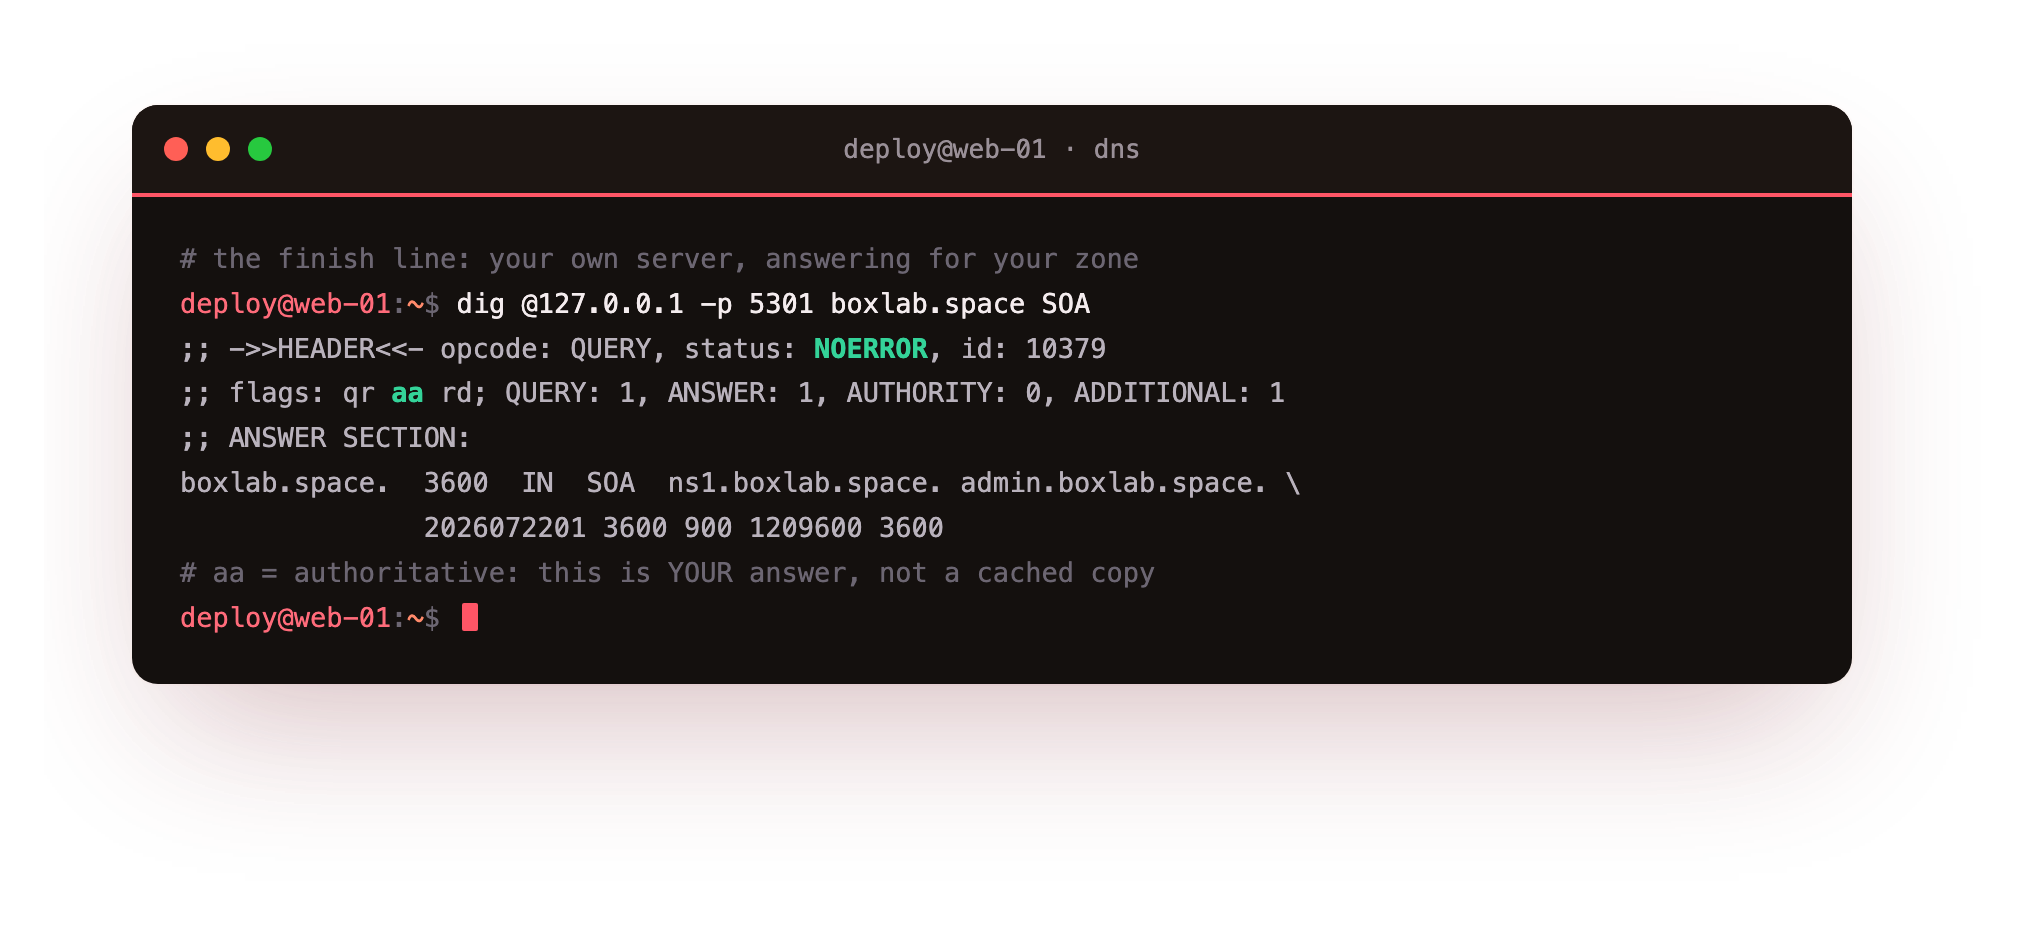
Two things in that header are the payoff. The status is NOERROR, so the server had an answer, and the flags read qr aa rd. That aa, authoritative answer, is the whole point: the server is speaking for boxlab.space because you loaded the zone into it, not repeating something it cached from elsewhere. Right now you have none of this. Your machines ask a resolver your provider runs, and your names live on a server someone else controls. The rest of the series moves that authority onto a slice you hold.
Install BIND and unbound on a bare slice
A fresh slice has no name server on it, so the from-zero step is to put one there. One apt command installs both roles at once: bind9 gives you named, the authoritative server, and unbound gives you the caching resolver, and the same packages bring the dig and named-checkzone tools you check them with. Update the package lists first, then install.
sudo apt update
sudo apt install -y bind9 unbound
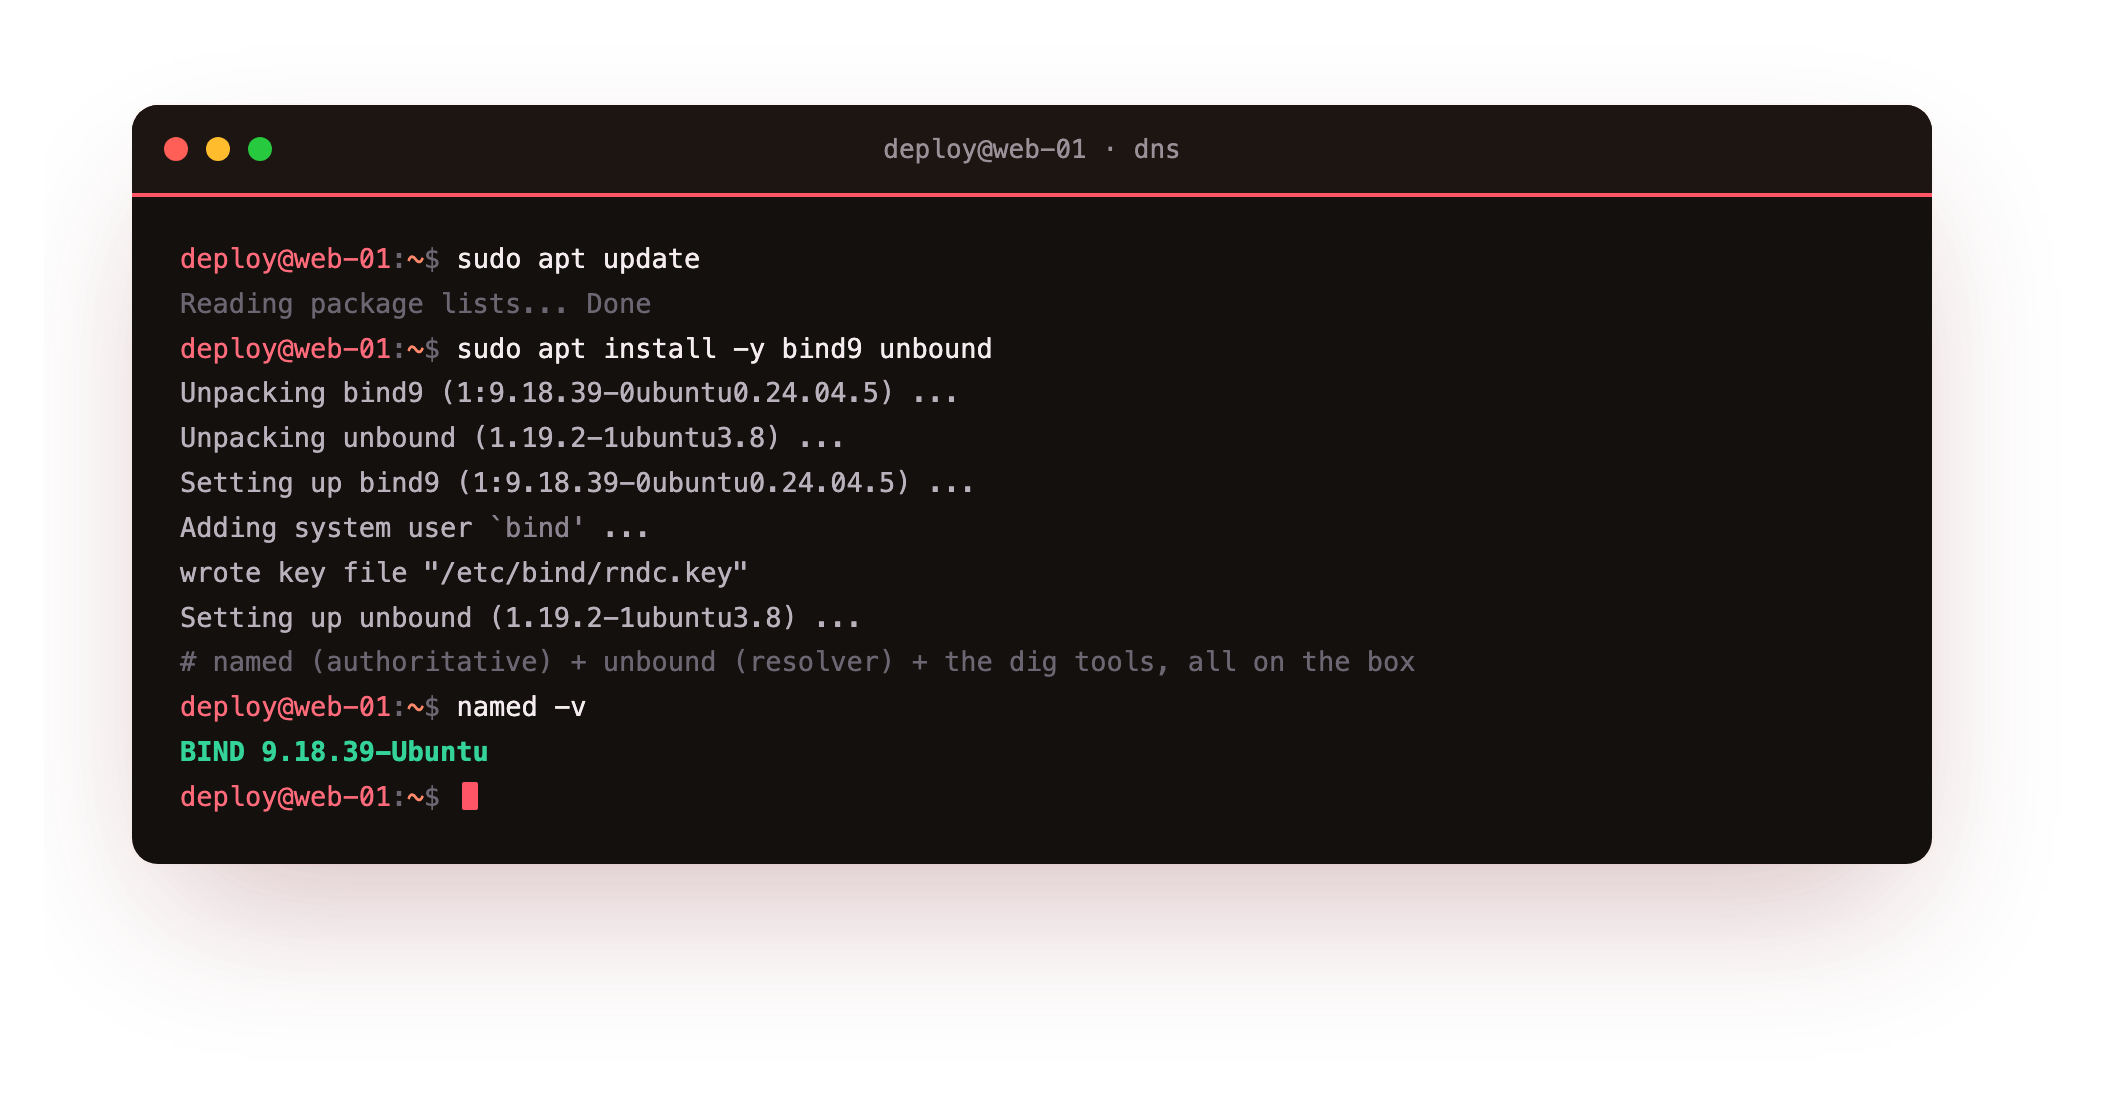
apt pulls in BIND 9.18 and unbound 1.19, the versions Ubuntu 24.04 ships, and registers both as systemd services. This series does not run them on the default port 53, because the slice already uses a stub resolver there for its own lookups. Instead every server you build binds to 127.0.0.1 on a private port, 5301 for the authoritative side and 5302 for the resolver, so you never disturb the machine's own name resolution while you experiment.
Run named -v and confirm it prints BIND 9.18, then unbound -V | head -1 for the resolver version. Both daemons and the query tools are now on the box, even though you have not written a zone or pointed anything at them yet.
How DNS resolution actually works
Two kinds of server answer DNS questions, and they do opposite jobs. An authoritative server is the source of truth for one zone. It knows boxlab.space because an operator loaded that zone into it, and it answers only for names it owns. This is the server you build in chapter two; ask it directly and read the header.
dig @127.0.0.1 -p 5301 boxlab.space A
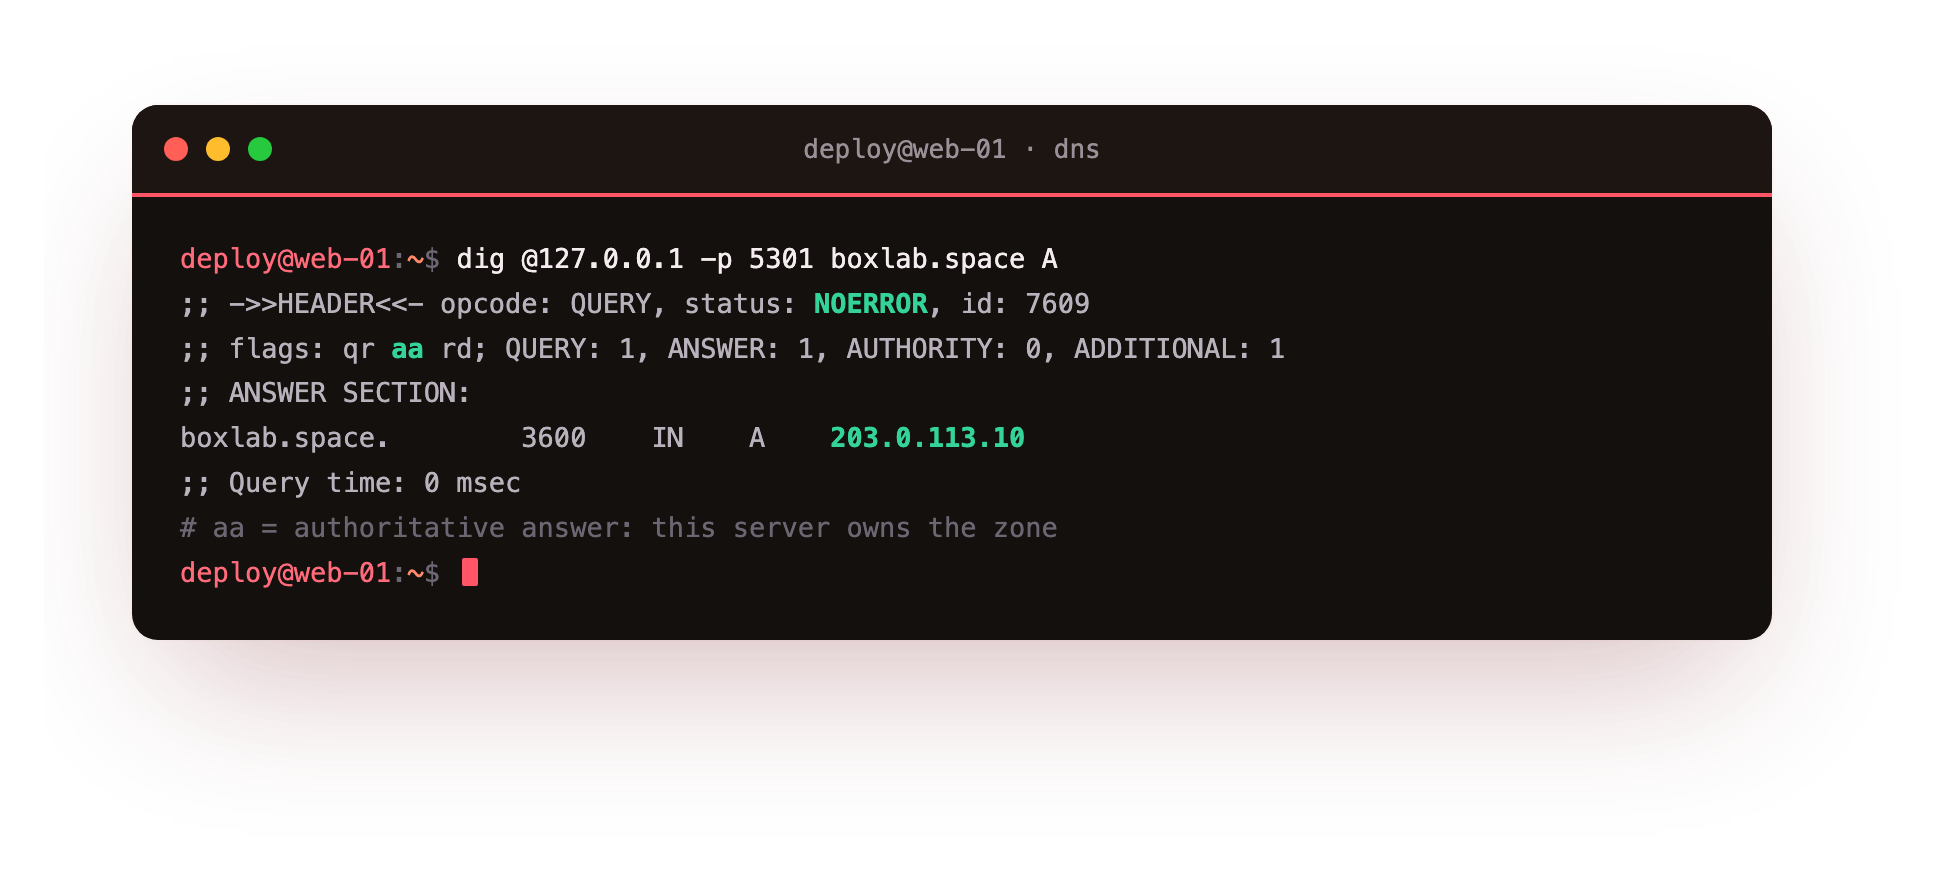
The flags read qr aa rd. The aa says the answer is authoritative, and there is no ra flag because this server does no lookups on your behalf. A recursive resolver is the other kind, the server your laptop actually talks to. It holds no zones. It starts at the root, follows referrals until it reaches an authoritative answer, hands the result back and caches it. This is the resolver you build in chapter three; ask it the same question.
dig @127.0.0.1 -p 5302 boxlab.space A
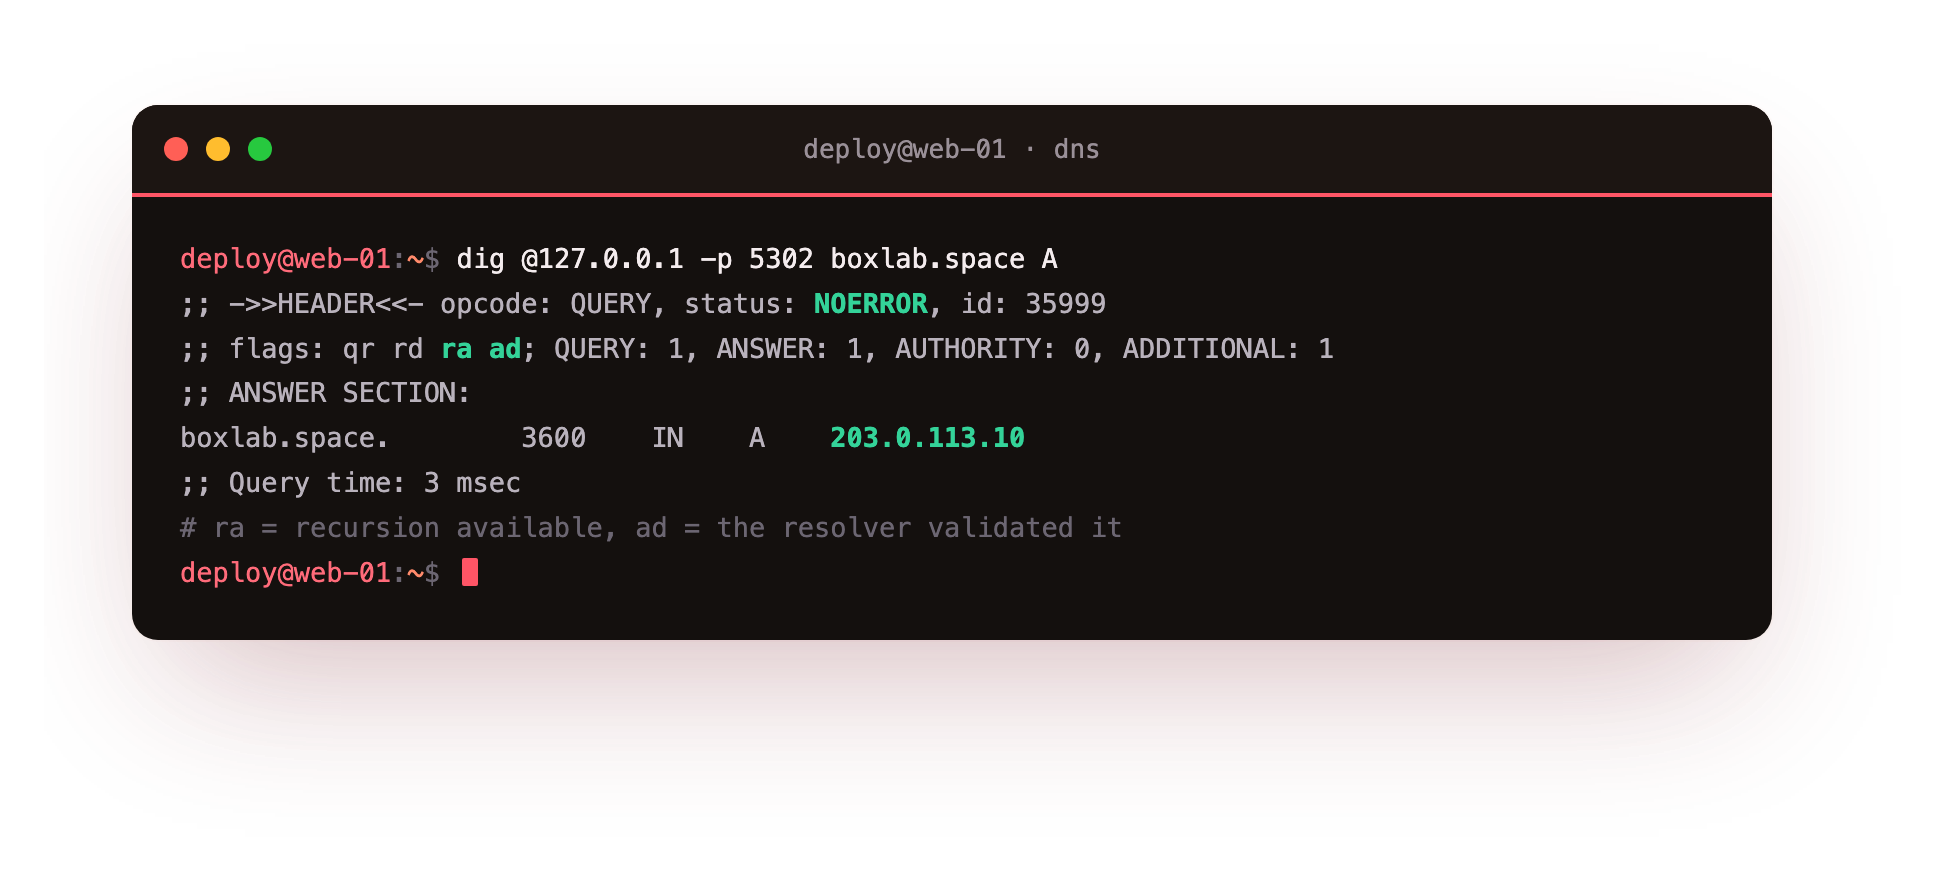
Now the header reads qr rd ra ad. The ra means recursion available, and the ad means the resolver validated the answer with DNSSEC. Same record, two roles: the resolver did the walking the authoritative server never does.
Compare the two headers. The authoritative reply carries aa and no ra; the resolver reply carries ra and no aa. If you ever see both missing, you asked a server that neither owns the zone nor recurses, which is the first thing to check when a lookup returns nothing useful.
Following a lookup from the root down
No single server knows the whole internet. Resolution is a chain of referrals that begins at the root zone, moves to the top level domain, and ends at the zone's own servers. The +trace option tells dig to perform each step itself and print the referral at every level, so the path a resolver takes becomes visible.
dig +trace boxlab.space
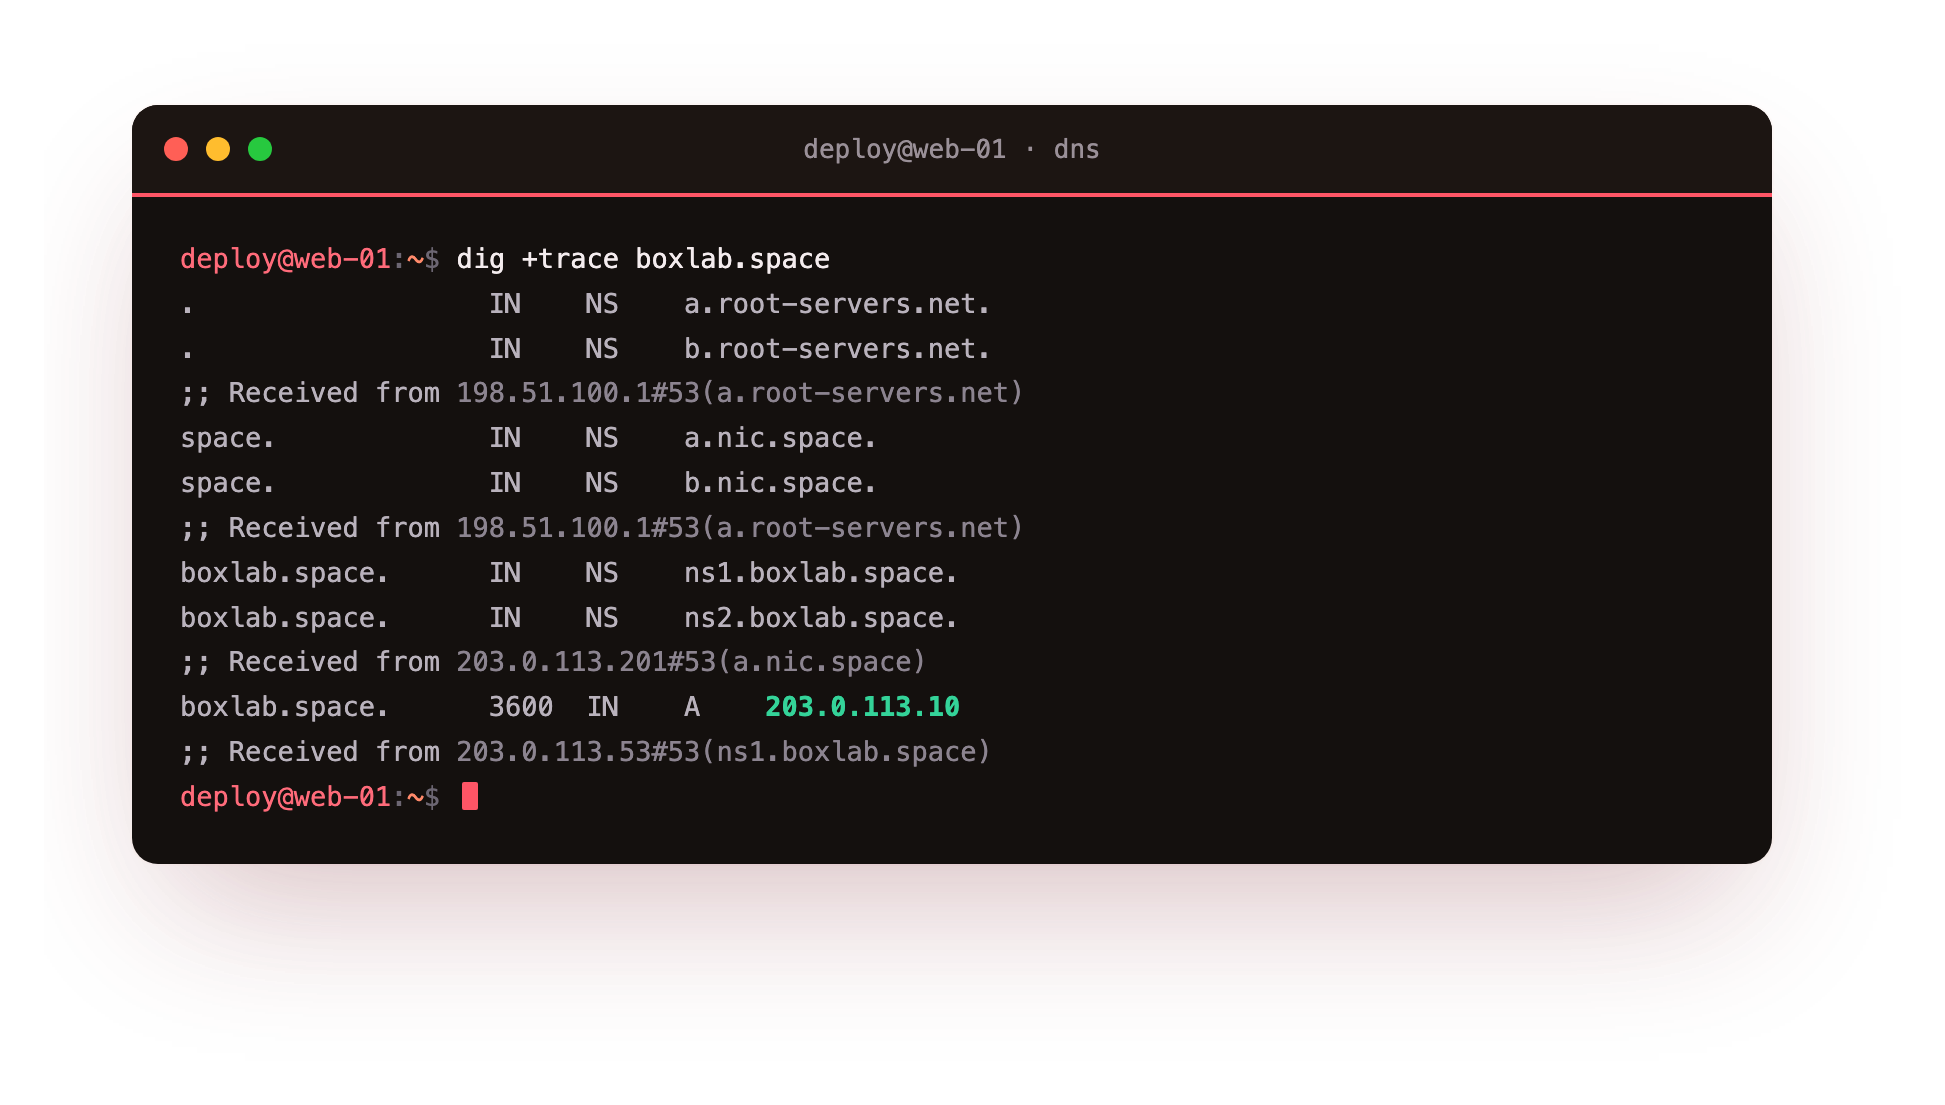
The output starts with the root server names, then the root refers the query to the .space TLD servers, which refer it to the authoritative servers for boxlab.space, which return the address. Each block is one delegation. A resolver caches these referrals, so the next lookup of any .space name skips the root and TLD steps and goes straight to the level it still remembers.
When a name will not resolve, +trace is the first tool out of the box, because it shows you exactly which delegation in that chain is broken.
Reading records, sections and TTLs
A DNS answer is more than an address. Each record has a type, a lifetime and a value, grouped into an ANSWER section for the data you asked for and an AUTHORITY section naming the servers responsible. Query a few types against the authoritative server and read what each one carries.
dig @127.0.0.1 -p 5301 boxlab.space MX
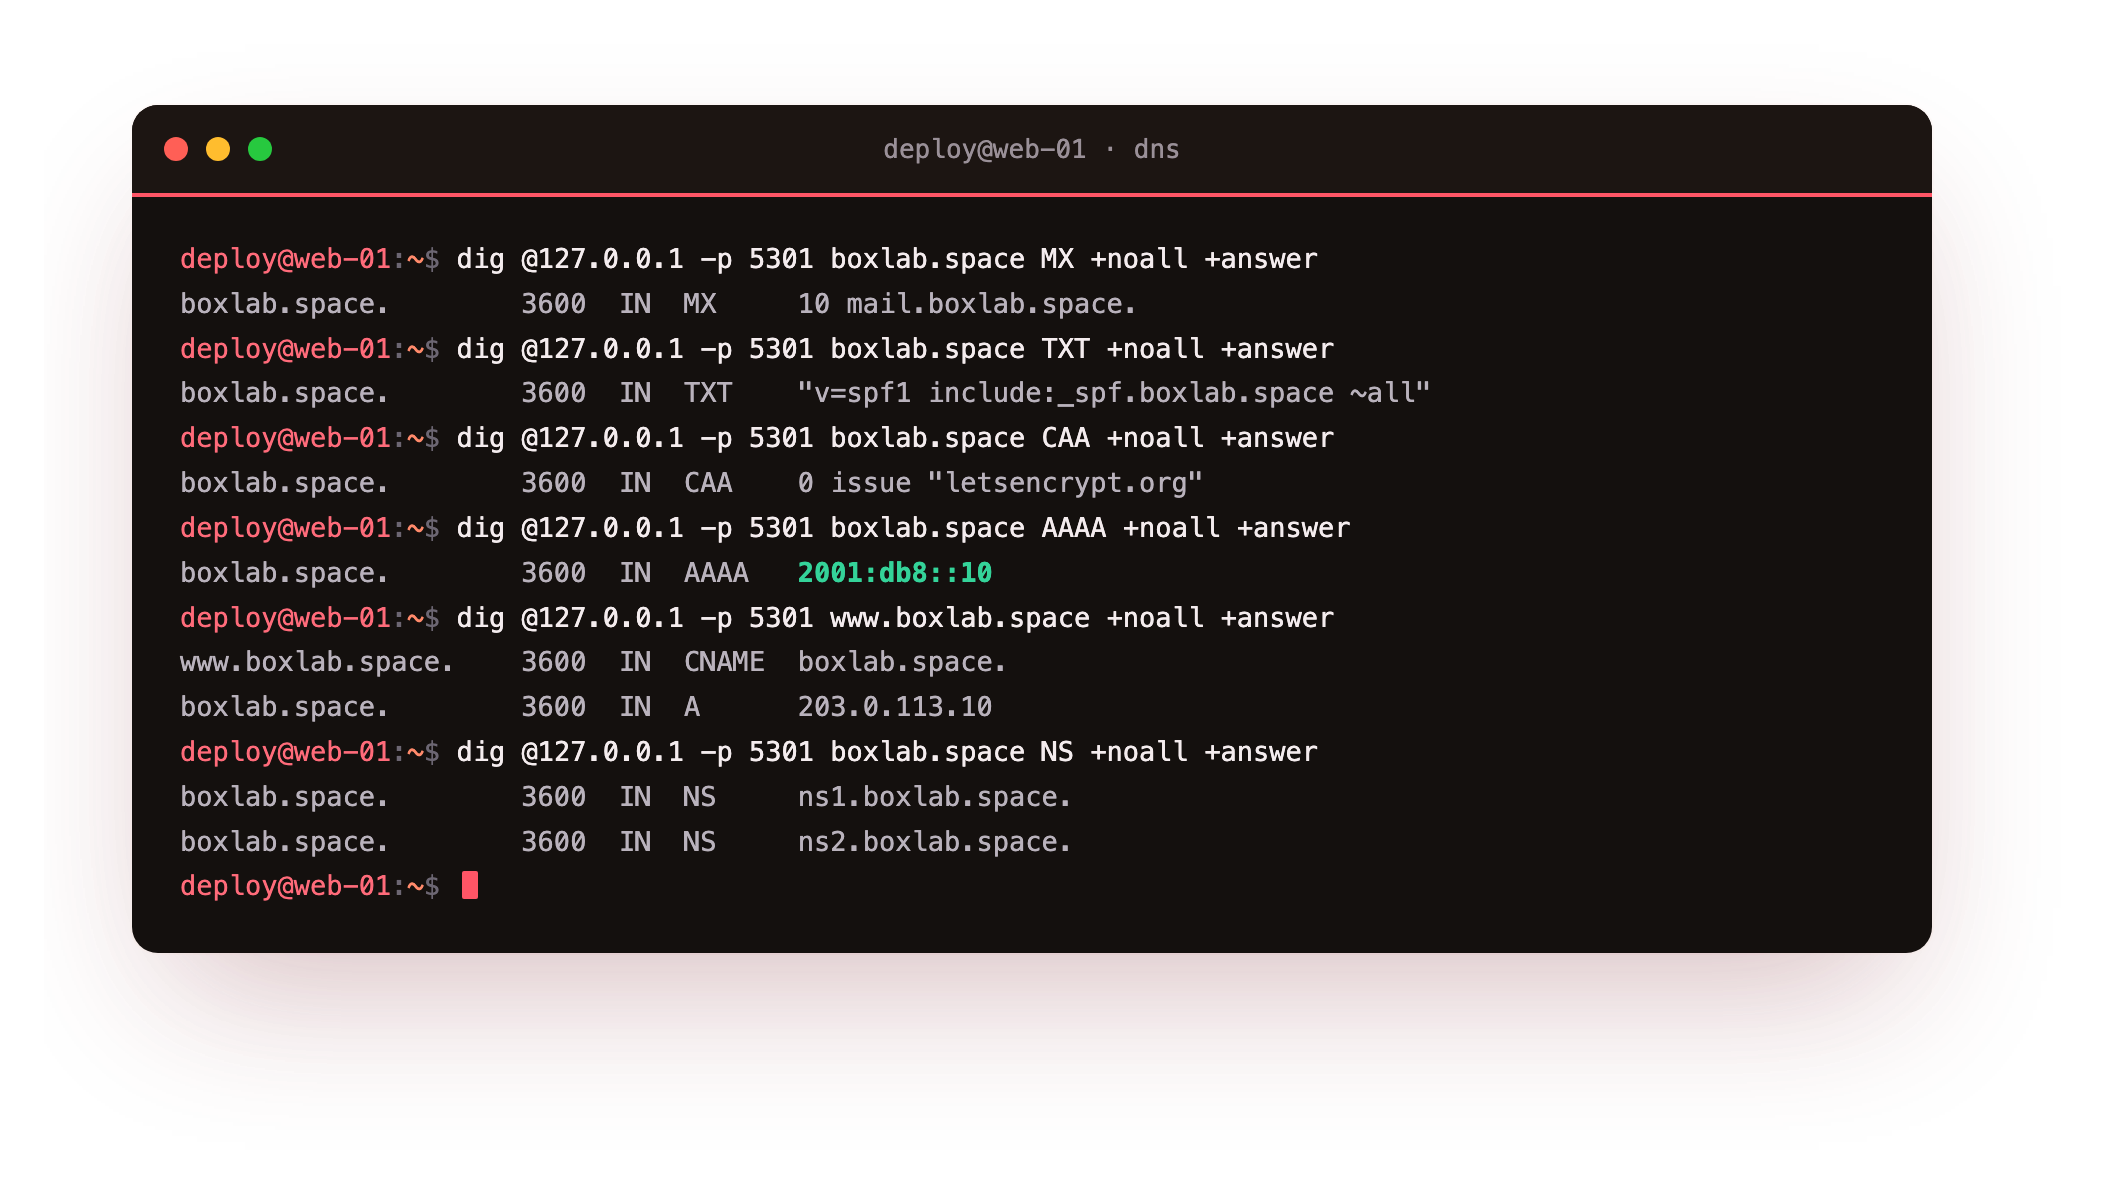
An A record maps a name to an IPv4 address and AAAA to IPv6. A CNAME points one name at another, so www is an alias for the apex. MX names the mail server and its priority, TXT holds free text such as an SPF policy, and CAA states which authority may issue certificates. NS lists the zone's nameservers and SOA carries the serial and timers. The number before each type is the TTL, the seconds a resolver may cache that record before asking again.
Run the same query twice and watch the TTL. Straight against the authoritative server on 5301 it stays fixed, because that server always answers from the zone. Through the resolver on 5302 it counts down, because the resolver is ageing a cached copy. That falling number is how you tell a cached answer from an authoritative one.
Frequently asked questions
What is the difference between authoritative and recursive DNS?
An authoritative server owns a zone and answers with the aa flag for names in that zone only. A recursive resolver owns no zones; it walks from the root to the authoritative servers on your behalf, caches the result, and sets the ra flag. Your devices query resolvers, and resolvers ultimately query authoritative servers like the one you build here.
Do I need a domain to follow this series?
No. Every server binds to the loopback address and every query uses dig @127.0.0.1 -p PORT, so the demo zone boxlab.space is served only to your own machine and never touches the public delegation. You need a real domain only on the day you decide to answer for it on the internet, which is a deliberate final step, not a prerequisite.
What does dig +trace actually show?
It shows each delegation in the resolution path: the root nameservers, the referral to the TLD servers, and the referral to the zone's authoritative servers, ending with the answer. It bypasses your normal resolver and queries each level directly, which is what makes it so useful for spotting a broken delegation.
Why did installing bind9 not take over my slice's DNS?
Because this series never runs the daemons on the default port 53, where the system's own stub resolver already listens. Each server you build binds to 127.0.0.1 on a private port instead, so the machine keeps resolving names for apt and SSH the entire time you are learning.
What you can do now
You can read a DNS answer the way a resolver does: the aa flag that marks an authoritative reply, the ra flag that marks a recursive one, the delegation walk that dig +trace lays out, and the record types and TTLs that decide what an answer means and how long it lasts. You also have both daemons installed on a slice you started from nothing, and you have seen the destination, your own server answering with aa for your zone.
That authoritative answer is the next thing you make real. The next chapter writes the boxlab.space zone file by hand, validates it with the checkers BIND ships, loads it into named, and confirms your own server is the one speaking for the zone: run an authoritative DNS server with BIND9.