What you will have
This tutorial shows you how to secure WordPress on a VPS and, more importantly, how to prove each control is actually working rather than just present in a config file. It is written for one person in particular: someone running a real WordPress site on their own slice who has read a dozen hardening checklists, pasted a dozen snippets, and still has no idea whether any of it is doing anything.
By the end you will have a locked-down site and a short set of commands that show, in plain output, that the locks are real.
Here is the destination, shown first. These are the exact proofs captured on the site we hardened while writing this, a small slice running WordPress behind nginx.
# the payoff: prove each control is really on, not just configured
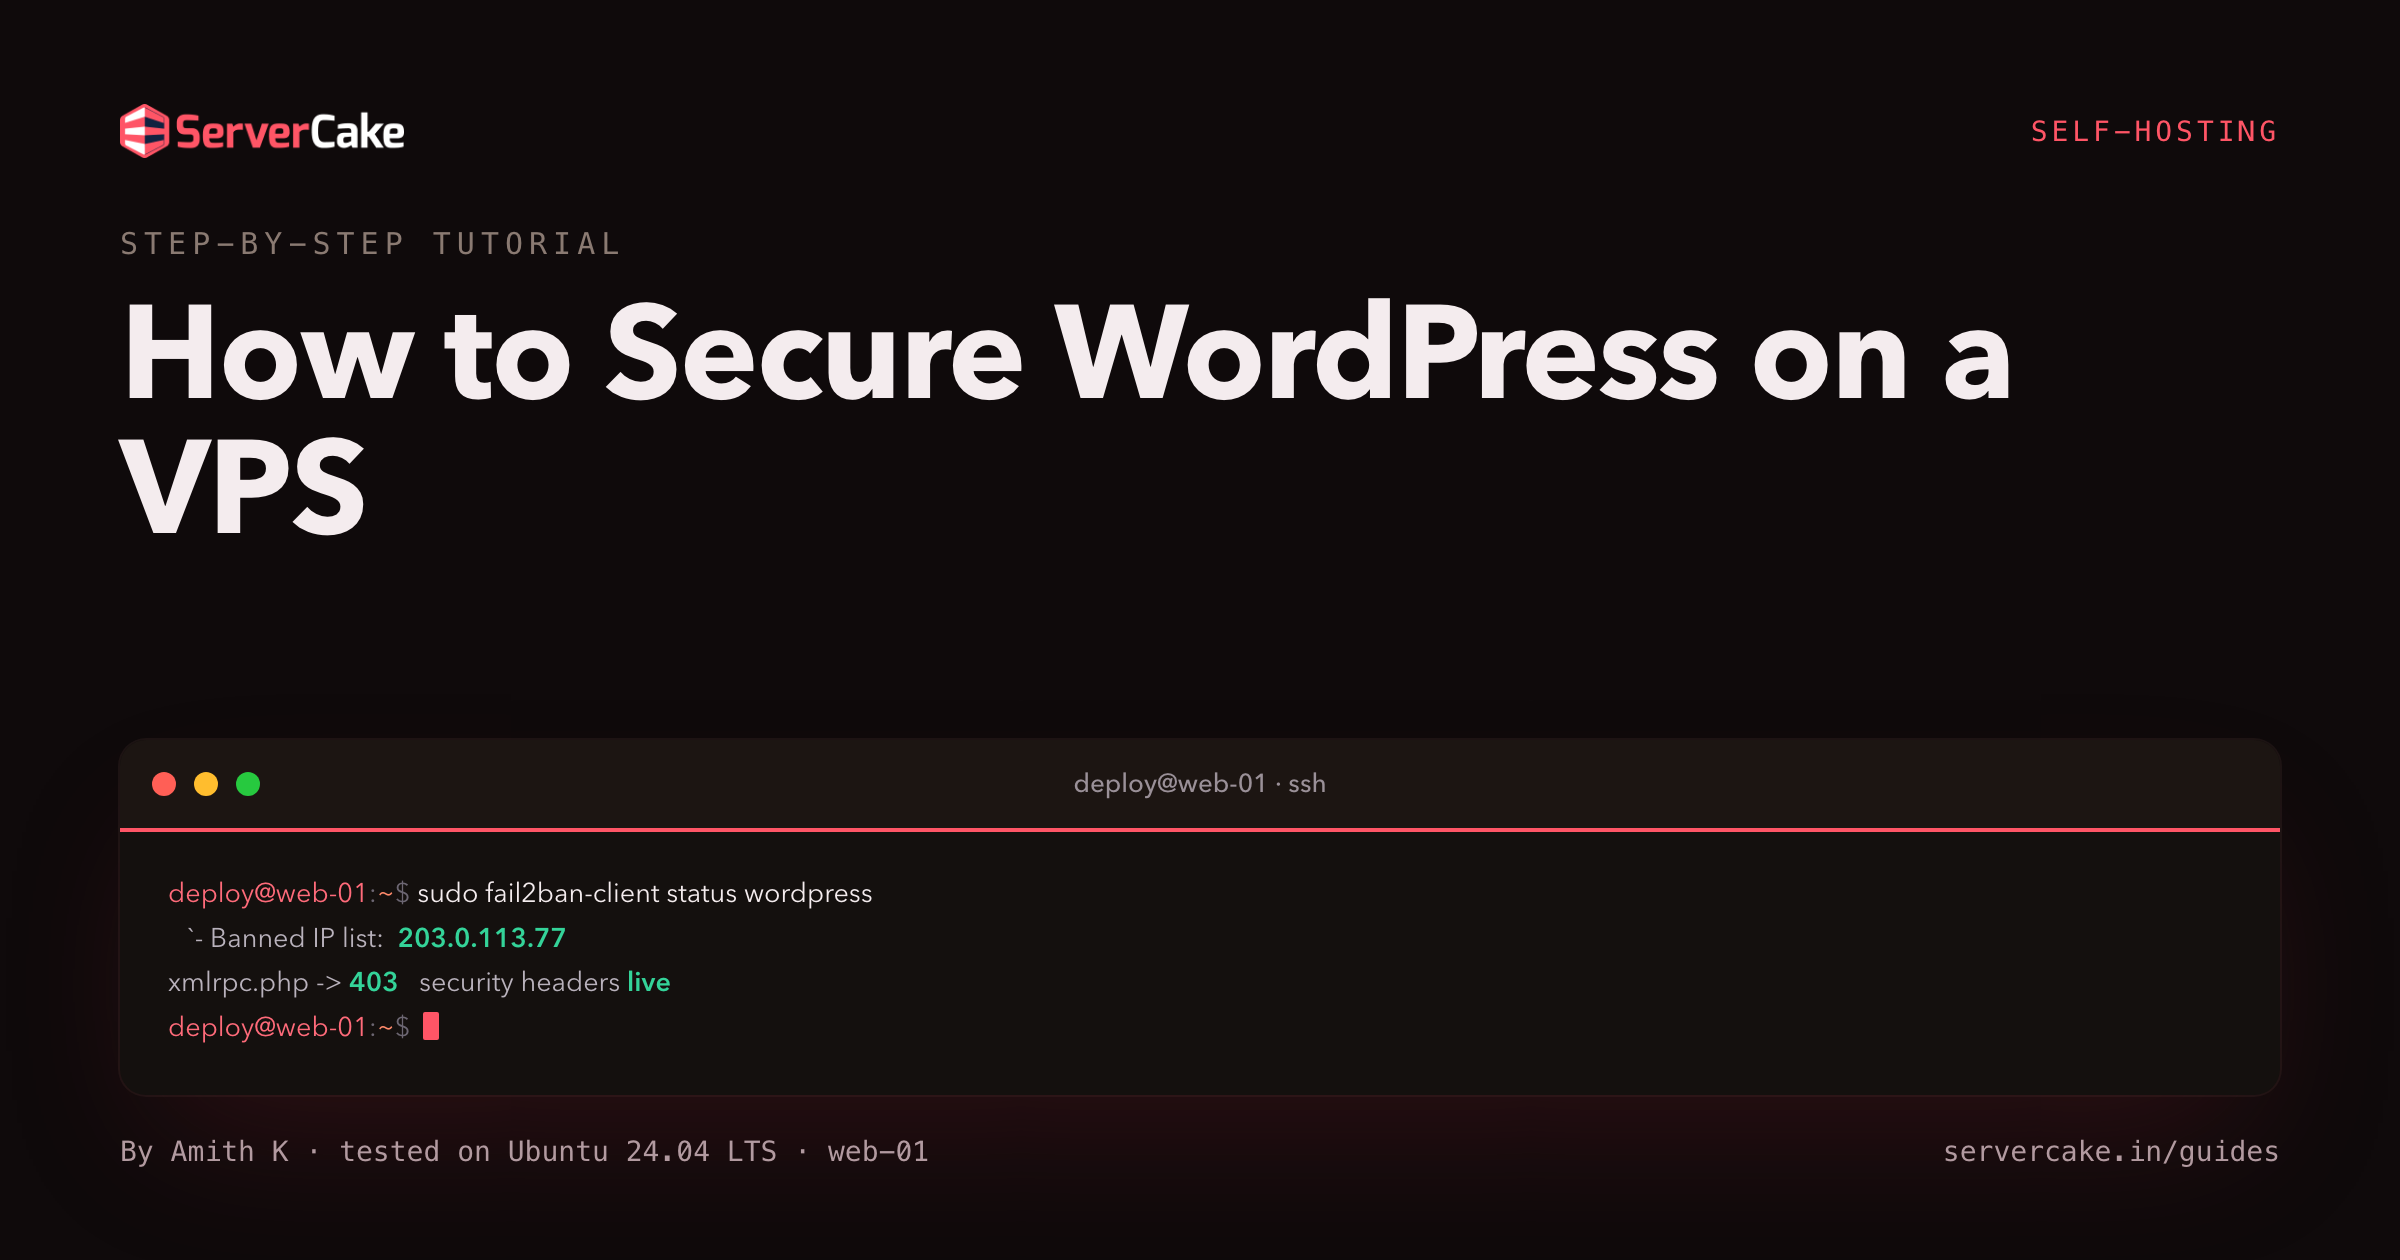
sudo fail2ban-client status wordpress                       # a real banned attacker IP
curl -sI https://your-domain/ | grep -i strict-transport    # security headers, live
curl -so /dev/null -w '%{http_code}\n' https://your-domain/xmlrpc.php   # XML-RPC blocked
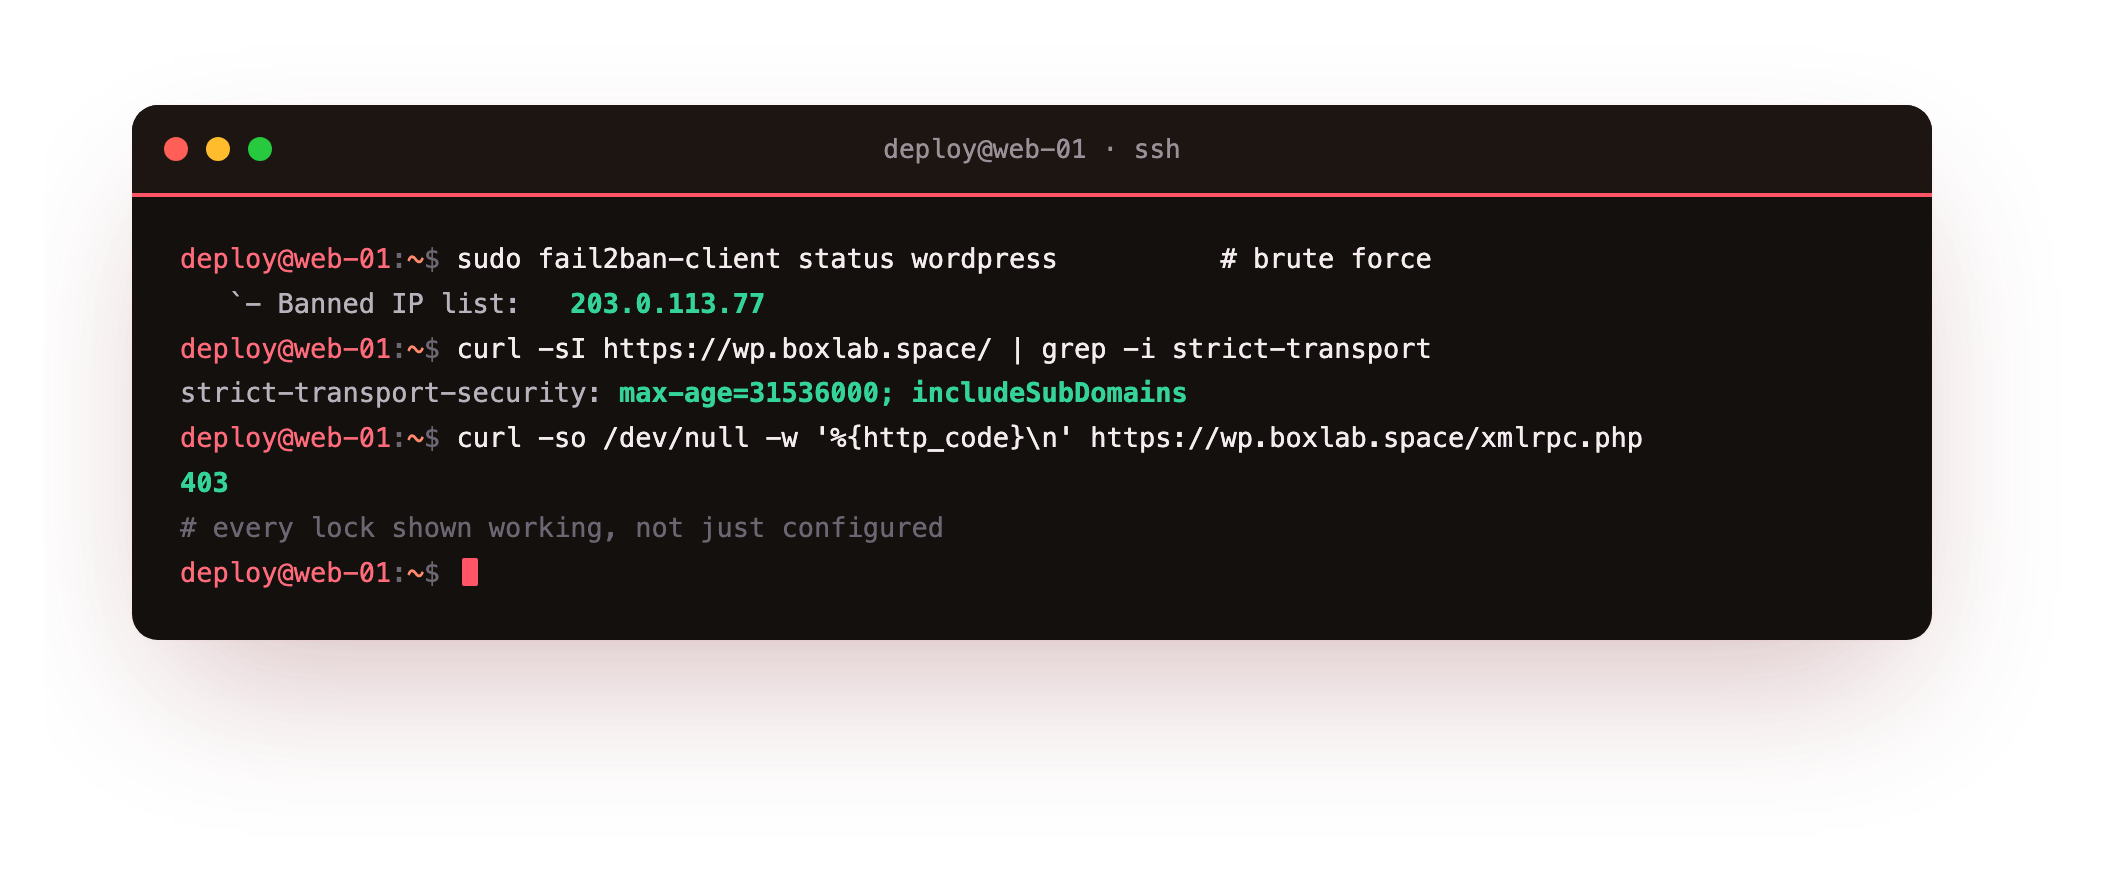
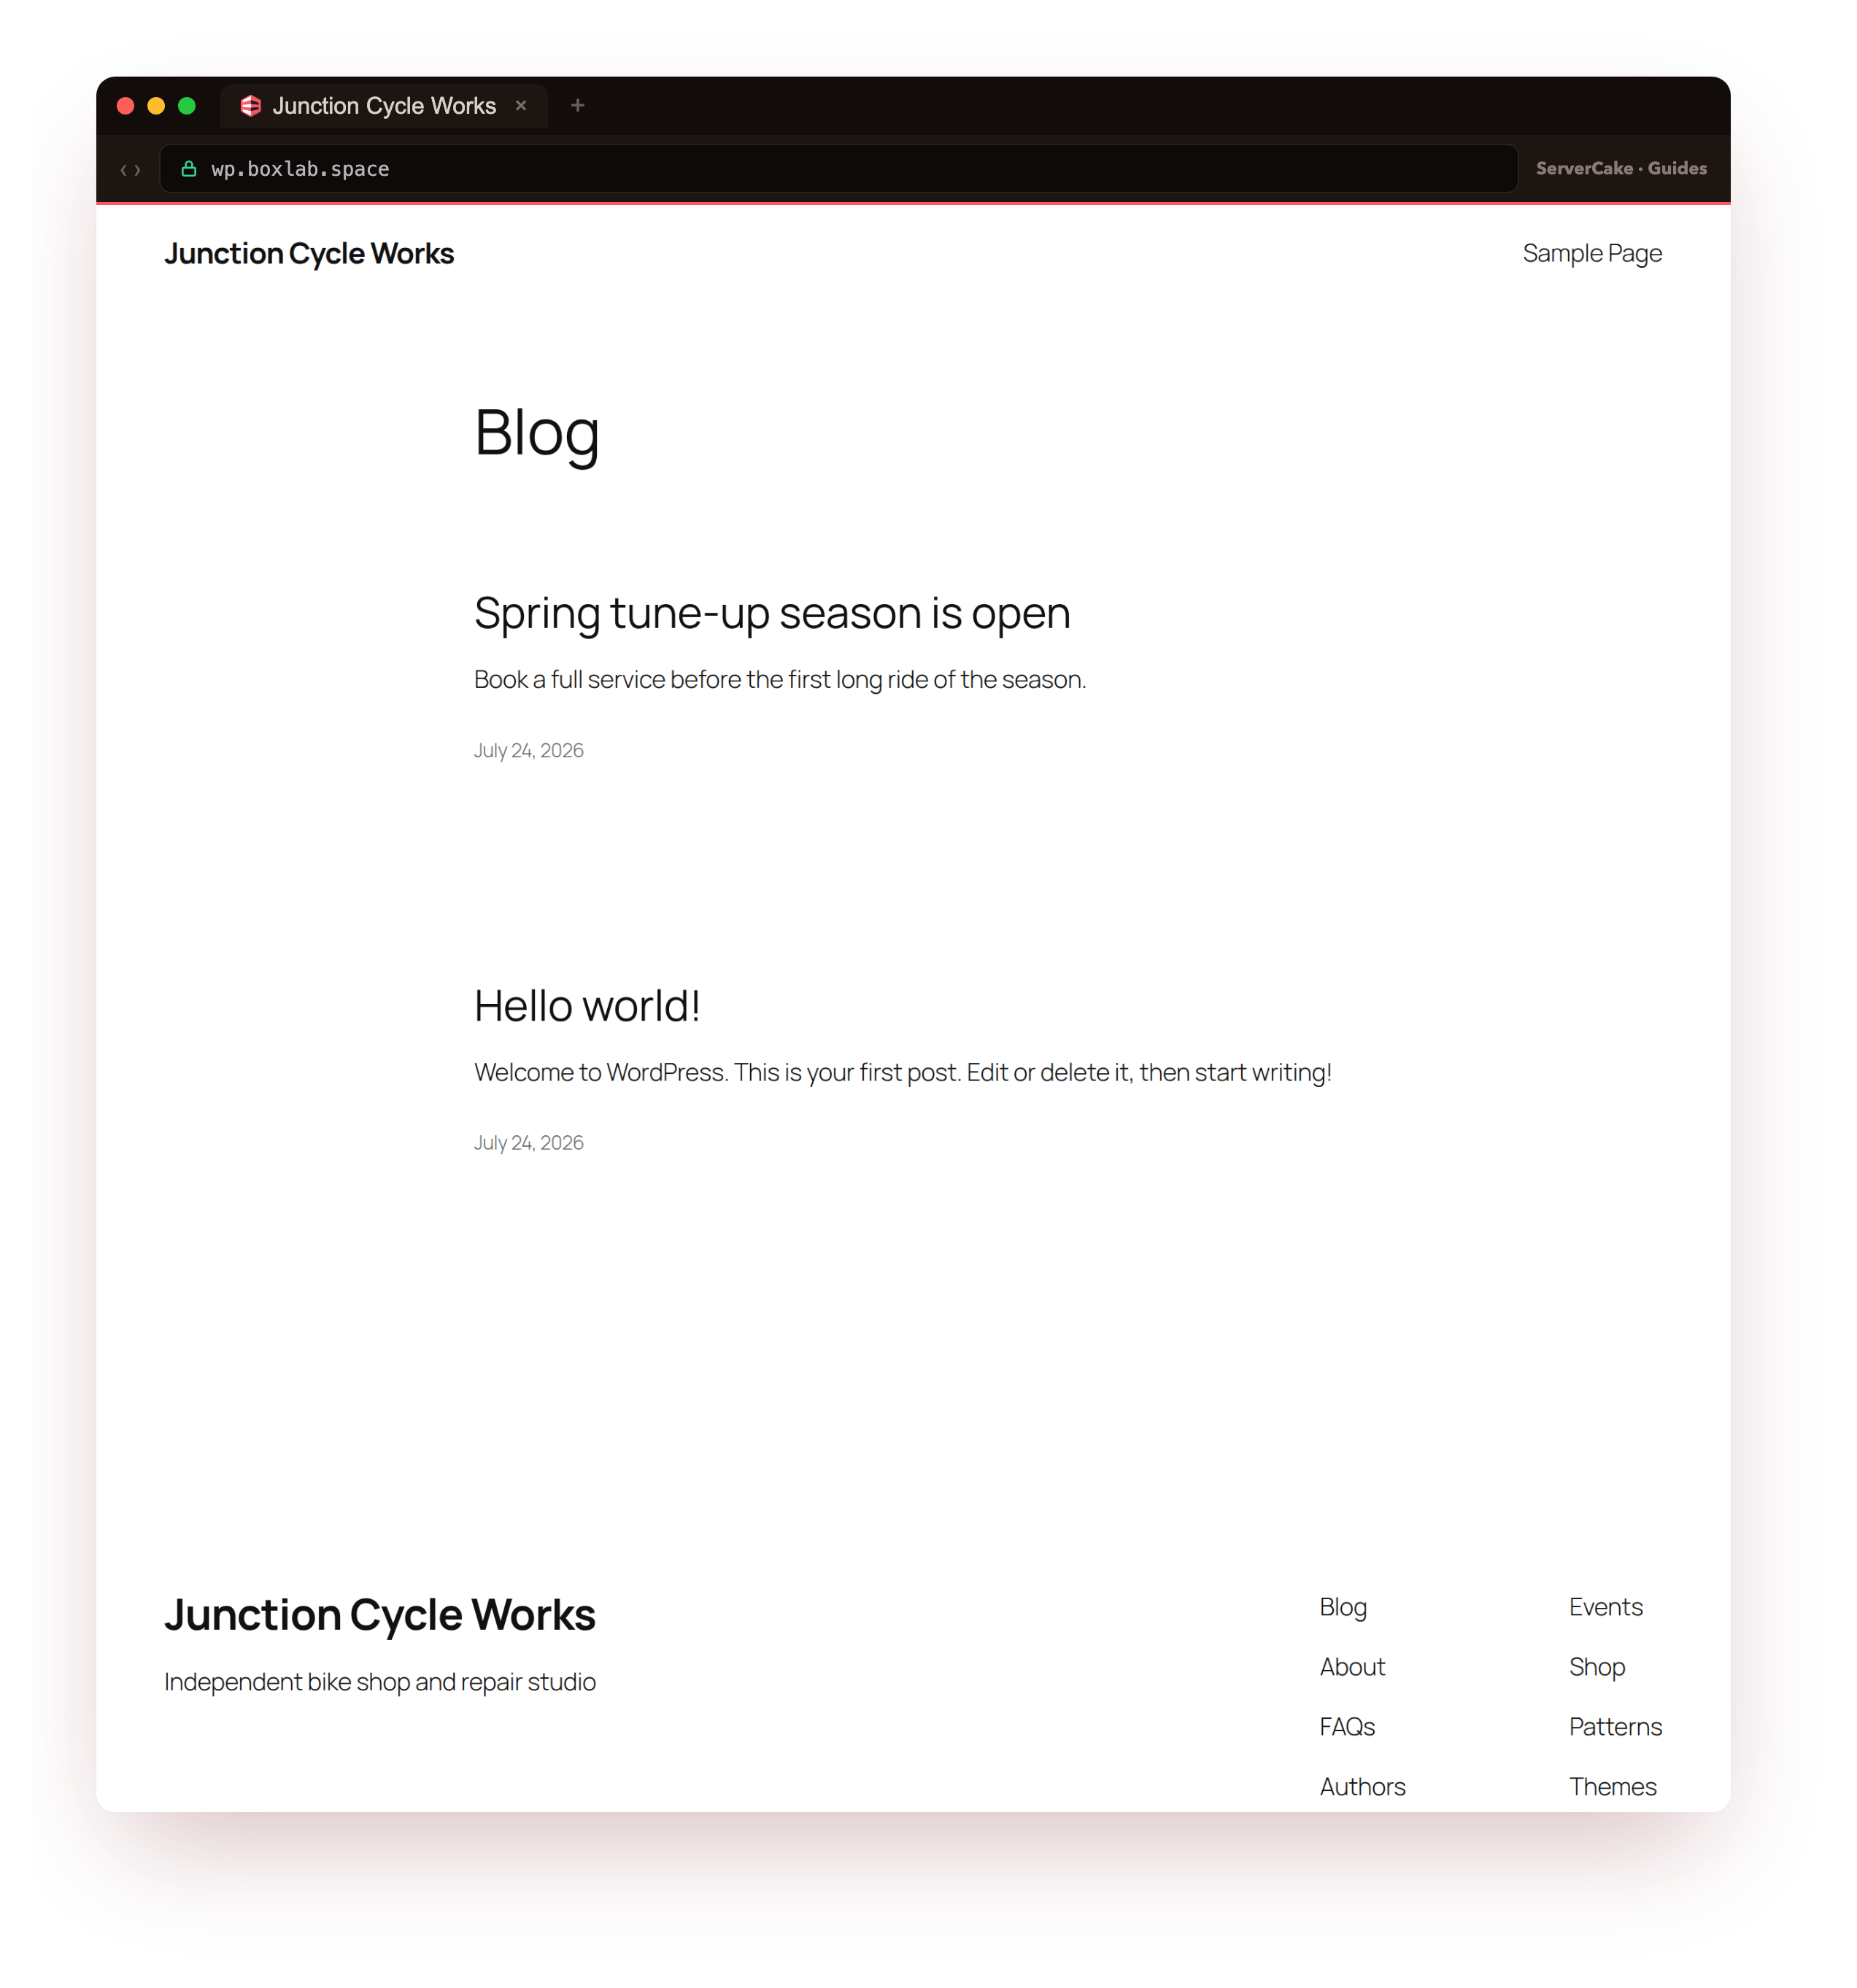
On our box those three commands returned a banned IP in the fail2ban jail, a live Strict-Transport-Security header, and a 403 on xmlrpc.php. That is the difference between hardening you hope is working and hardening you can see is working.
- Locking file permissions and wp-config, then proving a real 403 on wp-config.php.
- Disabling and blocking XML-RPC, and limiting the REST API against user enumeration.
- Stopping brute force with Limit Login Attempts and a real fail2ban ban on wp-login.
- Adding two-factor authentication and seeing the login challenge for yourself.
- Adding security headers and a basic request filter, then turning on automatic updates.
The theme running through all of it is proof. Anyone can add a line to a config file. The point of this tutorial is that after each change you run one command and watch the attack you just closed actually fail.
Before you begin
This tutorial hardens a site that already runs, so it assumes you have one to work on.
- A live WordPress site on a slice, already served over HTTPS by nginx and PHP-FPM, set up with how to install WordPress on a VPS. The hardening here assumes that same Ubuntu 24.04 stack of nginx, PHP 8.3-FPM and MariaDB.
- SSH access to the slice as a normal user cleared for
sudo, pluswp-cli, which the install tutorial sets up. - About an hour, and a willingness to run each proof command so you finish knowing the site is hardened rather than assuming it.
Everything below runs as a normal sudo user over SSH on the slice. Commands that need root call sudo explicitly, so there is no need to log in as the root account at all. Replace your-domain and /var/www/wp with your own values as you go.
How to secure WordPress on a VPS
There is no single switch that makes WordPress secure, so the job is a sequence of small, independent controls that each close one common way in. You will secure WordPress on a VPS by working through them in this order:
- Lock file permissions and wp-config so a leaked file cannot be read or edited.
- Disable and block XML-RPC, and limit the REST API so it stops naming your users.
- Stop brute force at two layers: Limit Login Attempts in WordPress and fail2ban in the firewall.
- Turn on two-factor authentication so a stolen password is not enough.
- Add security headers and a basic request filter, then turn on automatic updates.
Each step ends with a proof. If a proof does not show what the text says it should, stop and fix that step before moving on, because a control you cannot verify is a control you do not have.
Lock file permissions and wp-config
The first job is the least glamorous and the most important: make sure the files on disk cannot be read or rewritten by the wrong process. A fresh WordPress install often lands with group-writable files and a world-readable wp-config.php, which holds your database password and secret keys. The rule is simple: directories 755, files 644, and wp-config.php tightened to 640 so only the owner and the web server group can read it.
# directories 755, files 644, wp-config.php locked to 640
sudo find /var/www/wp -type d -exec chmod 755 {} \;
sudo find /var/www/wp -type f -exec chmod 644 {} \;
sudo chmod 640 /var/www/wp/wp-config.php
sudo chown -R www-data:www-data /var/www/wp
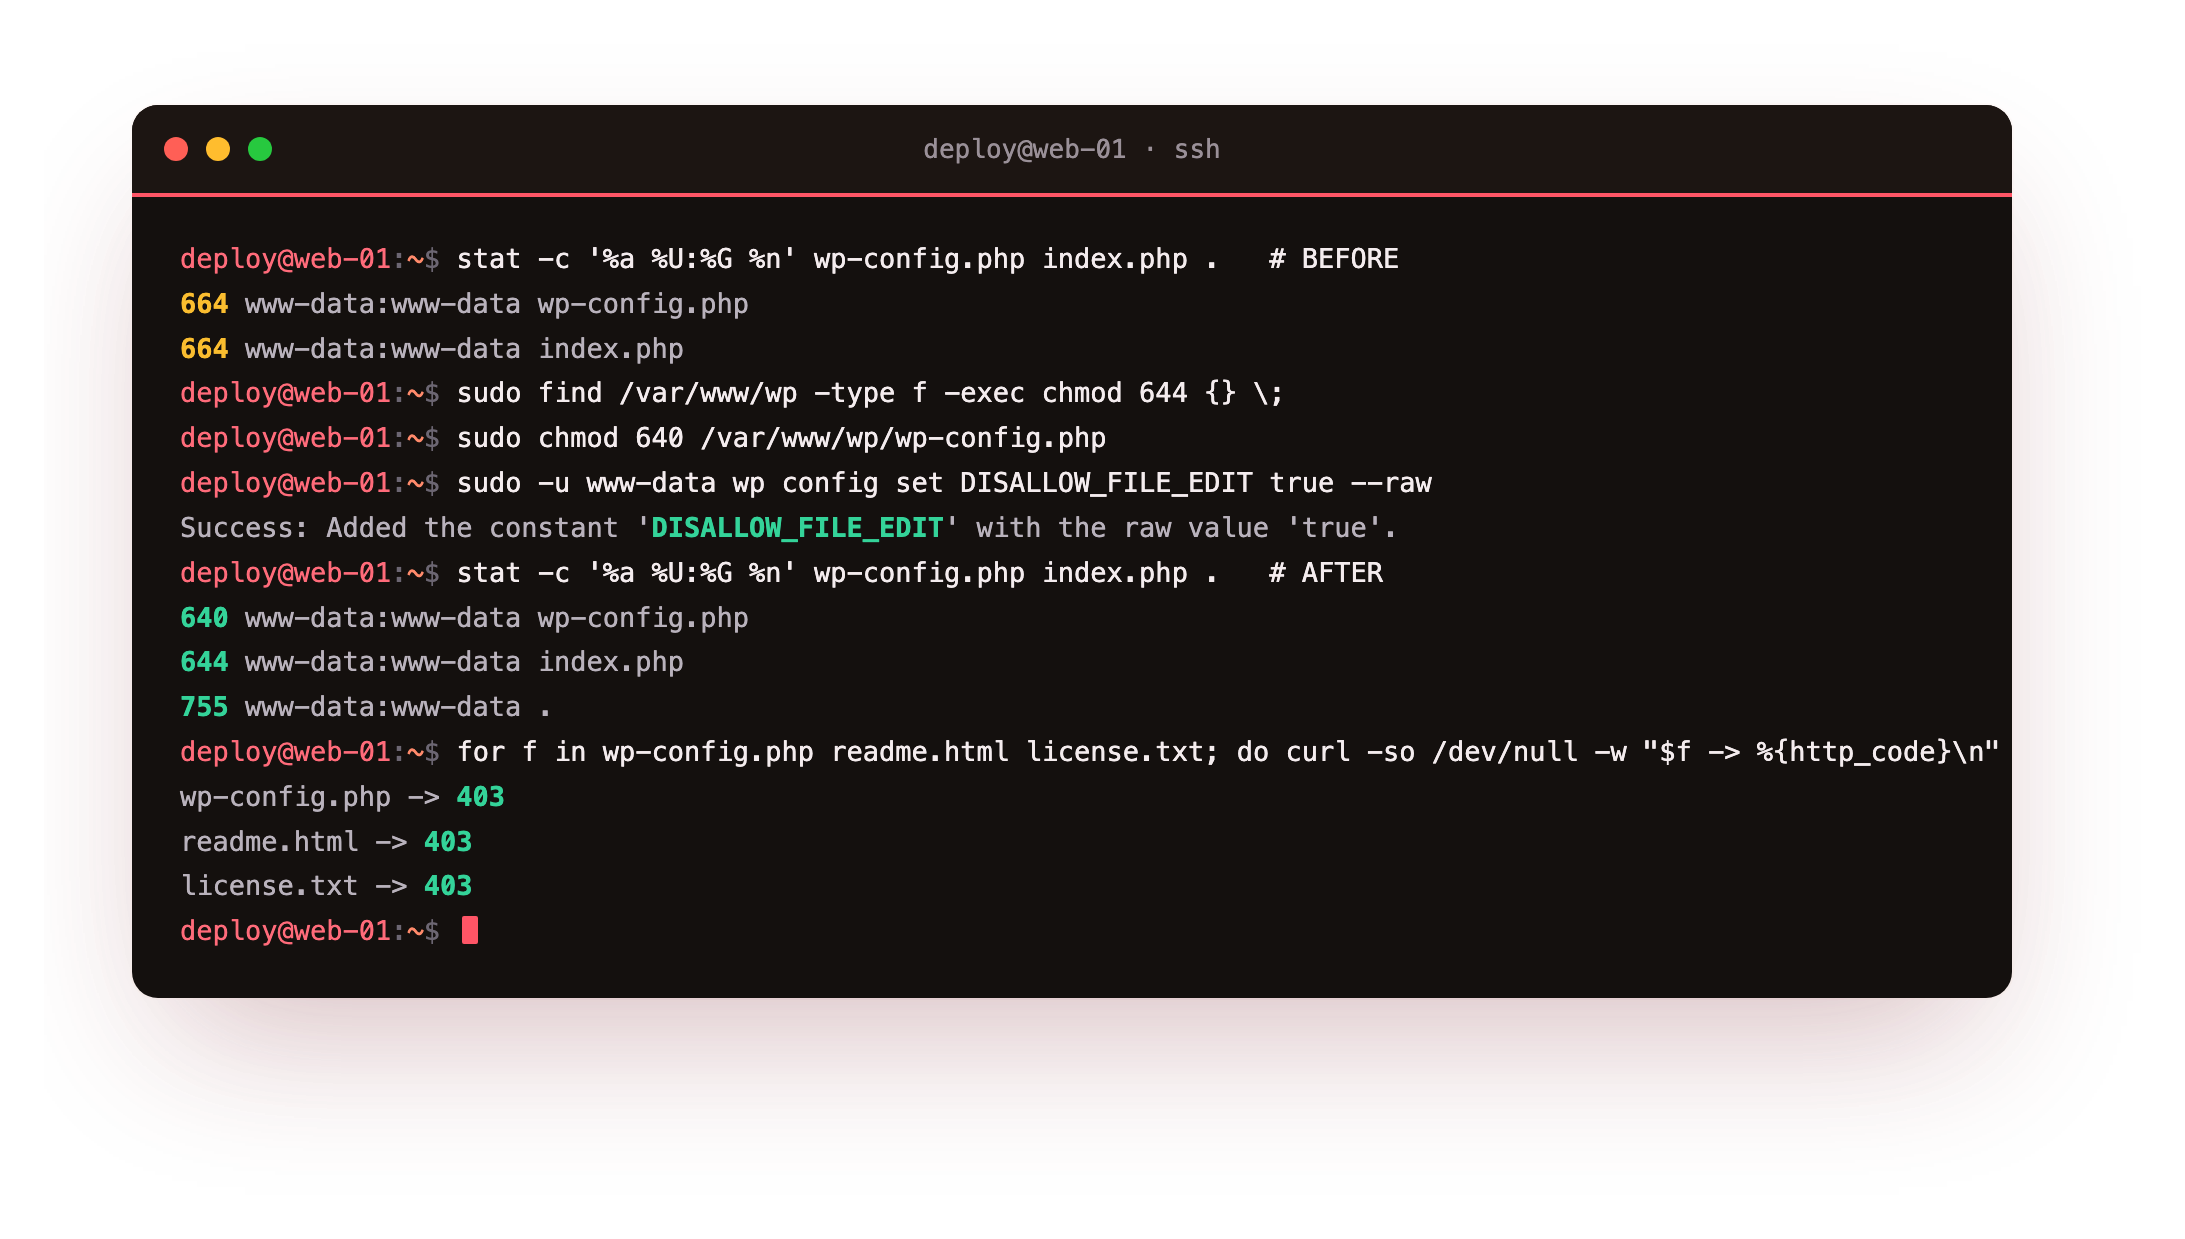
Next, stop the dashboard from being able to edit theme and plugin code. If an attacker ever gets into wp-admin, the built-in file editor hands them a shell in one click. One constant closes it. While you are there, confirm the new permissions took.
# forbid the dashboard code editor, then verify the permissions
sudo -u www-data wp config set DISALLOW_FILE_EDIT true --raw --path=/var/www/wp
stat -c '%a %U:%G %n' /var/www/wp/wp-config.php /var/www/wp/index.php /var/www/wp
On our box that reported 640 for wp-config.php, 644 for index.php, and 755 for the directory, all owned by www-data. Now prove the web server refuses to serve wp-config.php even if someone asks for it directly. Add a small deny block to your nginx server, alongside denies for the other files that leak version and path information.
# in the server { } block: never serve config or fingerprint files
location = /wp-config.php { deny all; }
location ~* /(?:readme\.html|license\.txt|wp-config\.php)$ { deny all; }
location ~ /\.(?!well-known) { deny all; }
Reload nginx and ask for the file. A hardened site answers with a refusal, not the contents.
sudo nginx -t && sudo systemctl reload nginx
# each of these should now be 403, while the site itself still serves 200
for f in wp-config.php readme.html license.txt; do
  echo -n "$f -> "; curl -so /dev/null -w '%{http_code}\n' https://your-domain/$f
done
On our box all three returned 403, while the front page and posts kept returning 200. The secrets file is now unreadable both on disk and over the web.
640 on wp-config.php, DISALLOW_FILE_EDIT set, and a 403 when you request wp-config.php over HTTPS. If wp-config.php returns anything other than 403, the nginx deny block is not being matched, so re-check it is inside the correct server block.Disable and block XML-RPC, and limit the REST API
xmlrpc.php is a legacy endpoint most sites never use, and it is a favourite for two attacks: password brute forcing amplified through system.multicall, and pingback-based denial of service. Out of the box it is wide open. On our unhardened install a single request listed eighty callable methods. Close it at two levels. First block it at nginx so the request never reaches PHP, then disable it inside WordPress as a backstop with a must-use plugin that also stops the REST API from listing your usernames.
# block the XML-RPC endpoint at the edge
location = /xmlrpc.php { deny all; access_log off; }
<?php
/* wp-content/mu-plugins/00-hardening.php : app-layer backstops */
add_filter( 'xmlrpc_enabled', '__return_false' );
// stop the REST API from enumerating usernames for logged-out visitors
add_filter( 'rest_endpoints', function ( $endpoints ) {
    if ( ! is_user_logged_in() ) {
        unset( $endpoints['/wp/v2/users'] );
        unset( $endpoints['/wp/v2/users/(?P<id>[\d]+)'] );
    }
    return $endpoints;
} );
A must-use plugin lives in wp-content/mu-plugins and cannot be deactivated from the dashboard, which is exactly what you want for a security backstop. Reload nginx, then prove both holes are shut.
sudo nginx -t && sudo systemctl reload nginx
# XML-RPC should now refuse every method, and the users endpoint should not name anyone
curl -so /dev/null -w 'xmlrpc %{http_code}\n' -X POST https://your-domain/xmlrpc.php -d 'x'
curl -s https://your-domain/wp-json/wp/v2/users | head -c 80
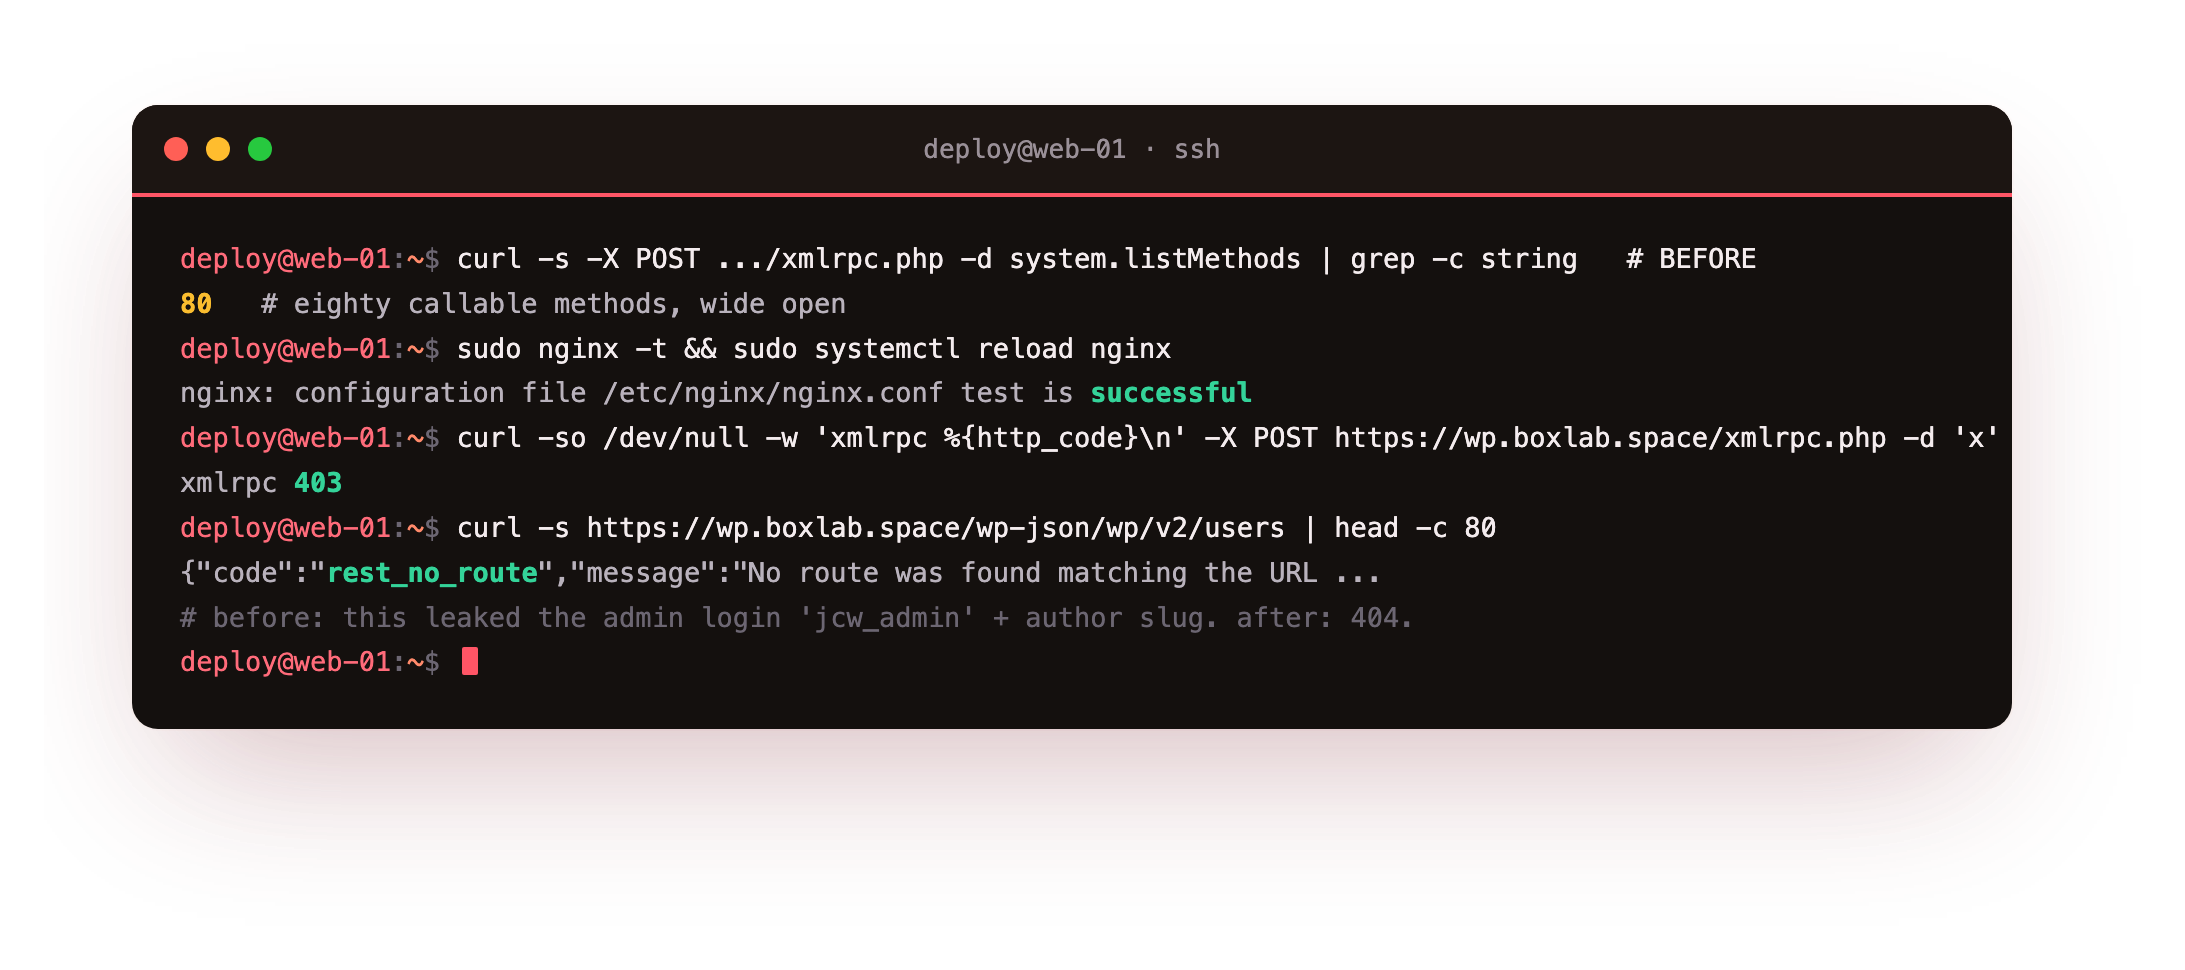
On our box xmlrpc.php went from listing eighty methods to returning 403, and the REST users endpoint went from happily printing the administrator's login and author slug to returning a flat rest_no_route 404. An attacker can no longer read your usernames off the site before they even start guessing passwords.
/wp-json/wp/v2/users should return a 404 rather than a JSON list of your users. If you use Jetpack or the WordPress mobile app, which need XML-RPC, keep the REST limits but allow xmlrpc.php from known IPs instead of denying it outright.Stop brute force with Limit Login Attempts and fail2ban
Brute forcing wp-login.php is the most common attack a WordPress site sees, and the answer is two layers that back each other up. The first, Limit Login Attempts Reloaded, works inside WordPress and locks out an IP after a few failures. The second, fail2ban, works in the firewall and drops a persistent attacker at the network edge so their requests never reach PHP again. Install the login limiter first.
cd /var/www/wp
sudo -u www-data wp plugin install limit-login-attempts-reloaded --activate
Now wire up fail2ban. The clean way to feed it real login failures is the WP fail2ban plugin, which writes every failed and blocked login to the system auth log in a format fail2ban can read. Install it, then add a filter that recognises those lines and a jail that watches for them.
sudo -u www-data wp plugin install wp-fail2ban --activate
# /etc/fail2ban/filter.d/wordpress.conf
[Definition]
failregex = ^.*wordpress\(\S+\)\[\d+\]: Authentication failure for .+ from <HOST>\s*$
            ^.*wordpress\(\S+\)\[\d+\]: Blocked authentication attempt for .+ from <HOST>\s*$
ignoreregex =
# /etc/fail2ban/jail.d/wordpress.conf
[wordpress]
enabled  = true
filter   = wordpress
logpath  = /var/log/auth.log
port     = http,https
maxretry = 3
findtime = 600
bantime  = 3600
Reload fail2ban and confirm the filter matches your log with the built-in tester, which reads the real auth log and reports how many lines it would act on.
sudo fail2ban-client reload
sudo fail2ban-regex /var/log/auth.log /etc/fail2ban/filter.d/wordpress.conf
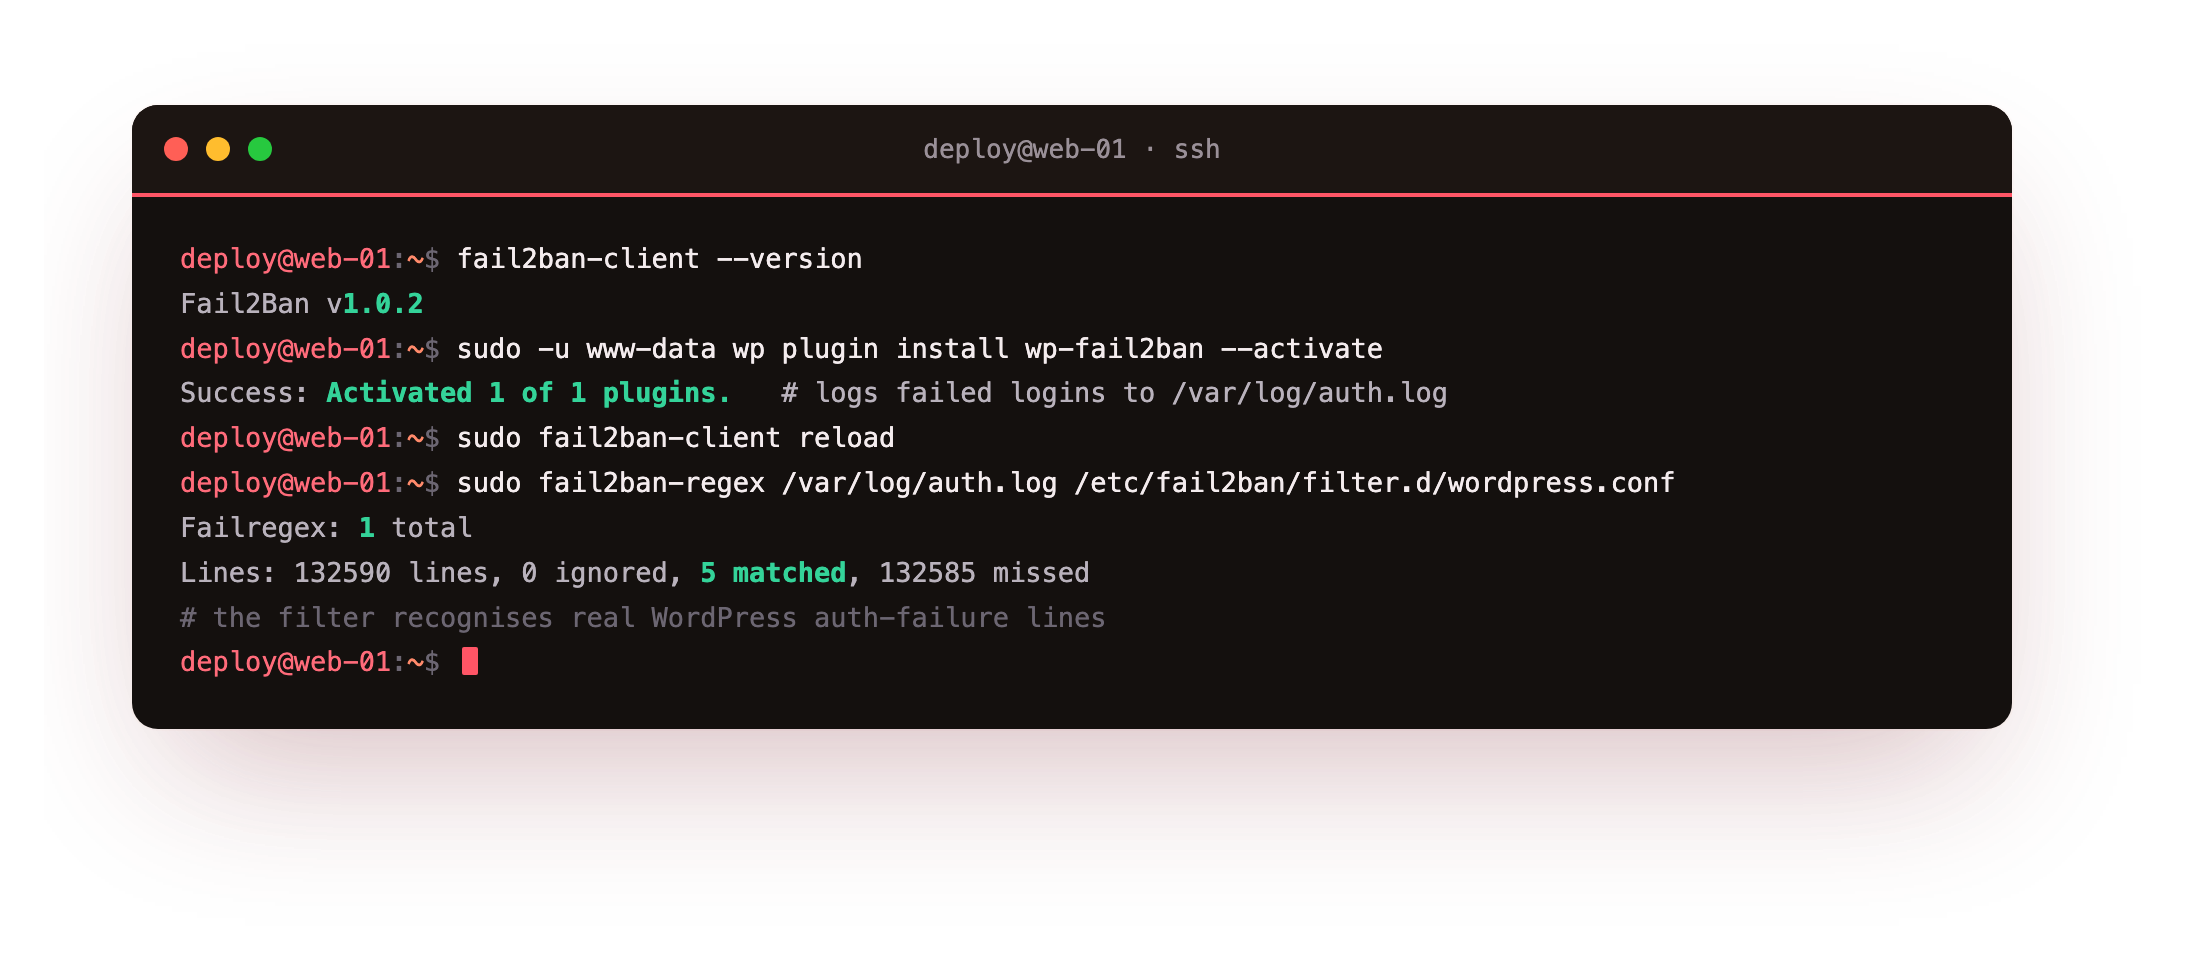
Now the important part: do not take it on trust, attack your own login and watch both layers respond. Fire a handful of wrong passwords, then read the state of each defence.
# hammer wp-login with wrong passwords from a test address, then read the defences
sudo fail2ban-client status wordpress
sudo nft list set inet f2b-table addr-set-wordpress
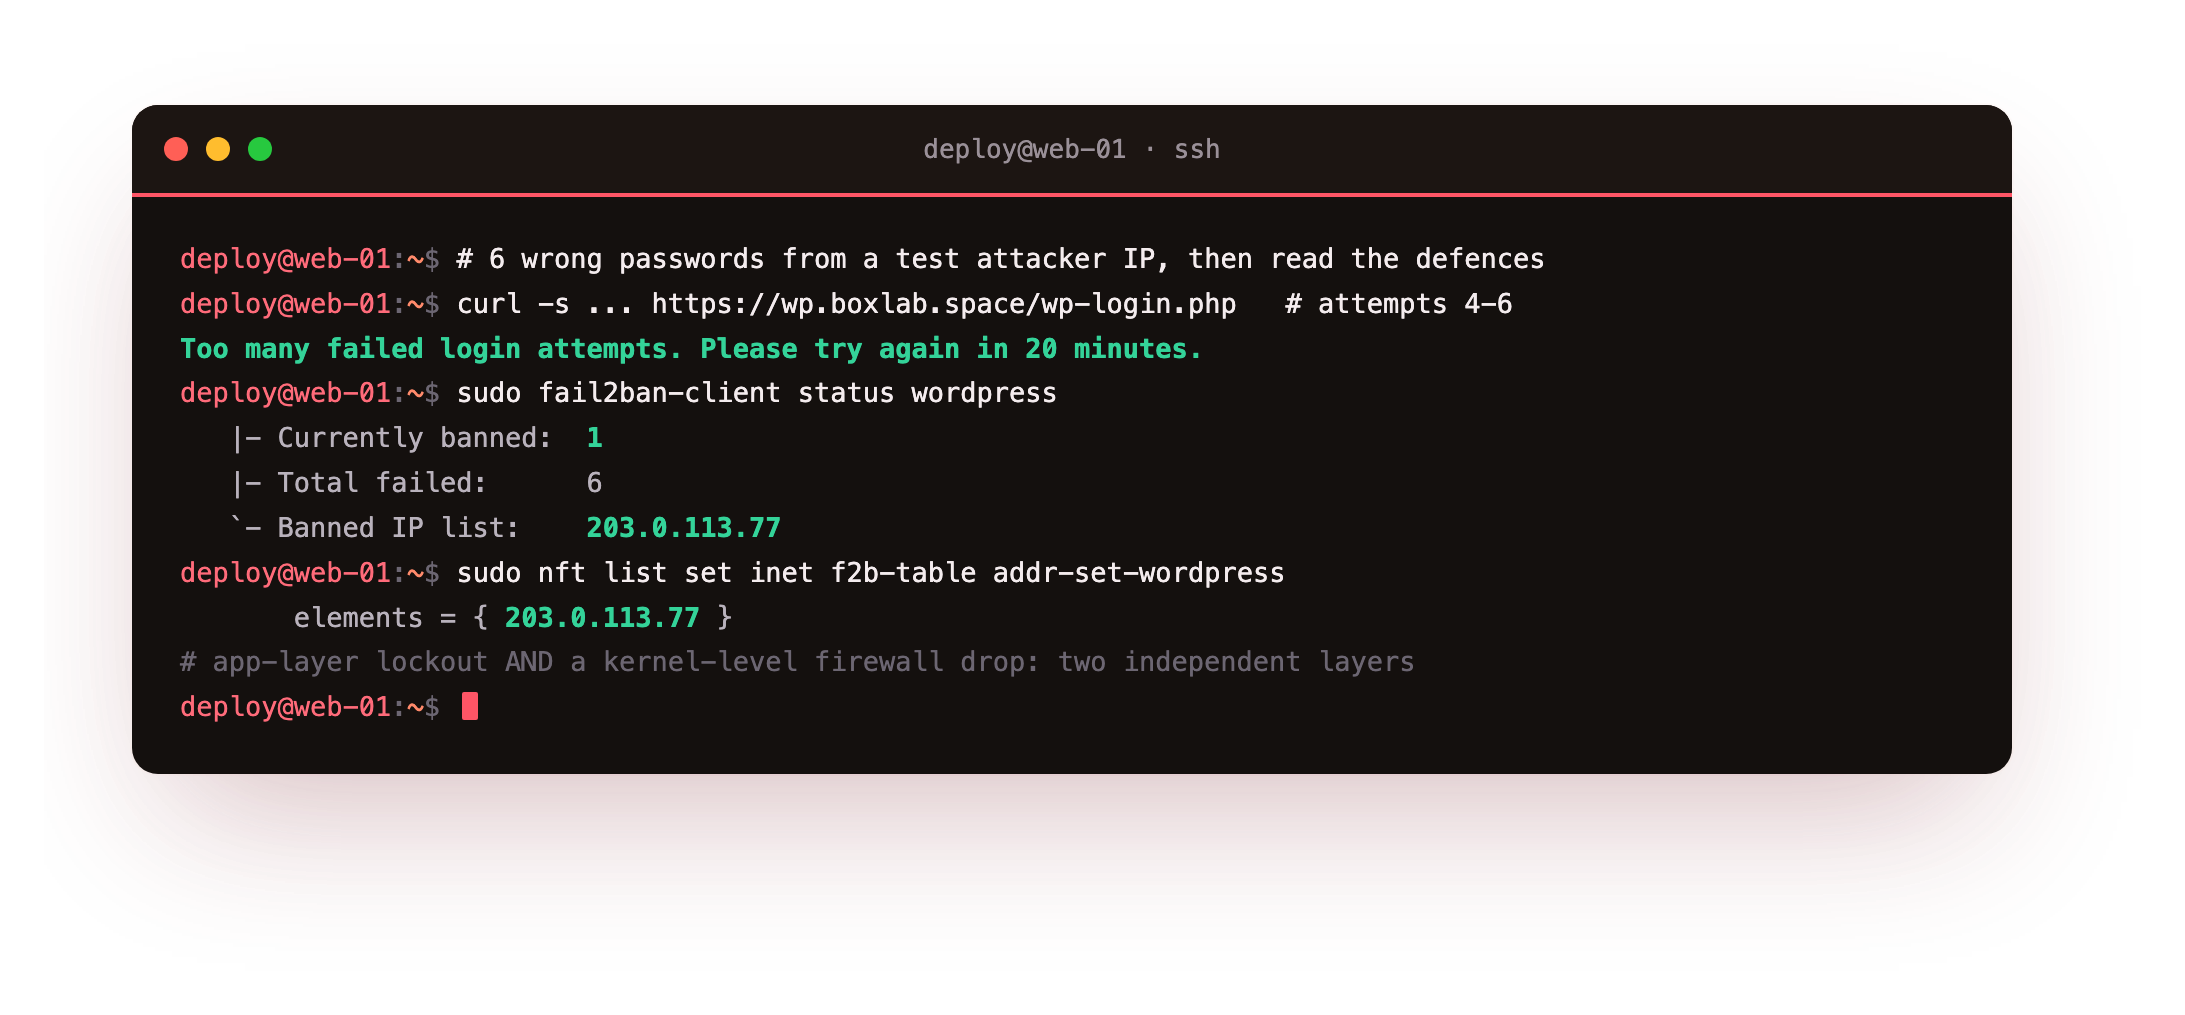
On our box, after six wrong passwords, Limit Login Attempts returned "Too many failed login attempts. Please try again in 20 minutes." to the browser, and fail2ban reported the attacker in its jail: Currently banned: 1, Banned IP list: 203.0.113.77. The nftables set backing the jail listed that same address, which means the kernel is now dropping its packets before nginx ever sees them. Two independent layers, both provably active.
ignoreip in the jail, or keep a second SSH session open, so a testing mistake cannot ban the address you administer the box from. On a slice behind Cloudflare, configure nginx real_ip so fail2ban bans the true visitor IP and not the proxy.Turn on two-factor authentication
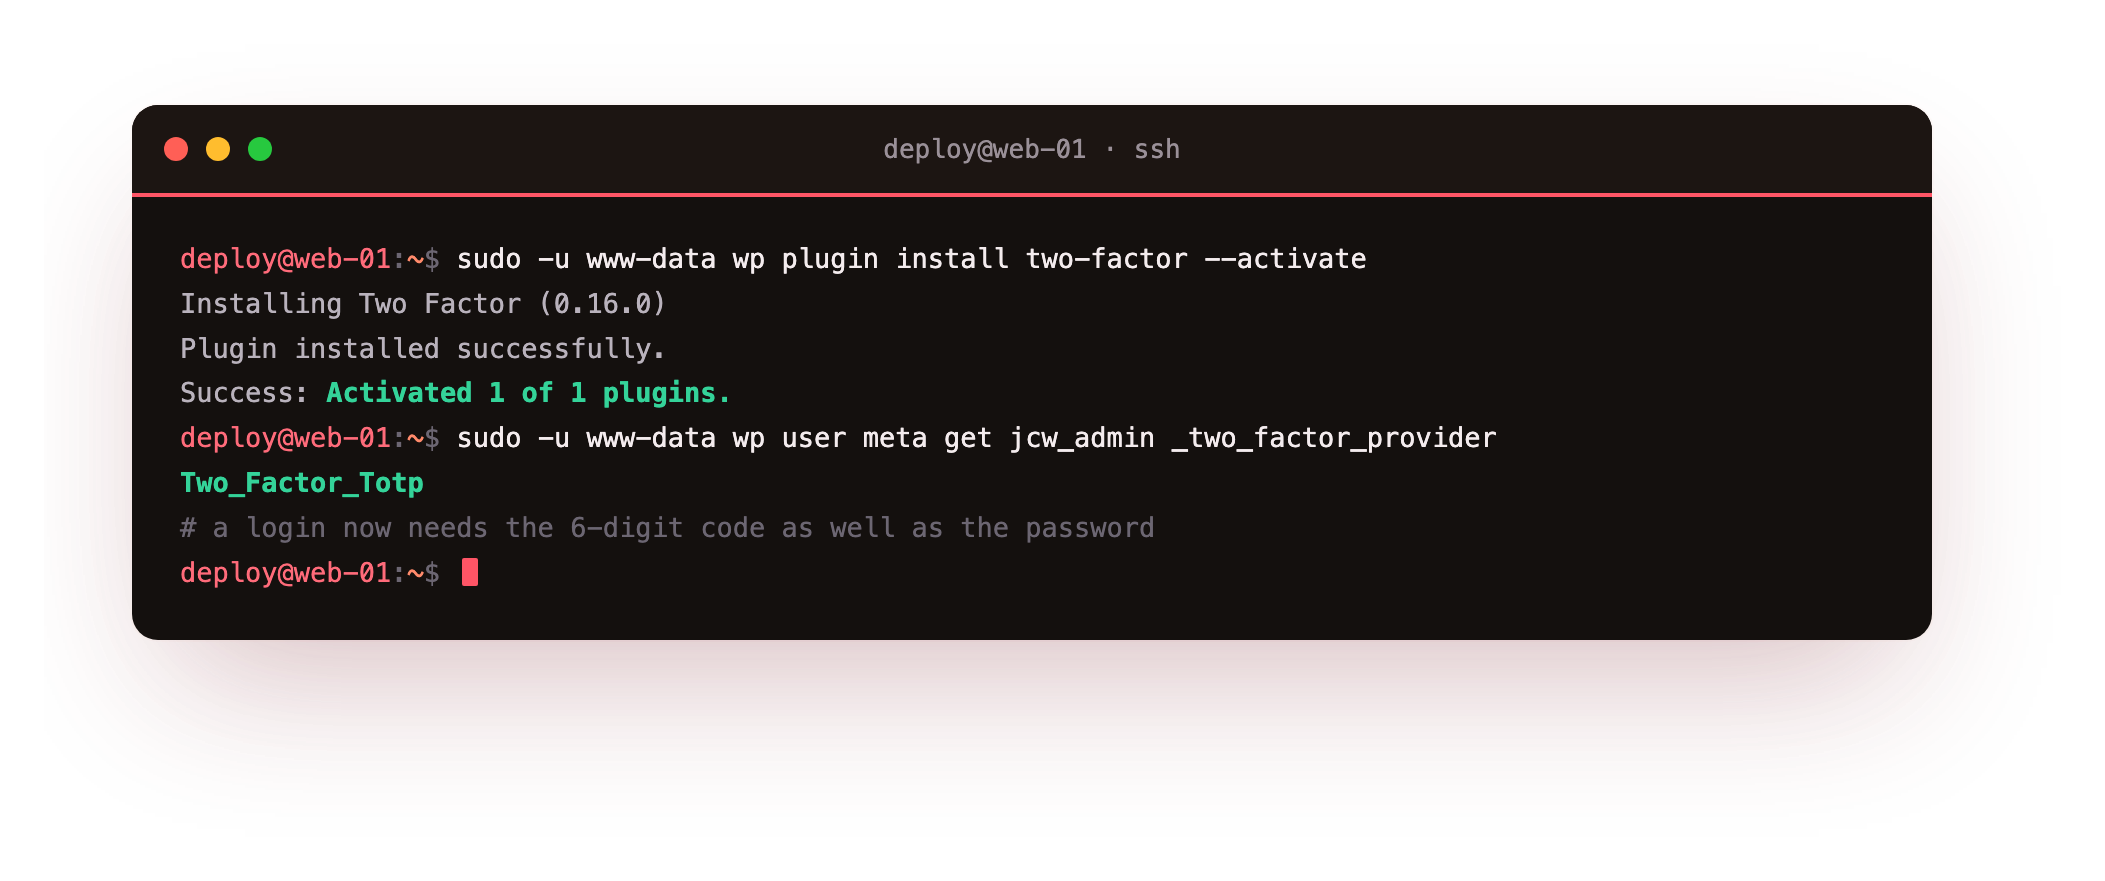
Everything so far slows down an attacker guessing a password. Two-factor authentication makes a guessed or stolen password useless on its own, because logging in also needs a code from a device only you hold. The Two-Factor plugin, maintained by the WordPress two-factor feature team, adds a time-based one-time password (TOTP) option with no third-party service. Install and activate it, then enable it from your profile.
sudo -u www-data wp plugin install two-factor --activate
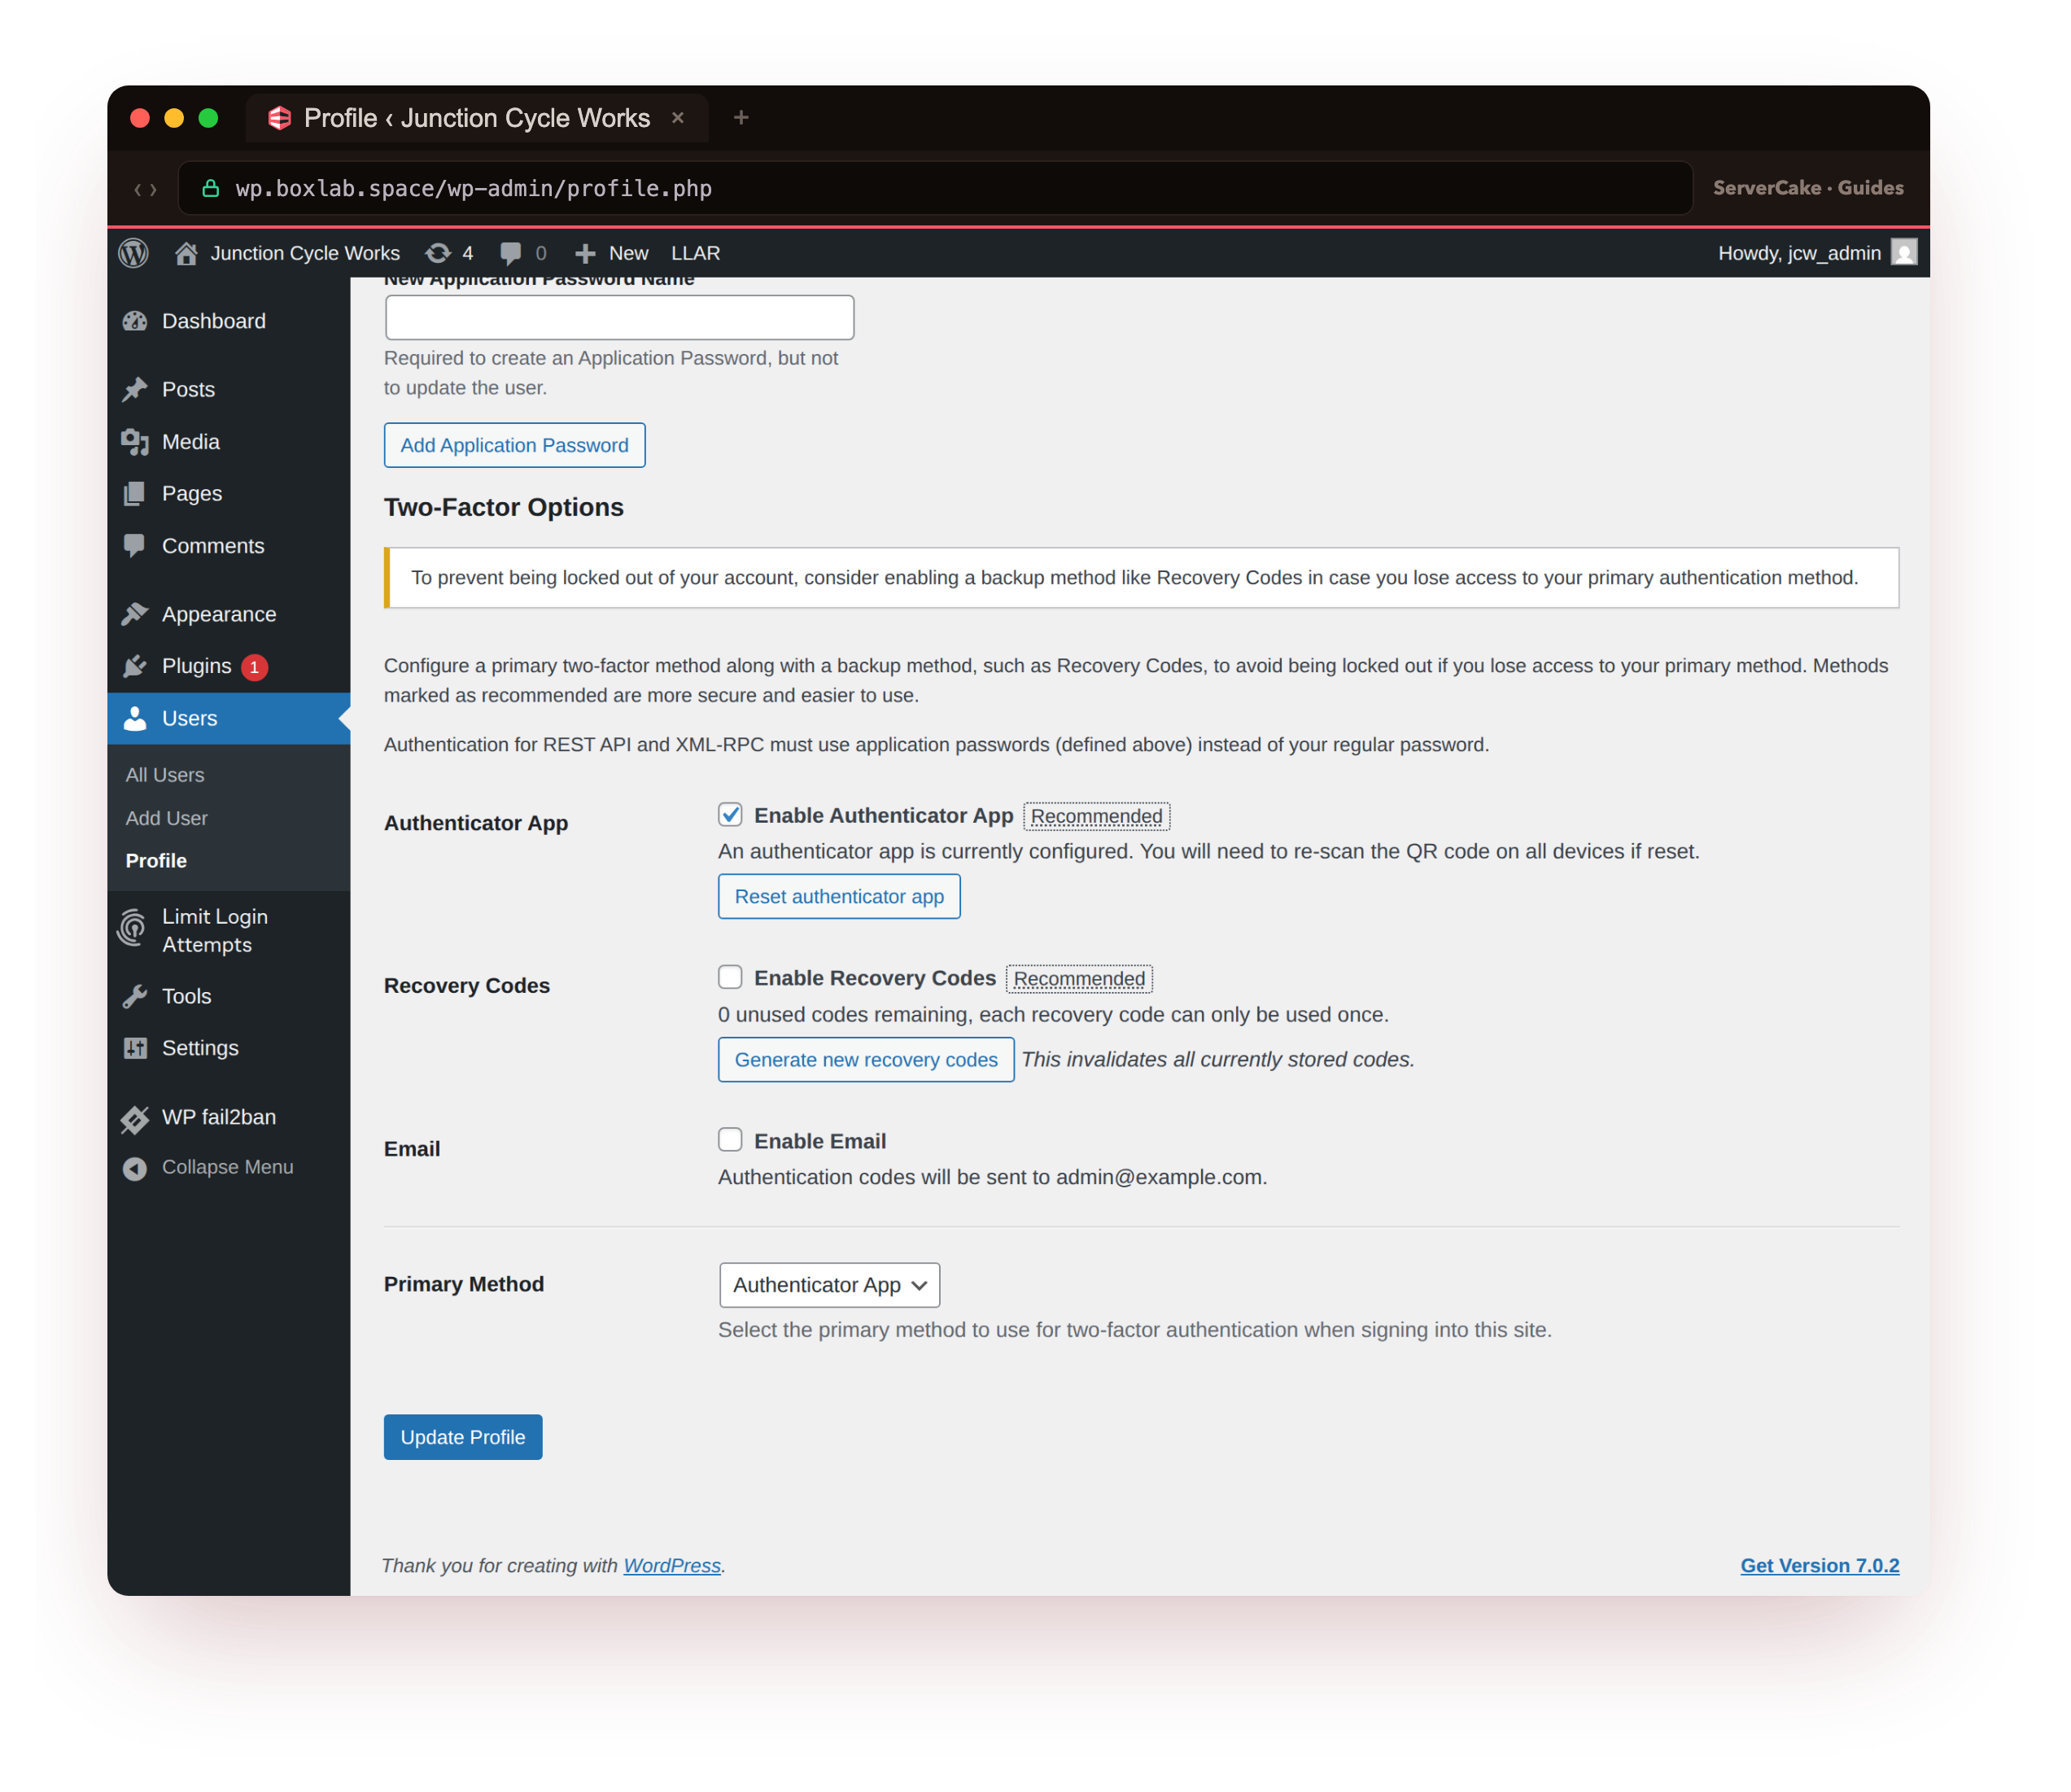
In wp-admin, open Users then Profile and scroll to Two-Factor Options. Tick Enable Authenticator App, scan the QR code with an app like Aegis, Google Authenticator or 1Password, enter the six-digit code to confirm, and set the Authenticator App as your primary method. Generating a set of Recovery Codes at the same time is worth the extra minute, because it is the way back in if you lose the phone.
From then on, every login is two steps: your password, and then the code. Log out and back in to see the challenge for yourself.
# after enabling 2FA, a correct password lands on the code challenge, not the dashboard
# log in at https://your-domain/wp-login.php and enter the 6-digit code from your app
sudo -u www-data wp user meta get jcw_admin _two_factor_provider --path=/var/www/wp
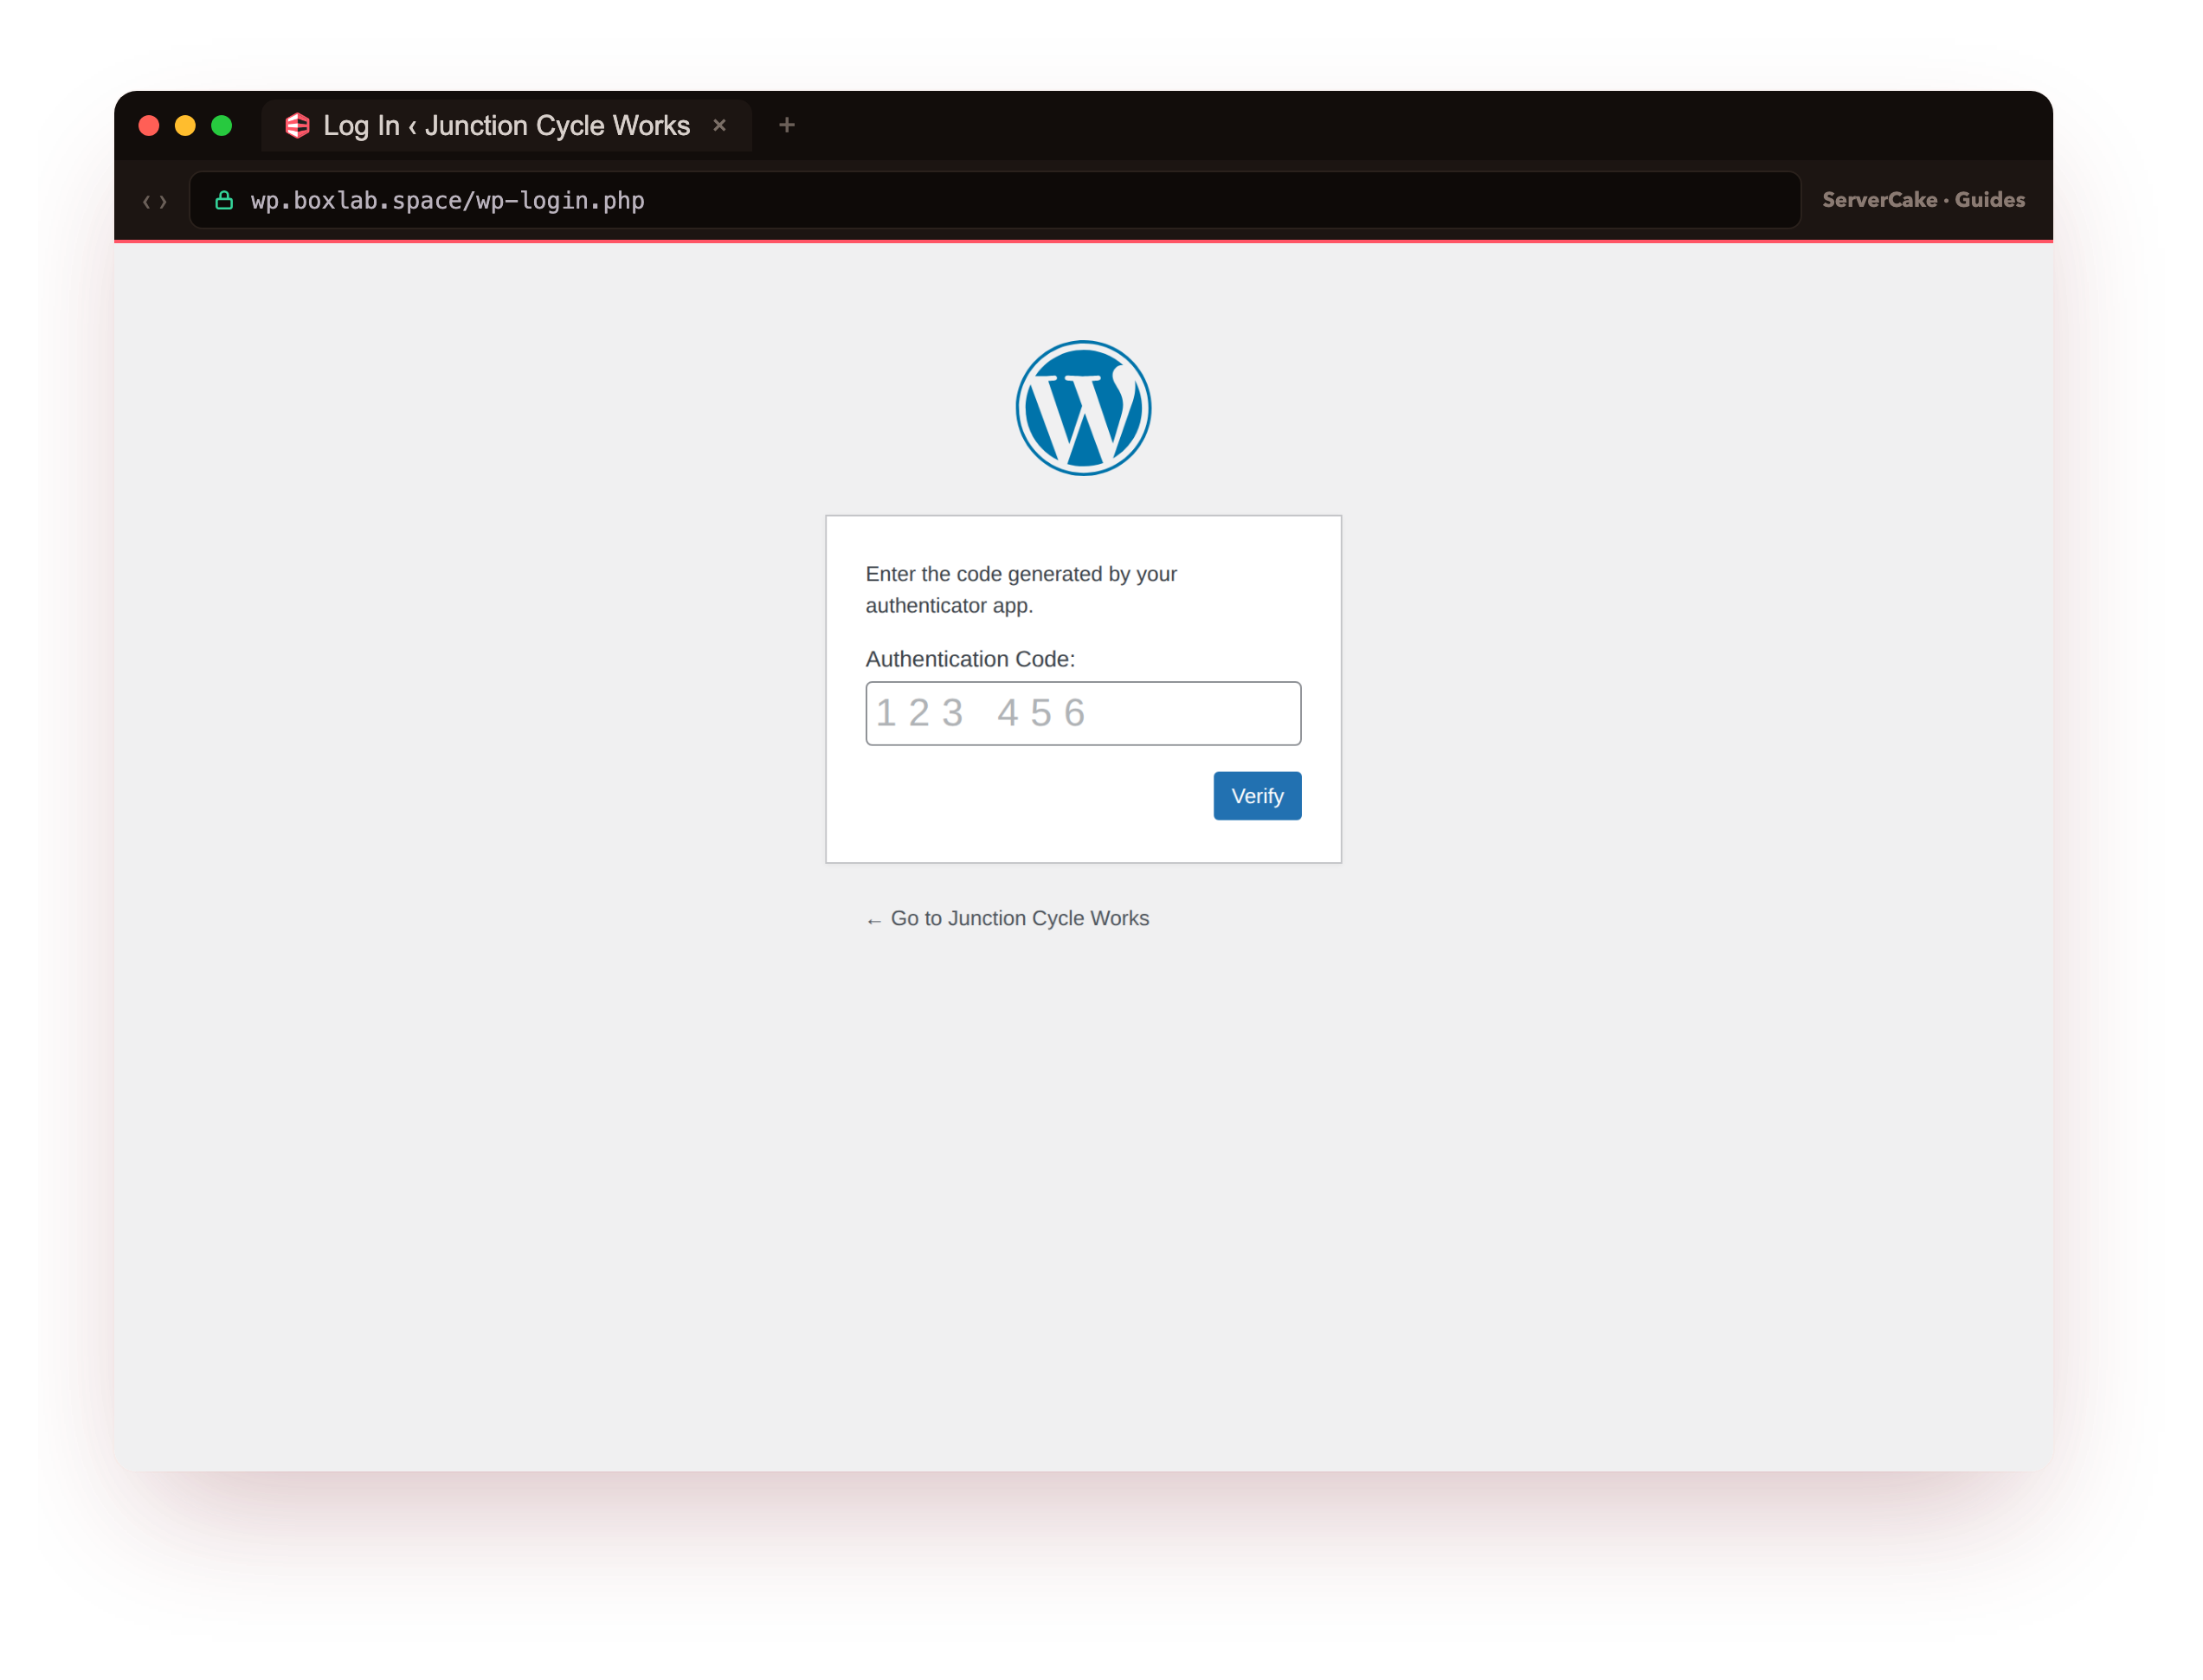
On our box that command reported Two_Factor_Totp, confirming TOTP is the active provider, and a fresh login stopped at a screen asking for the authenticator code before it would open the dashboard. A password alone no longer gets anyone in.
Add security headers and a basic request filter
Response headers tell the browser how to defend your visitors, and by default WordPress sends almost none of them. Add a small set at the nginx level so every page carries them. These enforce HTTPS, block your pages from being framed for clickjacking, stop content-type sniffing, and trim the information leaked in the referrer.
# security headers for every response
add_header Strict-Transport-Security "max-age=31536000; includeSubDomains" always;
add_header X-Frame-Options "SAMEORIGIN" always;
add_header X-Content-Type-Options "nosniff" always;
add_header Referrer-Policy "strict-origin-when-cross-origin" always;
add_header Permissions-Policy "geolocation=(), microphone=(), camera=()" always;
add_header Content-Security-Policy "frame-ancestors 'self'; upgrade-insecure-requests" always;

# a basic request filter: refuse obvious injection probes and PHP in uploads
if ($args ~* "(\.\./|union.*select|base64_decode|<script|%3Cscript)") { return 403; }
location ~* /wp-content/uploads/.*\.php$ { deny all; }
Reload nginx and confirm the headers are really being sent, then throw a couple of obvious attacks at the filter to see them bounce.
sudo nginx -t && sudo systemctl reload nginx
curl -sI https://your-domain/ | grep -iE 'strict-transport|x-frame|content-security'
curl -so /dev/null -w 'sqli probe   -> %{http_code}\n' 'https://your-domain/?id=1+union+select+password'
curl -so /dev/null -w 'uploads .php -> %{http_code}\n'  https://your-domain/wp-content/uploads/probe.php
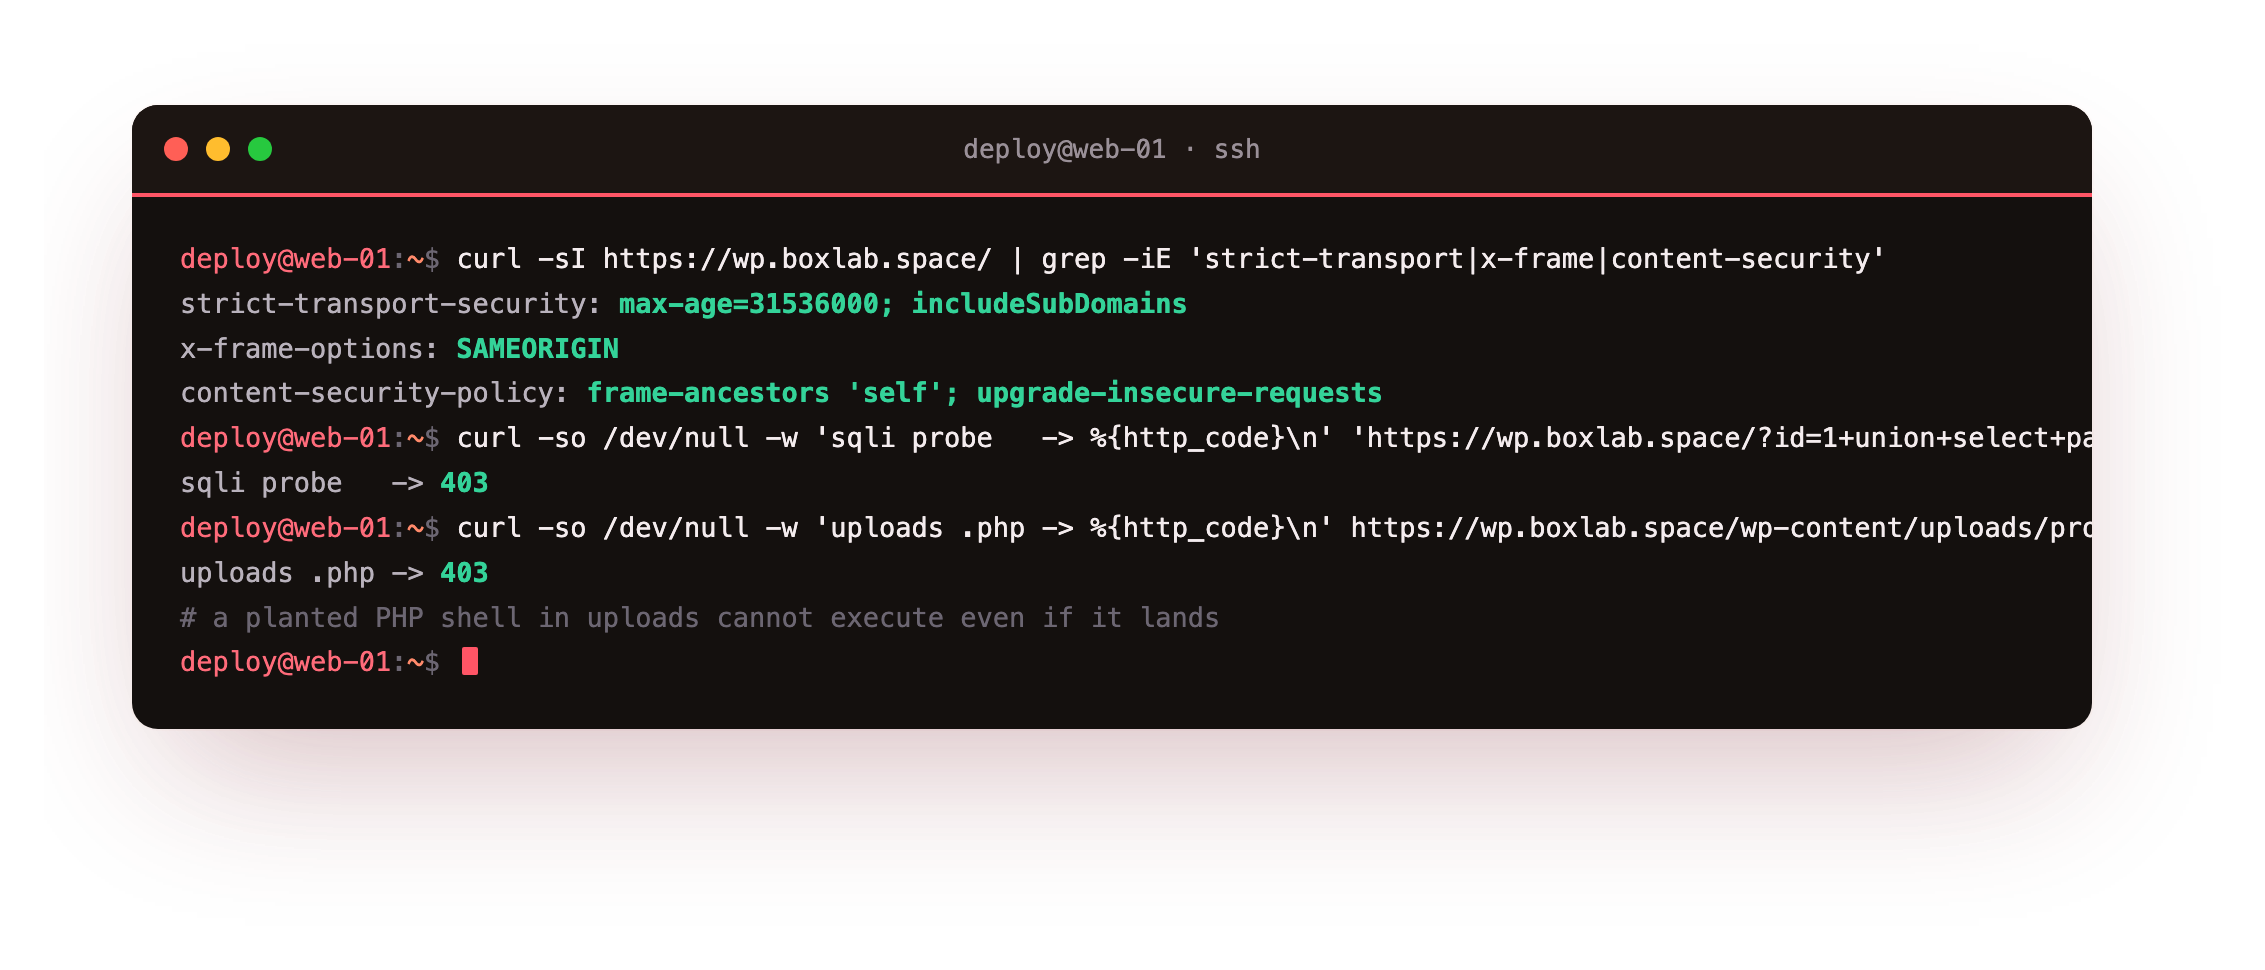
On our box the header check printed all six headers, the SQL-injection-style query string returned 403, and a request for a PHP file inside the uploads directory returned 403. That last one matters because a common way to plant a shell is to sneak a .php file into uploads through a vulnerable plugin, and now it cannot execute even if it lands.
This is a basic filter, not a full web application firewall, and a real content security policy for scripts needs tuning per site. It still earns its place, because it closes the crude, high-volume probes that make up most of the noise for free.
curl -sI should list your security headers on every page, including wp-admin. If a header is missing, check that each add_header uses the always flag, since without it nginx drops the header on error responses and some redirects.Turn on automatic updates and keep watch
Most WordPress sites are compromised through a plugin nobody updated, so the last control is the one that keeps the others from rotting: automatic updates. WordPress can update its own core, and with two commands it will keep every plugin and theme current too. Turn them on, then confirm they are on rather than assuming.
# enable auto-updates for core (minor/security), plugins and themes
sudo -u www-data wp config set WP_AUTO_UPDATE_CORE minor --path=/var/www/wp
sudo -u www-data wp plugin auto-updates enable --all --path=/var/www/wp
sudo -u www-data wp theme auto-updates enable --all --path=/var/www/wp
# prove every plugin now auto-updates
sudo -u www-data wp plugin list --fields=name,auto_update --path=/var/www/wp
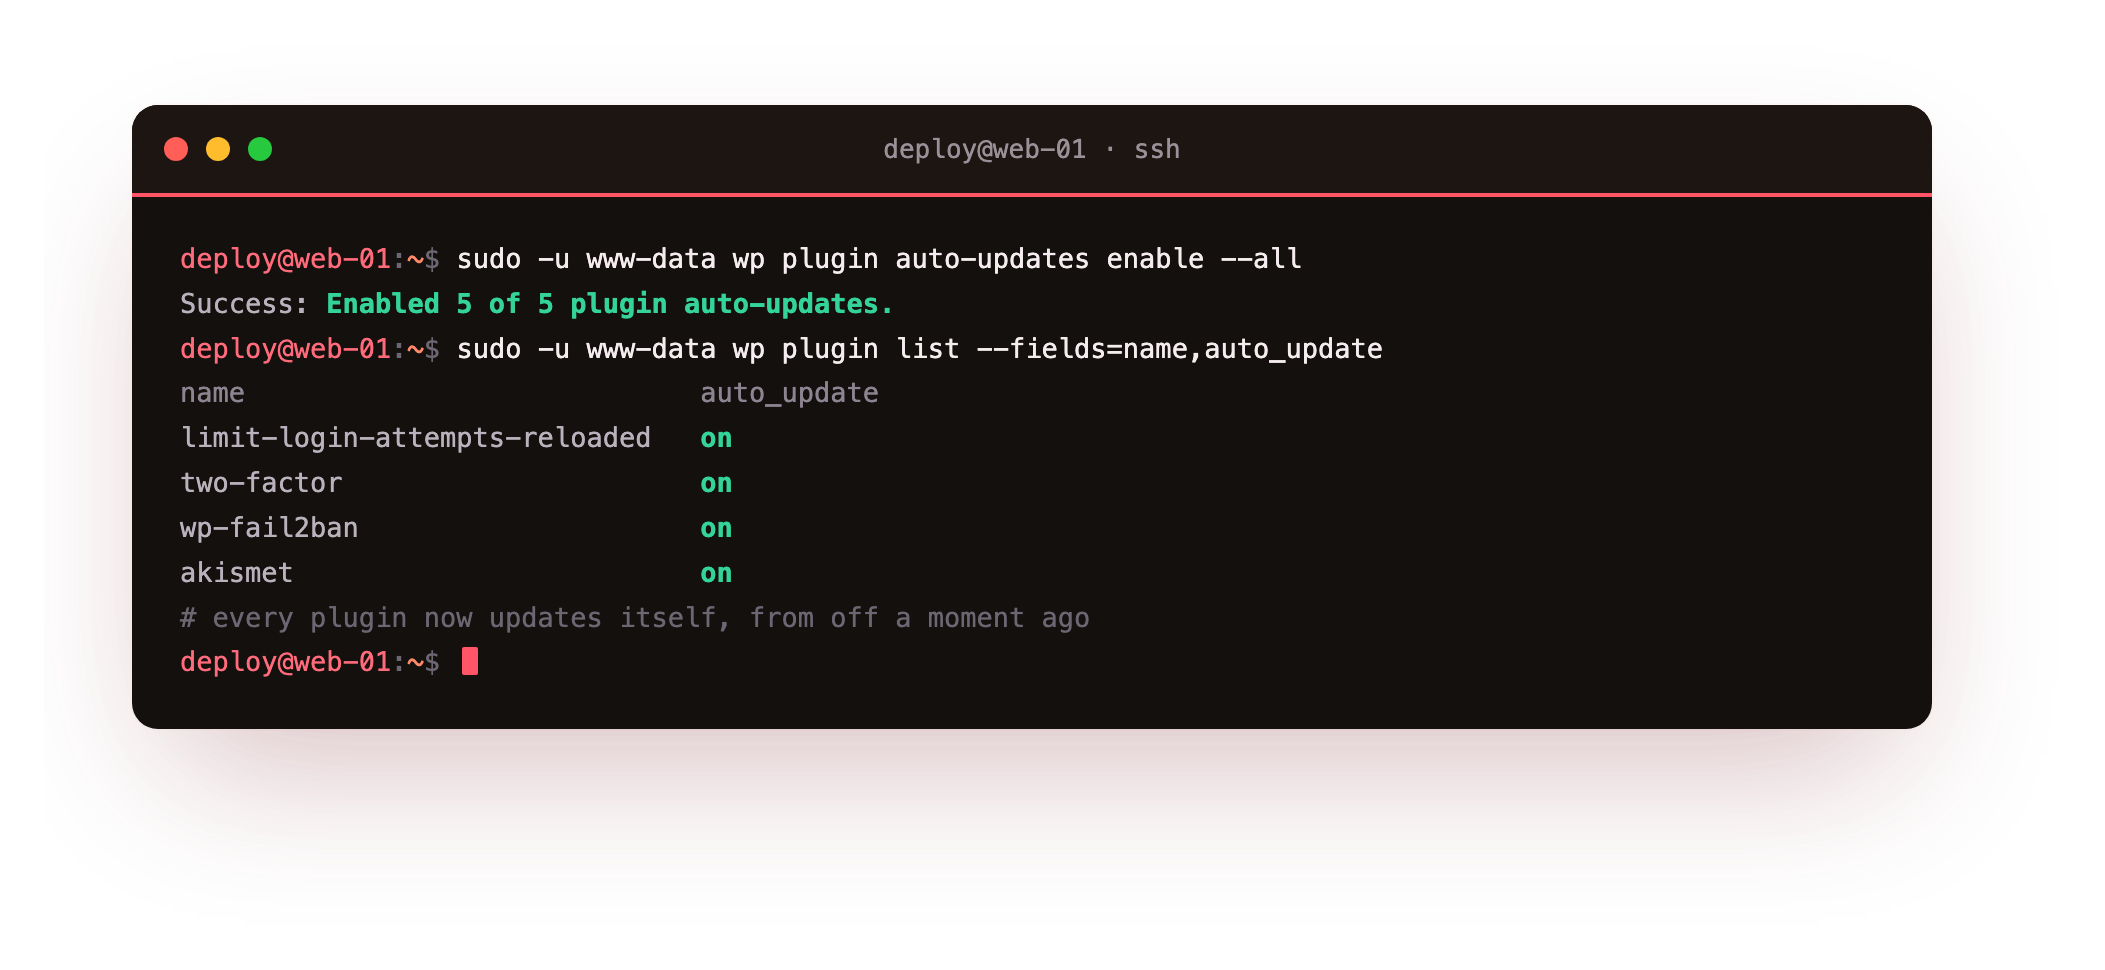
On our box that flipped every plugin from off to on, did the same for themes, and set core to install minor and security releases on its own. Do not forget the layer underneath WordPress: the operating system. Ubuntu ships unattended-upgrades, which installs security patches for the whole box without you logging in. Confirm it is enabled so nginx, PHP and MariaDB stay patched too.
# make sure the OS itself installs security updates on its own
systemctl is-enabled unattended-upgrades
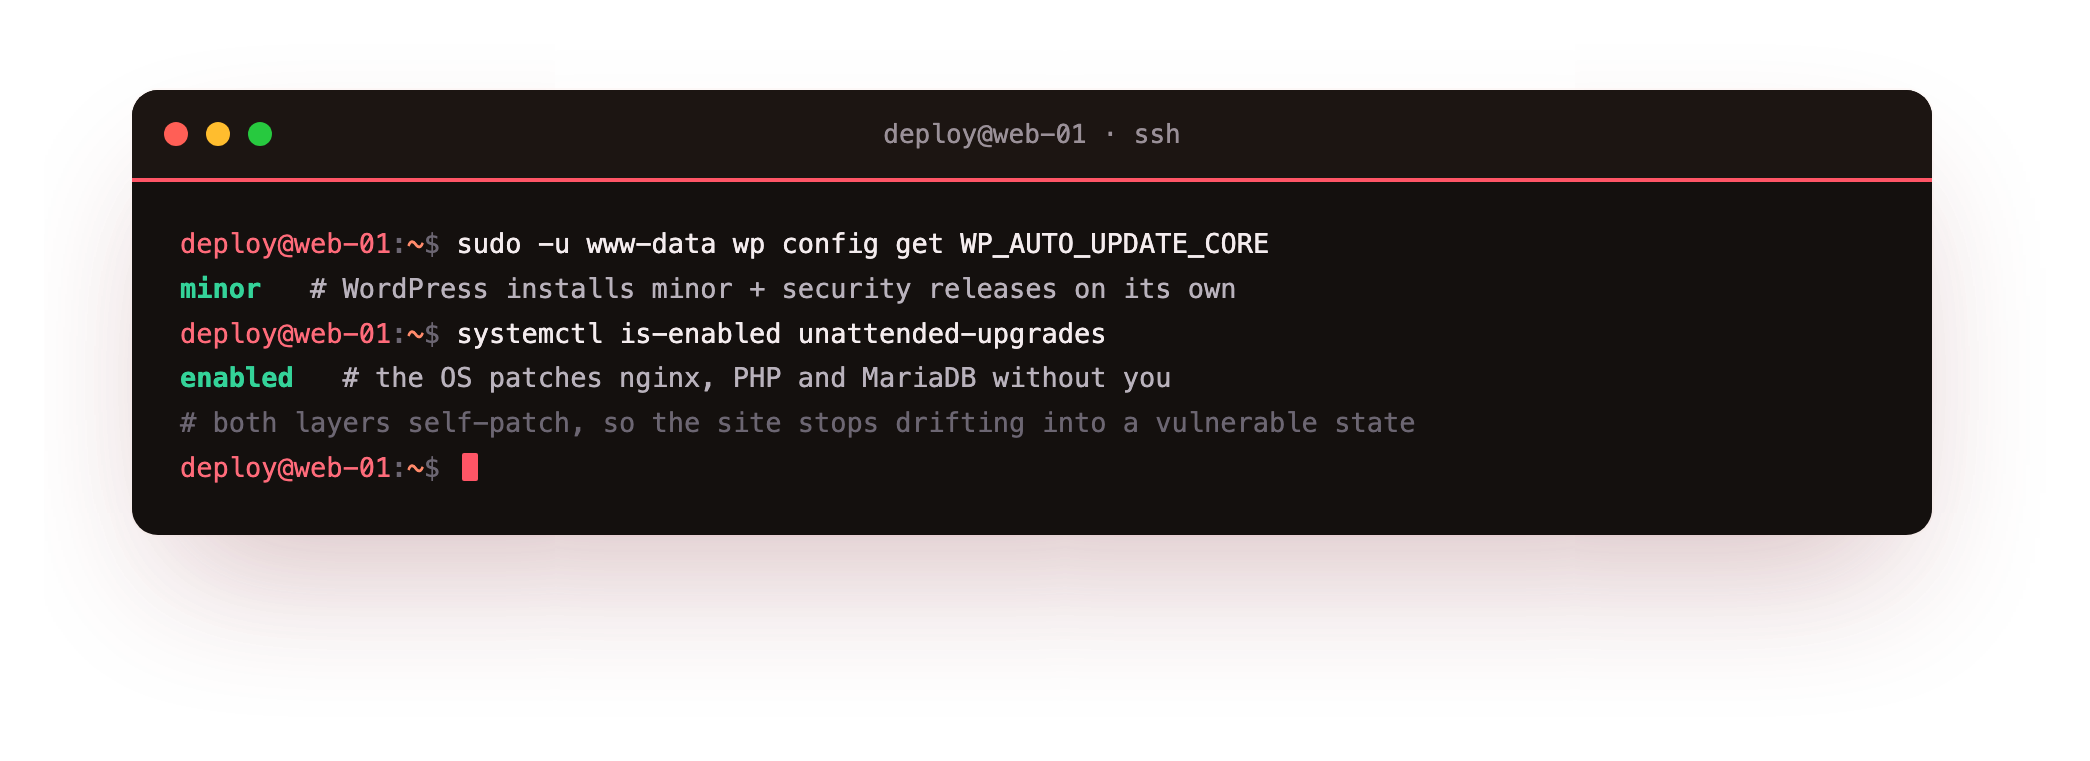
On our box that returned enabled, with the security pocket switched on in its config. Between WordPress updating itself and the OS patching itself, the site stops drifting into the vulnerable state that catches most sites out.
wp plugin list should show on in the auto_update column for every plugin, and unattended-upgrades should report enabled. Auto-updates can, rarely, break a site, so pair them with the backups from the next tutorial in this series and test a restore before you need one.Frequently asked questions
What is the single most important thing to do to secure WordPress?
Reduce what a stolen password can do, because credential attacks are the most common way in. That means two-factor authentication on every administrator account first, then brute-force protection so passwords are hard to guess in the first place. On a VPS you can go further than a plugin can, adding a fail2ban jail that bans a persistent attacker at the firewall, which is why this tutorial pairs Limit Login Attempts with fail2ban. Locking file permissions and disabling XML-RPC then close the next most common doors.Do I still need a security plugin like Wordfence or Sucuri?
On a VPS a lot of what those plugins offer, you can do more efficiently at the server level, which is what this tutorial does: nginx blocks XML-RPC and bad requests before PHP starts, and fail2ban bans attackers in the firewall rather than inside WordPress. A security plugin is still useful for malware scanning and a managed rule set if you would rather not maintain your own, but it is not a substitute for server-level hardening, and running a heavy all-in-one plugin on top of a tuned server often costs more performance than it is worth.Will disabling XML-RPC break anything?
It can, if you use something that depends on it. The classic cases are the WordPress mobile app and older Jetpack features, which talk to the site over xmlrpc.php. If you use those, keep the REST-API limits from this tutorial but, instead of denying xmlrpc.php outright, allow it only from the IP ranges those services use. Most sites use neither and lose nothing by blocking it, while shutting down the brute-force amplification and pingback attacks that target the endpoint.How do I know my hardening is actually working?
Test it rather than trust it, which is the whole point of this tutorial. Request wp-config.php and confirm a 403, POST to xmlrpc.php and confirm a 403, run curl -sI and confirm the security headers, and attack your own login to confirm both Limit Login Attempts and fail2ban respond with a real lockout and a real ban. Re-run those same checks after any big plugin or theme change, because an update can quietly reintroduce something you closed.Running WordPress on your own slice means every one of these controls is yours to own and verify, with nothing hidden behind a managed host's dashboard. When you want a box where you can harden the whole stack and prove it, a ServerCake slice gives you a clean Ubuntu 24.04 server in India, billed in rupees with GST, ready for exactly the setup above.