What you will build understanding of
Chapter one showed that root inside a rootless container is only your ordinary user on the host. This chapter proves how rootless Podman pulls that off, on a live box.
You will read the real subuid and subgid ranges Ubuntu handed your login, watch rootless Podman turn them into the uid map every container runs under, follow a file as it crosses the boundary between the container and the host and lands on a subordinate uid, and meet the userspace network helper that lets an unprivileged account publish a port at all. Nothing here is new setup: it is the machinery under what you already ran.
- Your login owns a block of subordinate uids and gids, listed in /etc/subuid and /etc/subgid, that it is allowed to hand out inside a namespace.
- Podman maps container uid 0 to your own uid and the rest of the container's users onto that subordinate block, which you can read straight from the kernel.
- A file written by the container lands on the host under a mapped subordinate uid, so container ownership and host ownership are two views of the same inode.
- Publishing a port and reaching the network happen through userspace helpers, because an unprivileged user cannot create real host interfaces.
- The rootless container from chapter one still running, or any container you can start as the same unprivileged login, so the port and process examples have something to point at.
- Comfort reading three-column output, since a uid map is just source, target and length, and most of this chapter is learning to read it.
- The alpine image, which the volume test pulls once if it is not already in your per-user store.
- No root shell is opened at any point in this chapter, which is itself part of the demonstration.
The subordinate ranges your login was given
When Ubuntu created your user it also reserved a block of uids and gids that only that user may use, and only inside a namespace. Those blocks live in two files.
cat /etc/subuid /etc/subgid
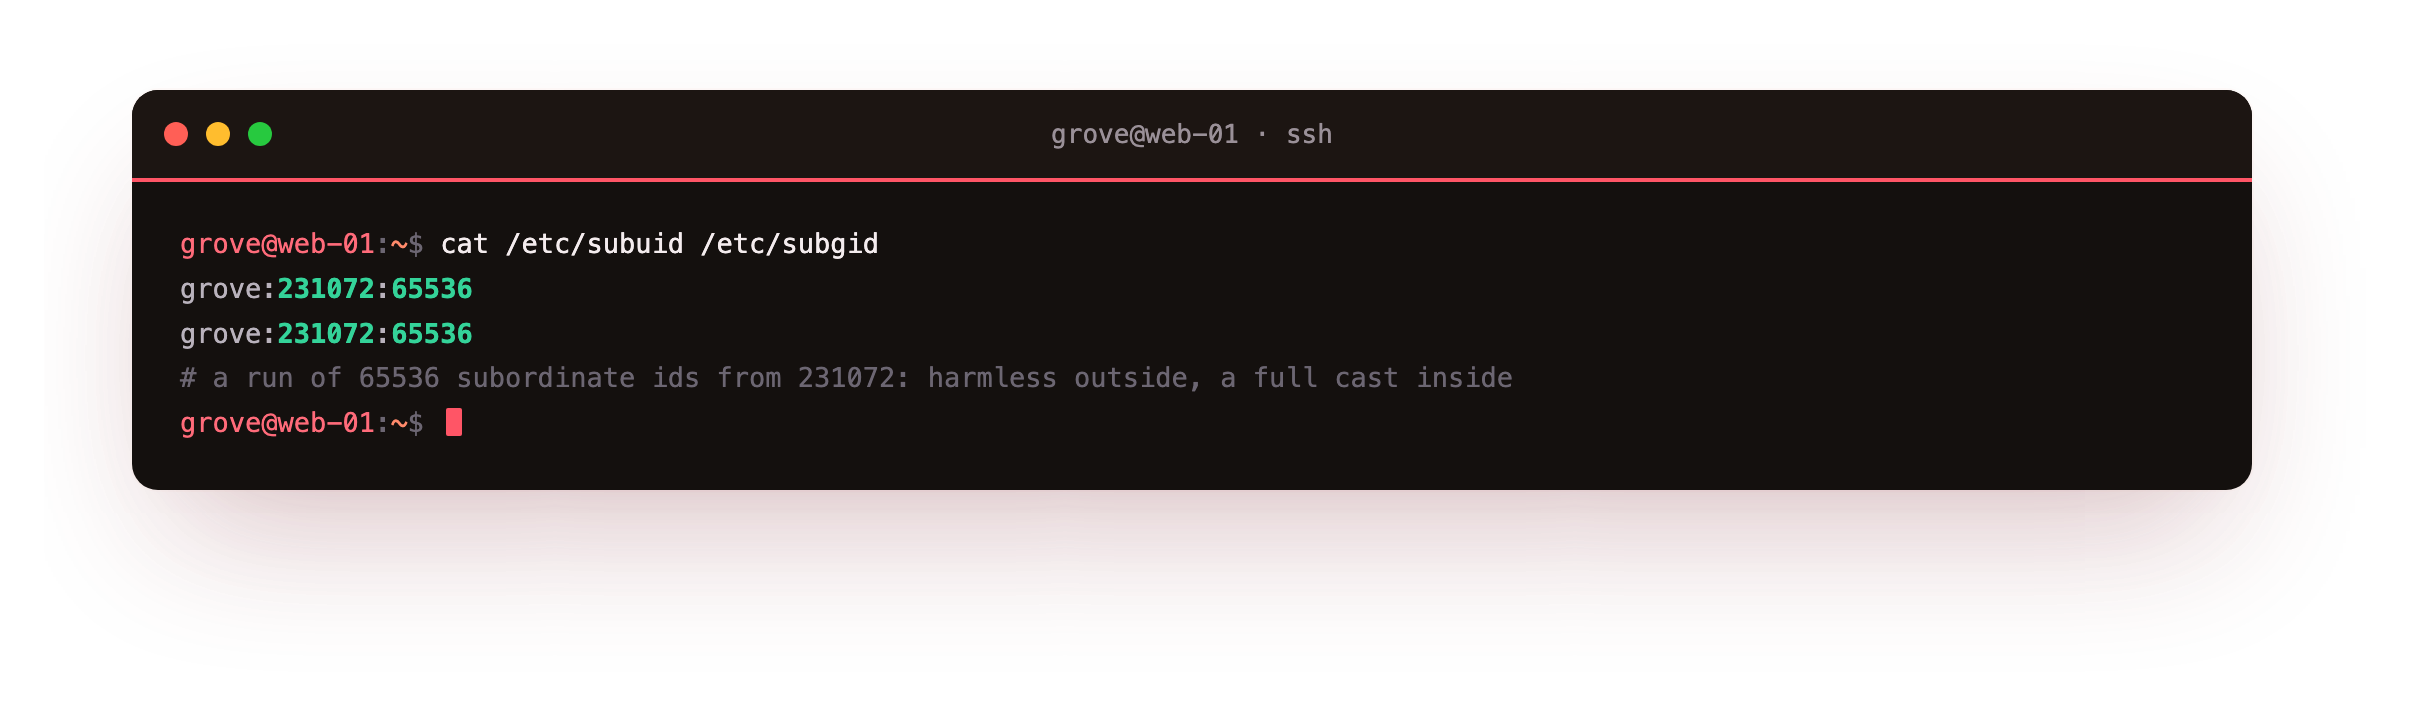
The line for the demo user reads a starting id and a count: a run of 65536 uids beginning at 231072, and the same for gids. These are not real accounts and own nothing on the running system.
They exist so that a namespace this user creates can pretend to have a full range of users inside it, each backed by one of these harmless outside ids. Without such a block, rootless containers could not offer more than a single uid, and most images expect to switch users during a build or a run.
The map Podman actually builds
The ranges above are the raw material. When Podman starts a container it asks the kernel for a user namespace and writes a mapping into it. You can enter the very same namespace by hand and read that mapping back.
podman unshare cat /proc/self/uid_map
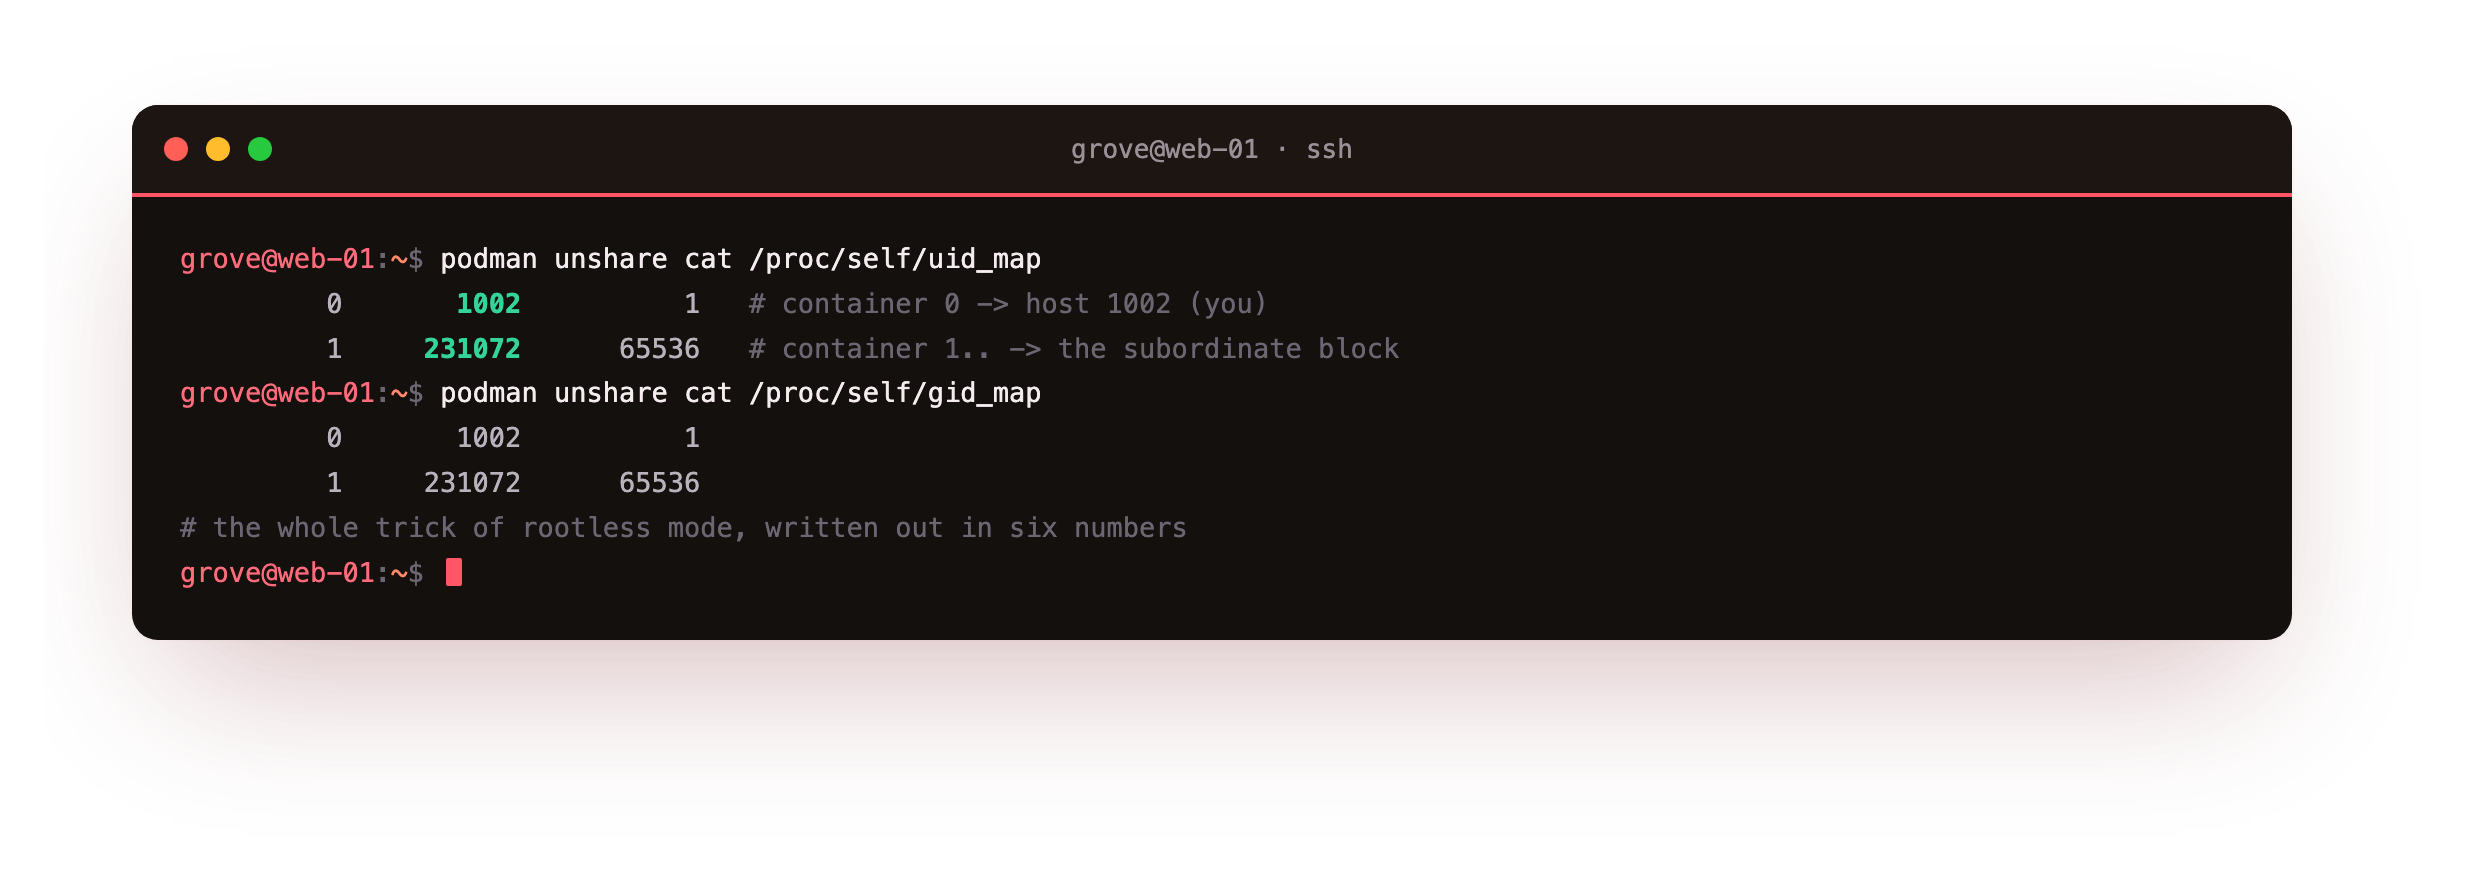
Read the map as three columns: the id inside the namespace, the id it becomes outside, and how many ids the row covers. The first row sends container uid 0 to your own host uid for a length of one, so root in the container is you. The second row sends container uid 1 and up onto the subordinate block starting at 231072, for the full 65536 count.
The gid map is built the same way. This is the whole trick of rootless mode written out in six numbers: a private cast of users inside, every one of them an unprivileged stranger outside.
The first line of the uid map should read 0, then your host uid, then 1. If instead it starts 0 0 4294967295, you are in a root context, not a rootless one, so exit and run the command as the unprivileged login.
How does rootless Podman shrink the blast radius?
The map is not an abstraction; it decides who owns files. Mount a fresh volume, run a container as a chosen non-root user inside it, and then look at the same files from the host and from inside the namespace.
podman run --rm -u 1500:1500 -v grove-userns:/data:U docker.io/library/alpine:3.20 sh -c 'id; touch /data/note.txt; ls -ln /data'
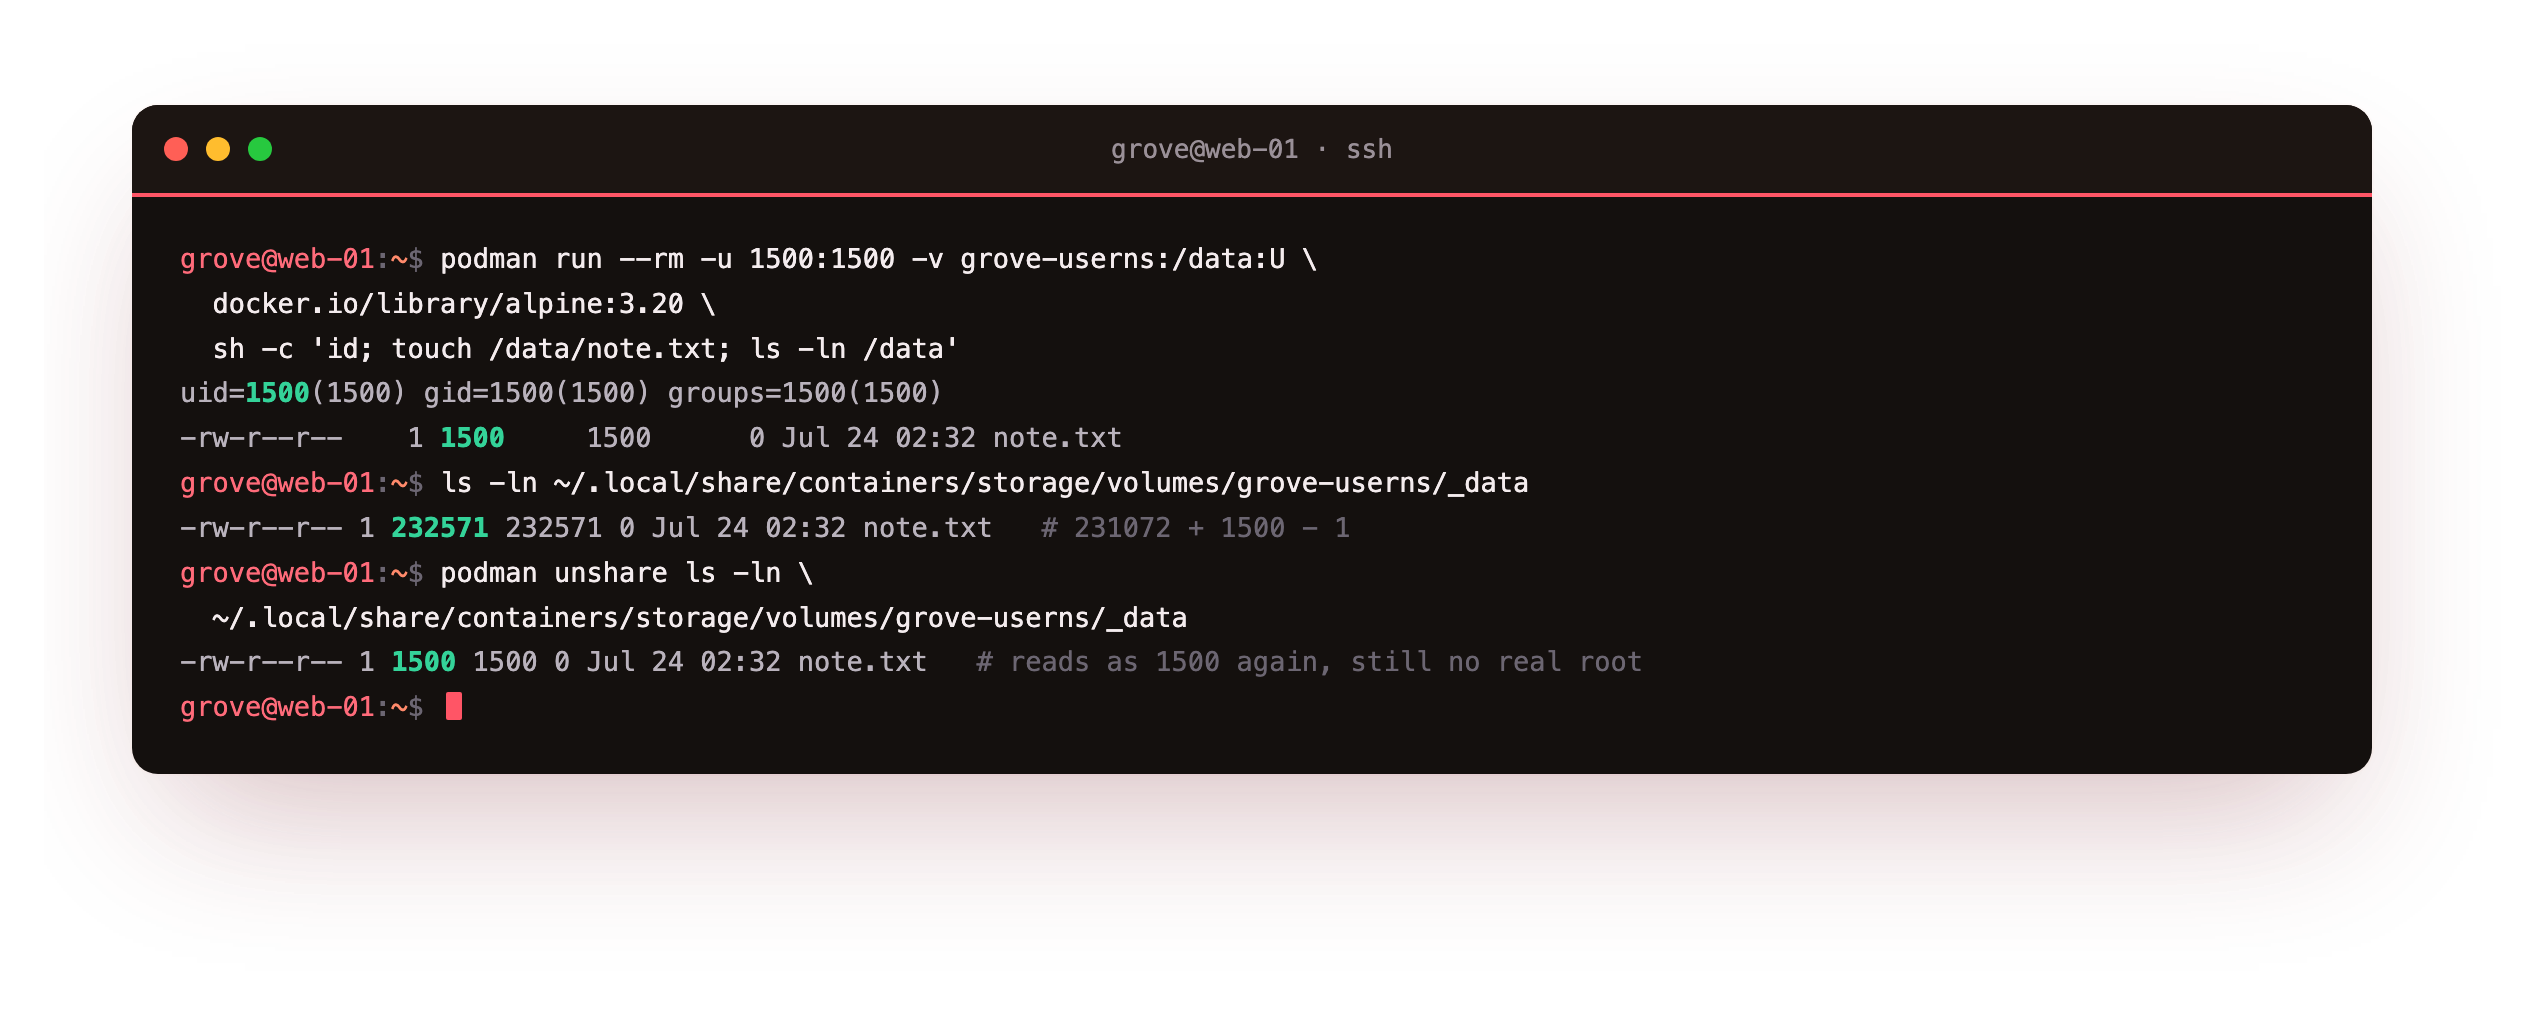
Inside the container the file belongs to uid 1500, exactly as the process that wrote it. On the host the same file belongs to uid 232571, which is 231072 plus 1500 minus one: the container uid pushed through the map onto your subordinate block. View it a third way, through podman unshare, and it reads as 1500 again, because unshare re-enters the same namespace and applies the same map.
This is why rootless Podman shrinks the blast radius. Every file a container creates is owned, on the real system, by an id that owns nothing else and can log in nowhere. A container that is fully compromised writes files as a stranger, not as root.
Rootless networking without root
An unprivileged user cannot create a bridge, assign an address to a host interface, or bind a low port. So how did the container in chapter one publish a port at all? Through userspace. Look at what actually holds the port.
ss -tlnp | grep 8080
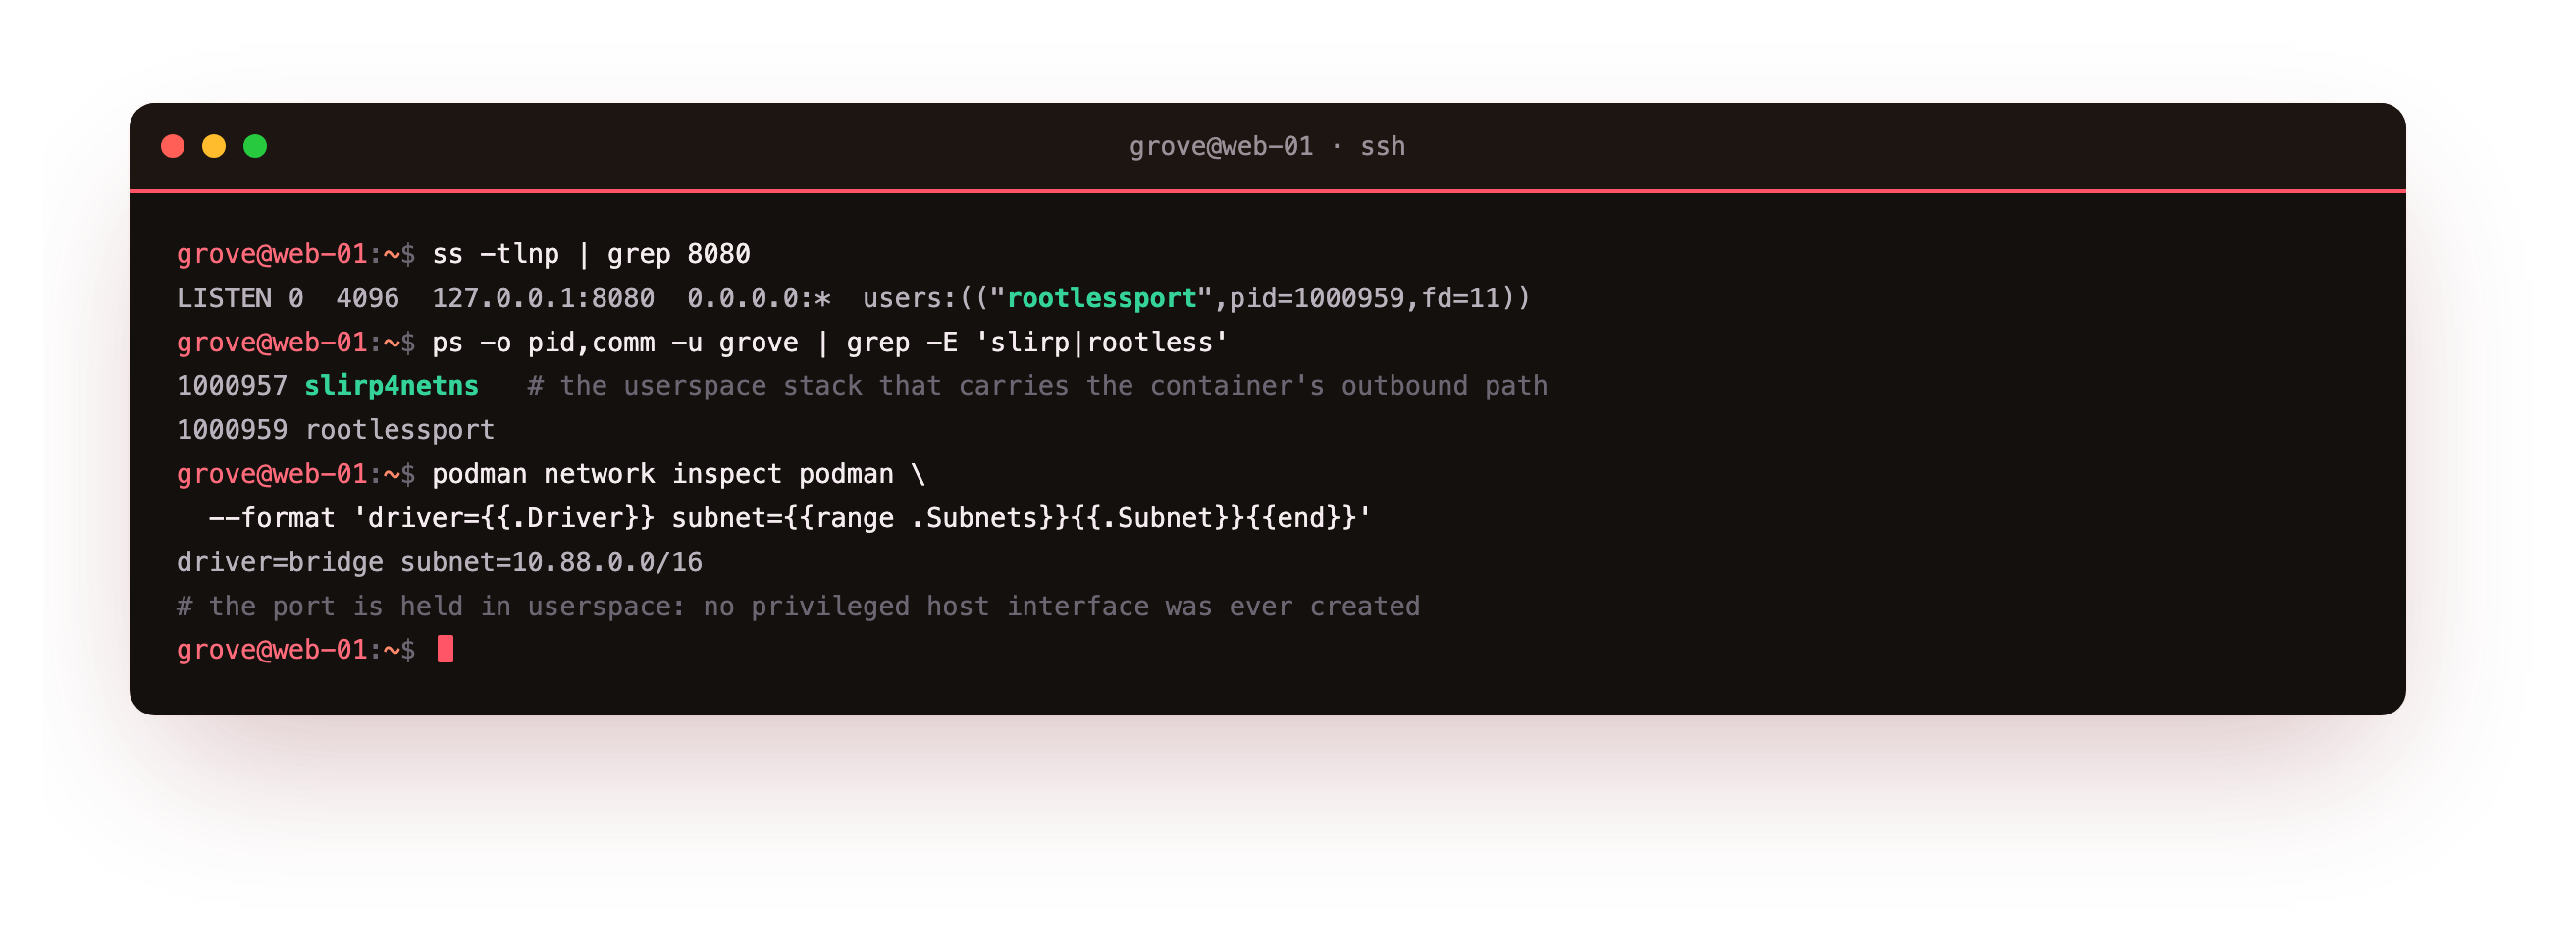
The listener on 127.0.0.1:8080 is held by a small process called rootlessport, not by the kernel on the container's behalf. Alongside it in your process list is slirp4netns, a userspace TCP and IP stack that gives the container its outbound path. Between them, packets move in and out of the container without any privileged interface ever being created. The container itself lives on Podman's default rootless bridge, a private network in the 10.88.0.0/16 range managed by netavark, but the crossing to the host is done by these helpers running as you.
Going further: pasta, slirp4netns and the network backend
Two moving parts sit under rootless networking, and it helps to keep them apart. The network backend, netavark on this box, builds the container's own network and resolves container names to addresses. The rootless network helper is what carries traffic across the boundary to the host, since that crossing cannot use a privileged interface.
On Podman 4.9 that helper is slirp4netns, a userspace network stack that has been the default for years. Newer Podman releases default to pasta instead, which is faster and preserves the real client address more faithfully, and both binaries are present on this system so you can select either.
You do not have to choose today. The important idea is that rootless networking is a userspace translation, not a hole poked in the host's networking, which is why an unprivileged user can do it safely. When you reach the pod chapter, all of the containers in a pod share one of these network setups, which is exactly what lets them talk to each other over localhost.
Frequently asked questions
Why do container files show up as strange high-numbered owners on the host?
Because they are owned by your subordinate uid range. A file written inside the container by uid 1500 is stored on the host as your subuid base plus 1500 minus one, a number in the tens or hundreds of thousands. Those owners look odd only because they are not real accounts. They are the host side of the namespace map, and they are the reason a container cannot write a file that any real user or service would trust.
How do I fix ownership on a rootless volume without becoming root?
Use podman unshare, which drops you into the same user namespace the container runs in, where the mapped ids read as their in-container values. Inside that shell you can chown and chmod files with the numbers the container expects, and the kernel translates them back to your subordinate range on disk. The :U mount option used in this chapter does the same thing at start time, recursively chowning a volume to the container's user, which is often all you need.
Can a rootless container bind a port below 1024?
Not by default, because low ports are privileged and you are not. Two clean options exist. You can publish the container on a high loopback port, as this series does, and let a front proxy or an SSH tunnel handle the public side. Or an administrator can lower the unprivileged port floor once, with a sysctl, so your user may bind lower ports directly. The high-port-plus-proxy pattern keeps the whole path unprivileged and is the safer default.
Is slirp4netns slower than running with the host network?
There is a cost, because traffic passes through a userspace stack rather than the kernel, and for very high throughput it shows. For most self-hosted apps it is not the bottleneck. If it becomes one, switching the rootless helper to pasta narrows the gap, and a reverse proxy in front of the container means the userspace hop only carries traffic between the proxy and the app on the same box. Measure before assuming the network layer is your limit.
What you have, and what comes next
You read the subordinate ranges your login owns, watched rootless Podman turn them into the uid and gid maps every container runs under, followed a file across the userns boundary onto a subordinate host uid and back, and found the userspace helpers that publish a port for an unprivileged user. The security story of chapter one is now something you can see in the kernel rather than take on trust.
So far each container has stood alone. The next chapter groups two of them: a pod that puts an app and a Redis datastore into one shared network namespace, so they reach each other over localhost, and serves the result to a browser.