What you will have at the end
By the end of this series you can get HTTPS right on your own slice: a free, auto renewing Let's Encrypt certificate with the wildcard included, and the confidence to read a TLS handshake and fix a broken padlock instead of guessing. This first chapter shows you what a correct connection looks like on a live Ubuntu 24.04 server, installs certbot from a bare box, then teaches you to read the handshake and the certificate chain so the padlock stops being magic.
- The series destination: a domain that started with no certificate ends with a valid Let's Encrypt one, wildcard included, that renews itself, and openssl reports
Verify return code: 0 (ok)against it. - On a fresh slice certbot is not there.
apt install certbotplus the dns-cloudflare plugin is the real first step, and it enables the renewal timer on boot for you. - A certificate proves identity by chaining: the leaf is signed by an intermediate, the intermediate by a root your machine already trusts, and the whole path is what a client verifies.
- openssl s_client is the one command that shows the chain, the negotiated version and the cipher for any server, so it is how you check your own work and debug someone else's.
- A slice with a public IP running Ubuntu 24.04, reached over SSH as a sudo user, with certbot not yet installed.
- A domain whose DNS you can edit, since the wildcard in chapter two proves control by writing a DNS record rather than serving a file.
- Port 443 open to the internet if you want browsers to reach the finished site, though this first chapter reads a handshake over loopback and needs nothing public.
- Enough shell to run apt and to read the block of text openssl prints, which is the only skill the verification here asks of you.
See the destination first
Here is the finish line for the whole series, on one screen. This is openssl s_client opening a TLS connection to an origin that serves a genuine Let's Encrypt wildcard certificate, the same kind you will hold by the end. Point it at the origin and pass the hostname with -servername so the server knows which certificate to send.
openssl s_client -connect 127.0.0.1:443 -servername boxlab.space </dev/null
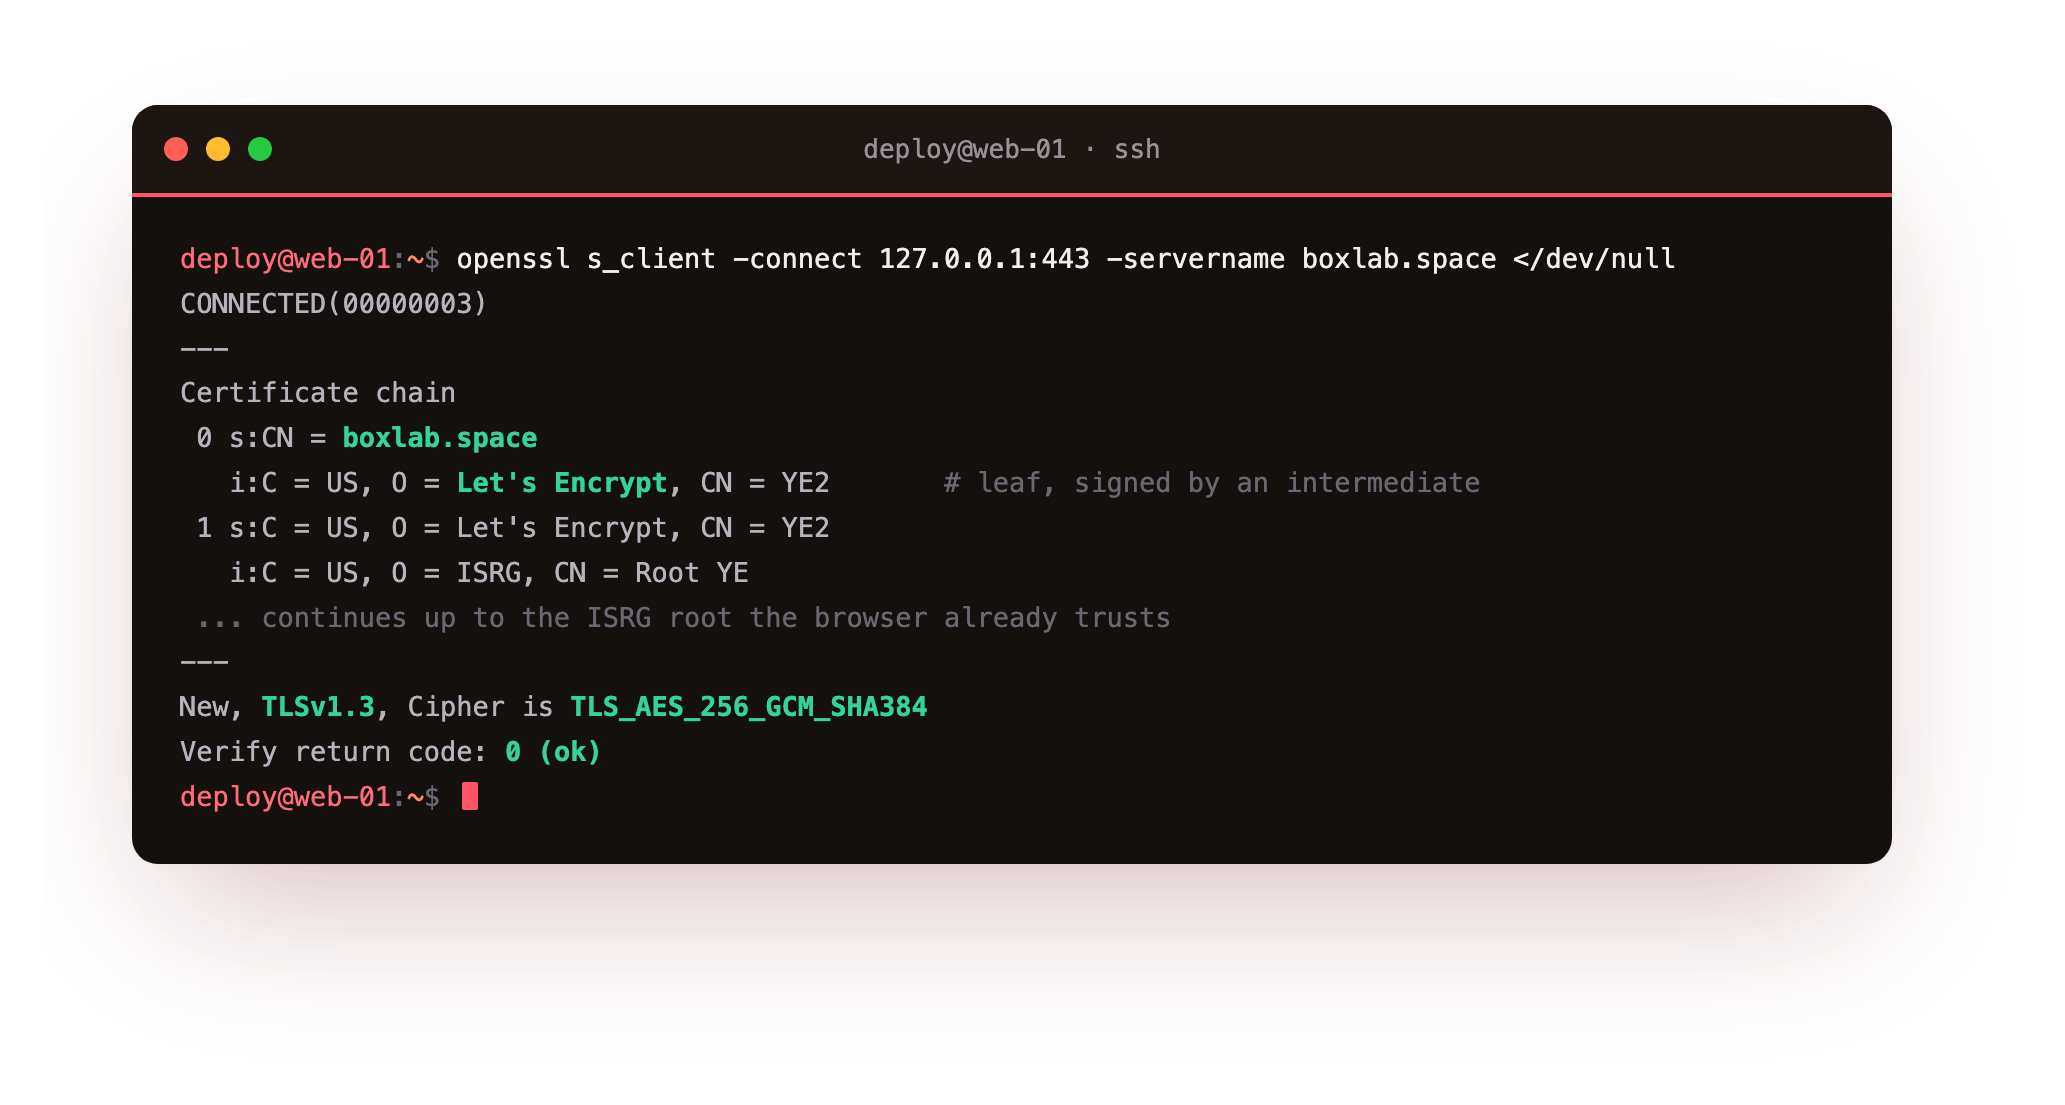
Three things in that output are the payoff. The certificate chain lists the leaf for boxlab.space, then the Let's Encrypt intermediate that signed it, climbing to a root your machine already trusts. The negotiated line reads TLSv1.3 with the cipher TLS_AES_256_GCM_SHA384. And the last line, Verify return code: 0 (ok), is openssl telling you it walked that chain to a trusted root and every link checked out. That single zero is what a correct, trusted, unexpired certificate looks like from the command line.
You do not hold a certificate like this yet. There is no cert on your slice, no padlock, nothing for a browser to trust. The rest of this chapter installs the tool that gets you one and teaches you to read exactly what you just saw, and the later chapters issue the real certificate, automate its renewal, and turn the reading skill into a debugging one.
Install certbot from a bare slice
certbot is the client that talks to Let's Encrypt, requests certificates, and installs the timer that renews them. On a fresh slice it is not present, and installing it is the from-zero step most TLS guides skip past. Update the package lists, then install certbot together with the Cloudflare DNS plugin the wildcard will need in chapter two.
sudo apt update
sudo apt install -y certbot python3-certbot-dns-cloudflare
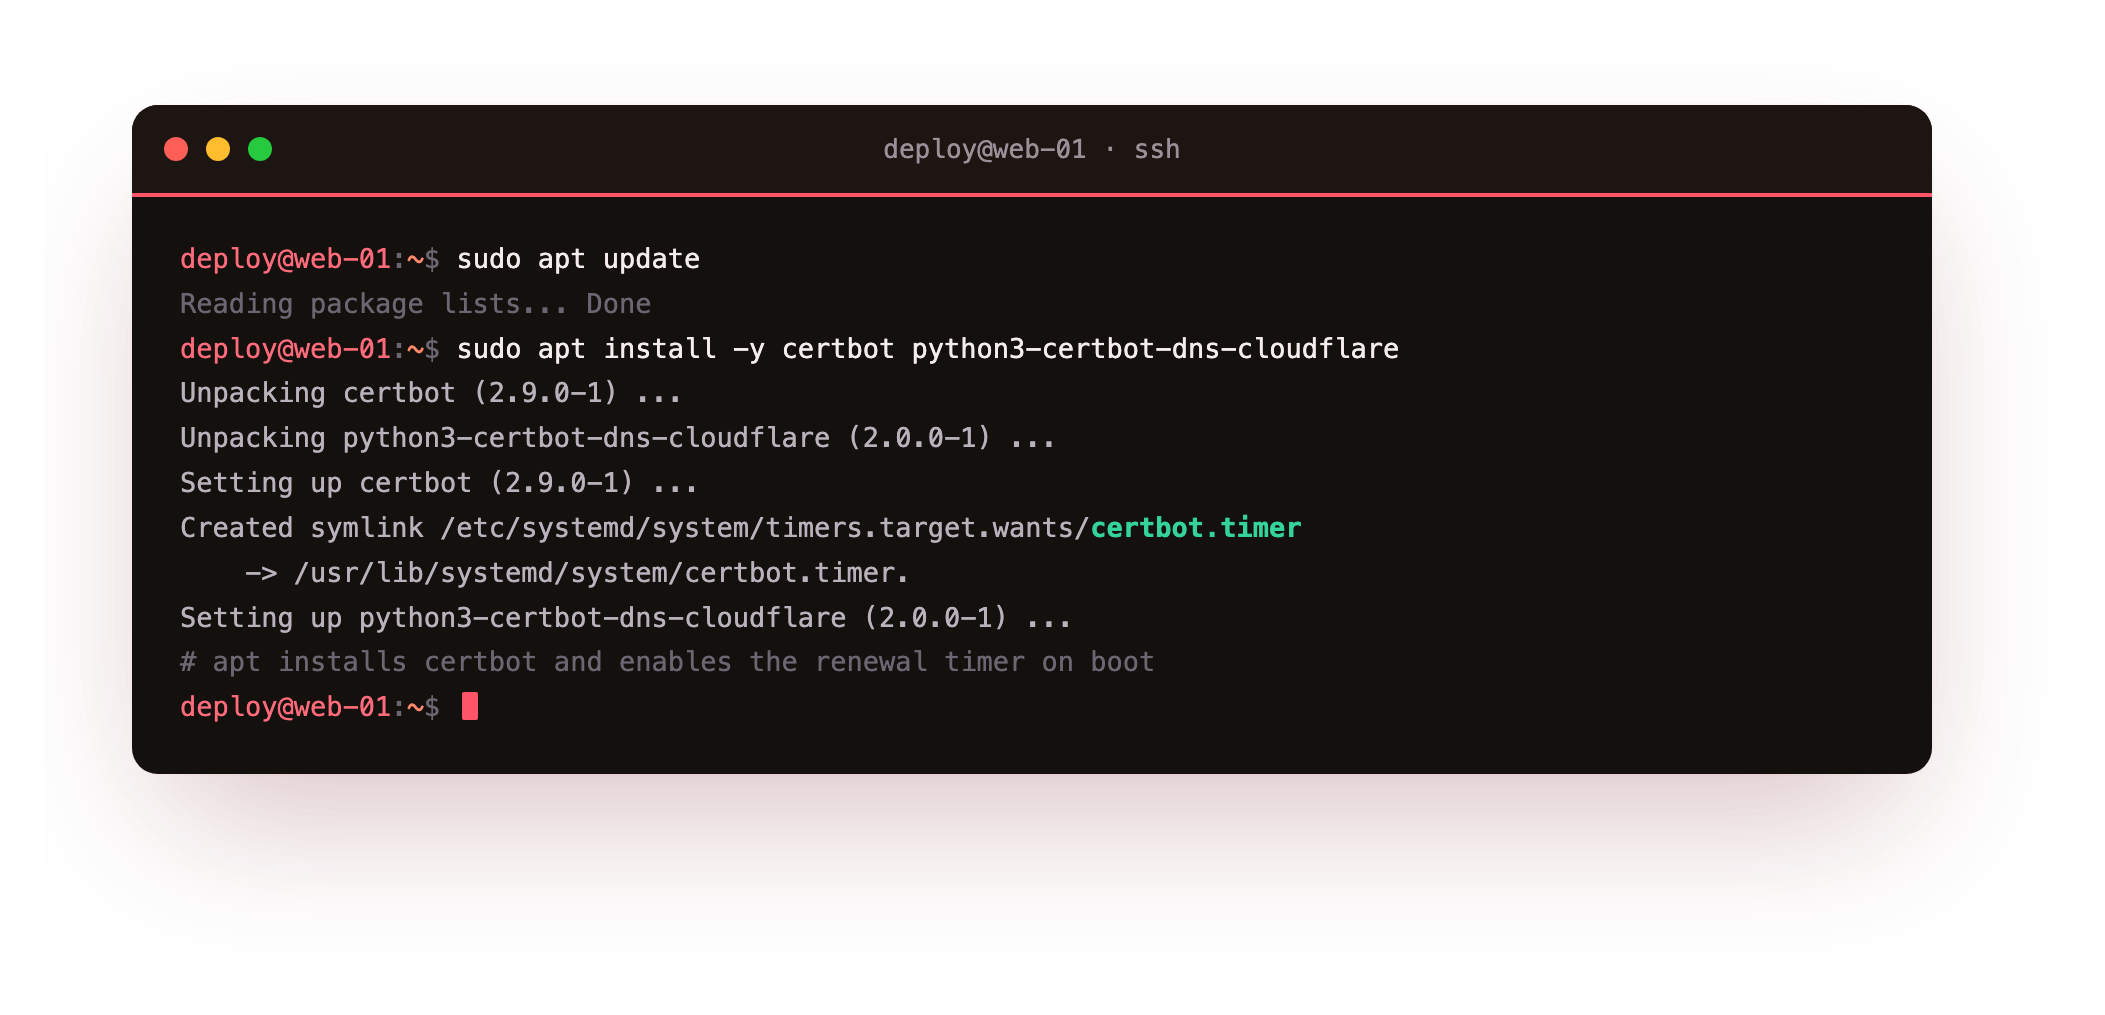
apt pulls in certbot 2.9.0, the version Ubuntu 24.04 ships, plus the python3-certbot-dns-cloudflare plugin that will answer the DNS challenge for you later. The install does one thing worth calling out: it creates and enables certbot.timer, a systemd timer that will renew your certificates on a schedule, so the automation the series depends on is in place before you own a single certificate.
Run certbot --version. It should print certbot 2.9.0. Then run systemctl is-enabled certbot.timer and confirm it says enabled. The tool is on the box and the renewal machinery is already armed, even though you have nothing for it to renew yet.
Read the TLS handshake on a live server
Now open up the destination screen. The -servername flag sets SNI, the Server Name Indication. One IP can host many sites, so the client has to name the hostname it wants before the server can pick the right certificate. Leave SNI off and you often get the wrong certificate or the default site. Redirecting from /dev/null closes standard input, so the command returns instead of waiting for you to type.
The output opens with the certificate chain the server presented, then the negotiated protocol and cipher, and the verify result. That Verify return code: 0 (ok) line is the whole point of the certificate half of TLS: encryption alone is easy, but knowing you agreed on the key with the real server, and not with someone sitting in the middle, is the hard part, and the certificate is what settles it.
The certificate chain, link by link
A certificate does not vouch for itself. It is signed by another certificate, which is signed by another, up to a root that your operating system and browser already trust. Reading that chain top to bottom is how you reason about trust.
The chain here starts with the leaf, the certificate for boxlab.space itself. Its issuer is a Let's Encrypt intermediate. That intermediate's issuer is an ISRG root. Each entry shows a subject (s:) and an issuer (i:), and the issuer of one line is the subject of the next. That is the chain: leaf, intermediate, root.
Why the middle link? Roots are precious. A root's private key is kept offline and almost never touches a server, because if it leaked, every certificate under it would be worthless. So the root signs a small number of intermediates once, and those intermediates do the daily work of signing millions of leaf certificates. Your server sends the leaf and the intermediate; the client already holds the root and stops there.
In the chain, confirm the i: issuer of line 0 exactly matches the s: subject of line 1. If it does, the leaf really was signed by the intermediate below it. A break in that match is the single most common TLS bug, and the next paragraph names it.
That match is also where the most common real world TLS failure hides. If your server sends the leaf but forgets the intermediate, some clients cannot connect the leaf to a root they trust and reject the certificate, even though a desktop browser that caches intermediates might still load the site. Sending the full chain, leaf plus intermediate, is what fullchain.pem is for, and chapter five turns this into a repeatable debugging step.
Inside the certificate
The chain shows who signed what. To see what a single certificate actually claims, decode it. Pipe the handshake into openssl x509 and print the human readable form.
openssl s_client -connect 127.0.0.1:443 -servername boxlab.space </dev/null 2>/dev/null \
  | openssl x509 -noout -text
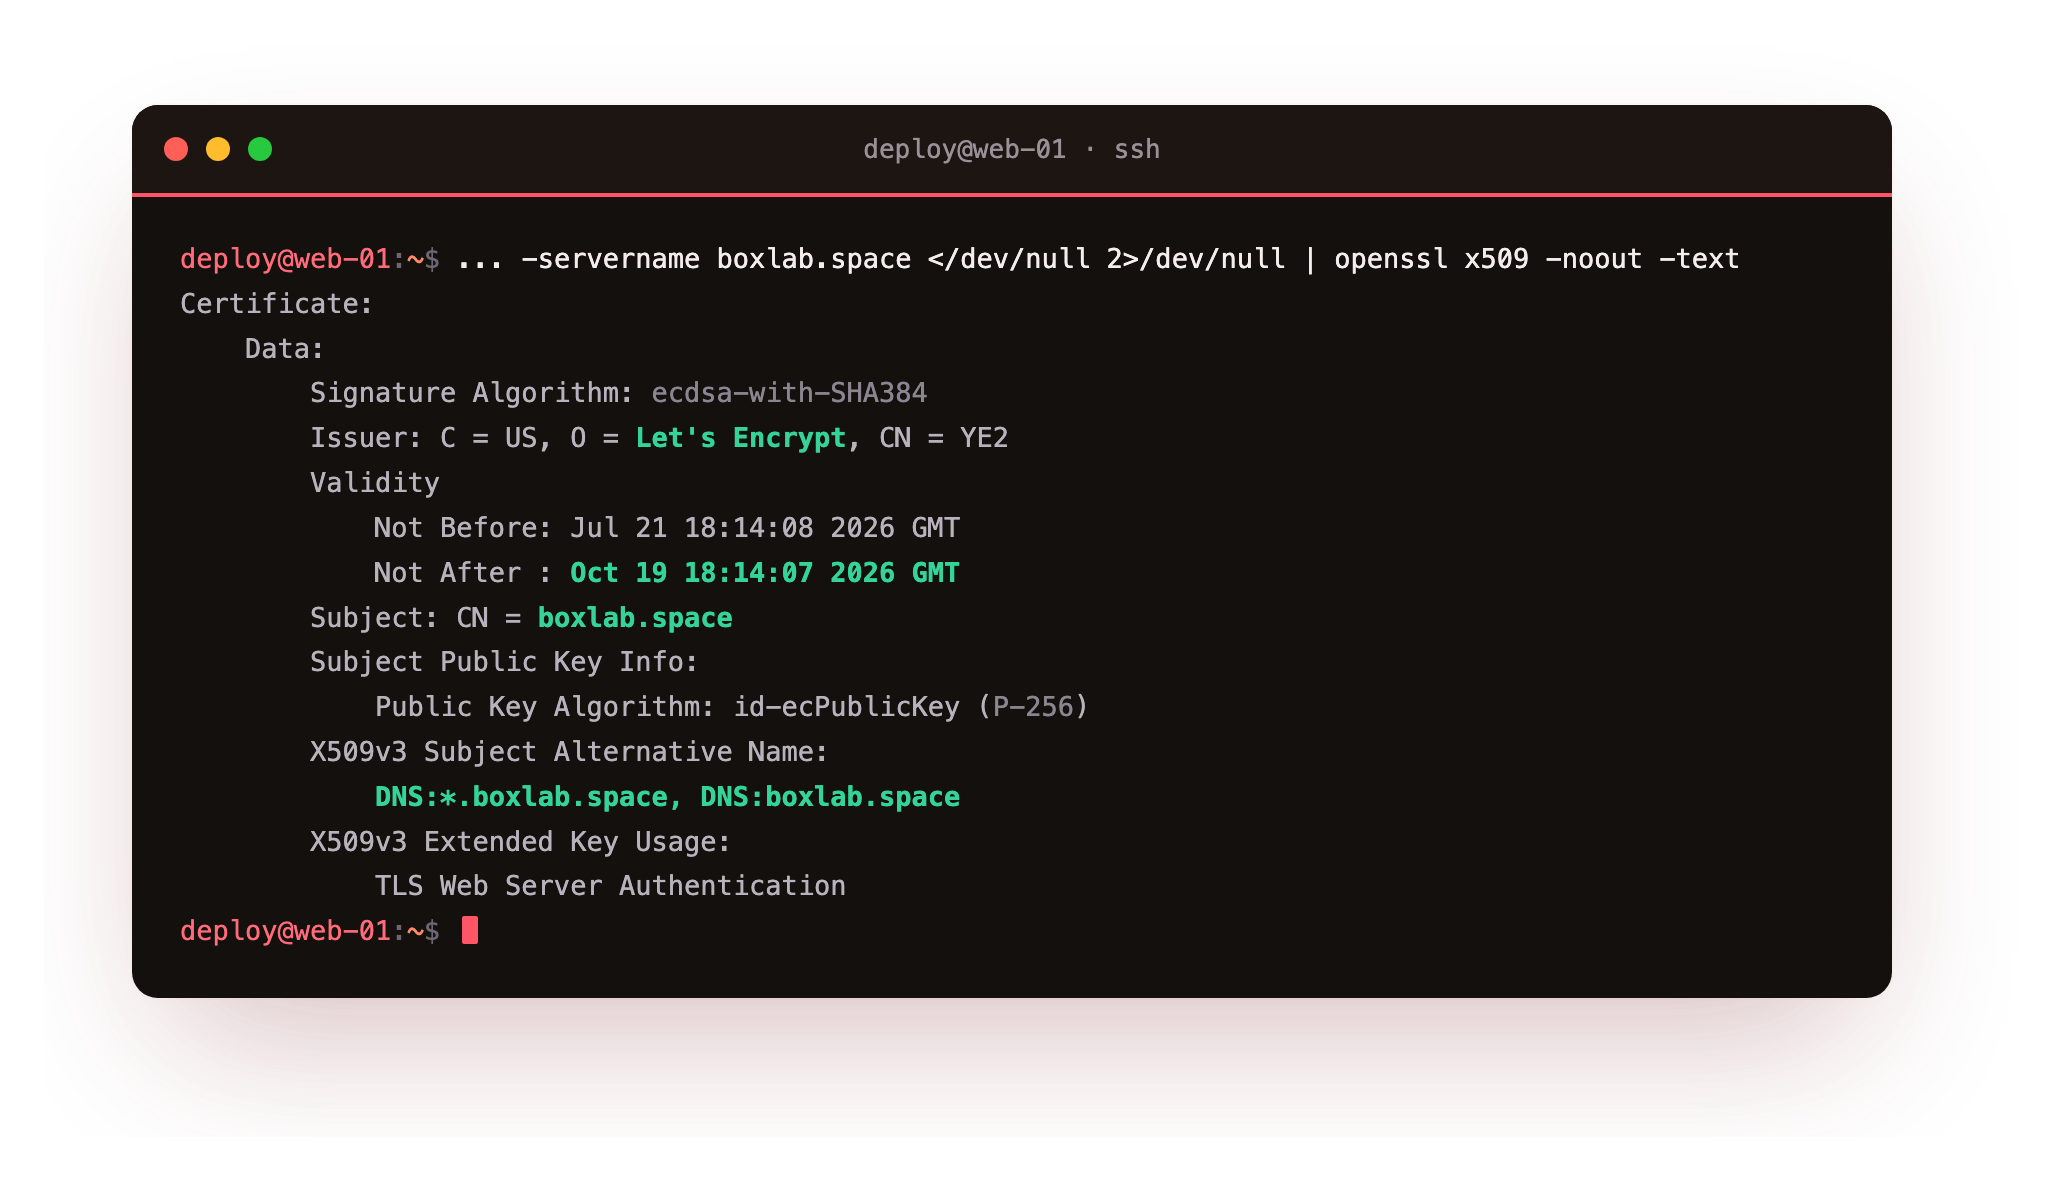
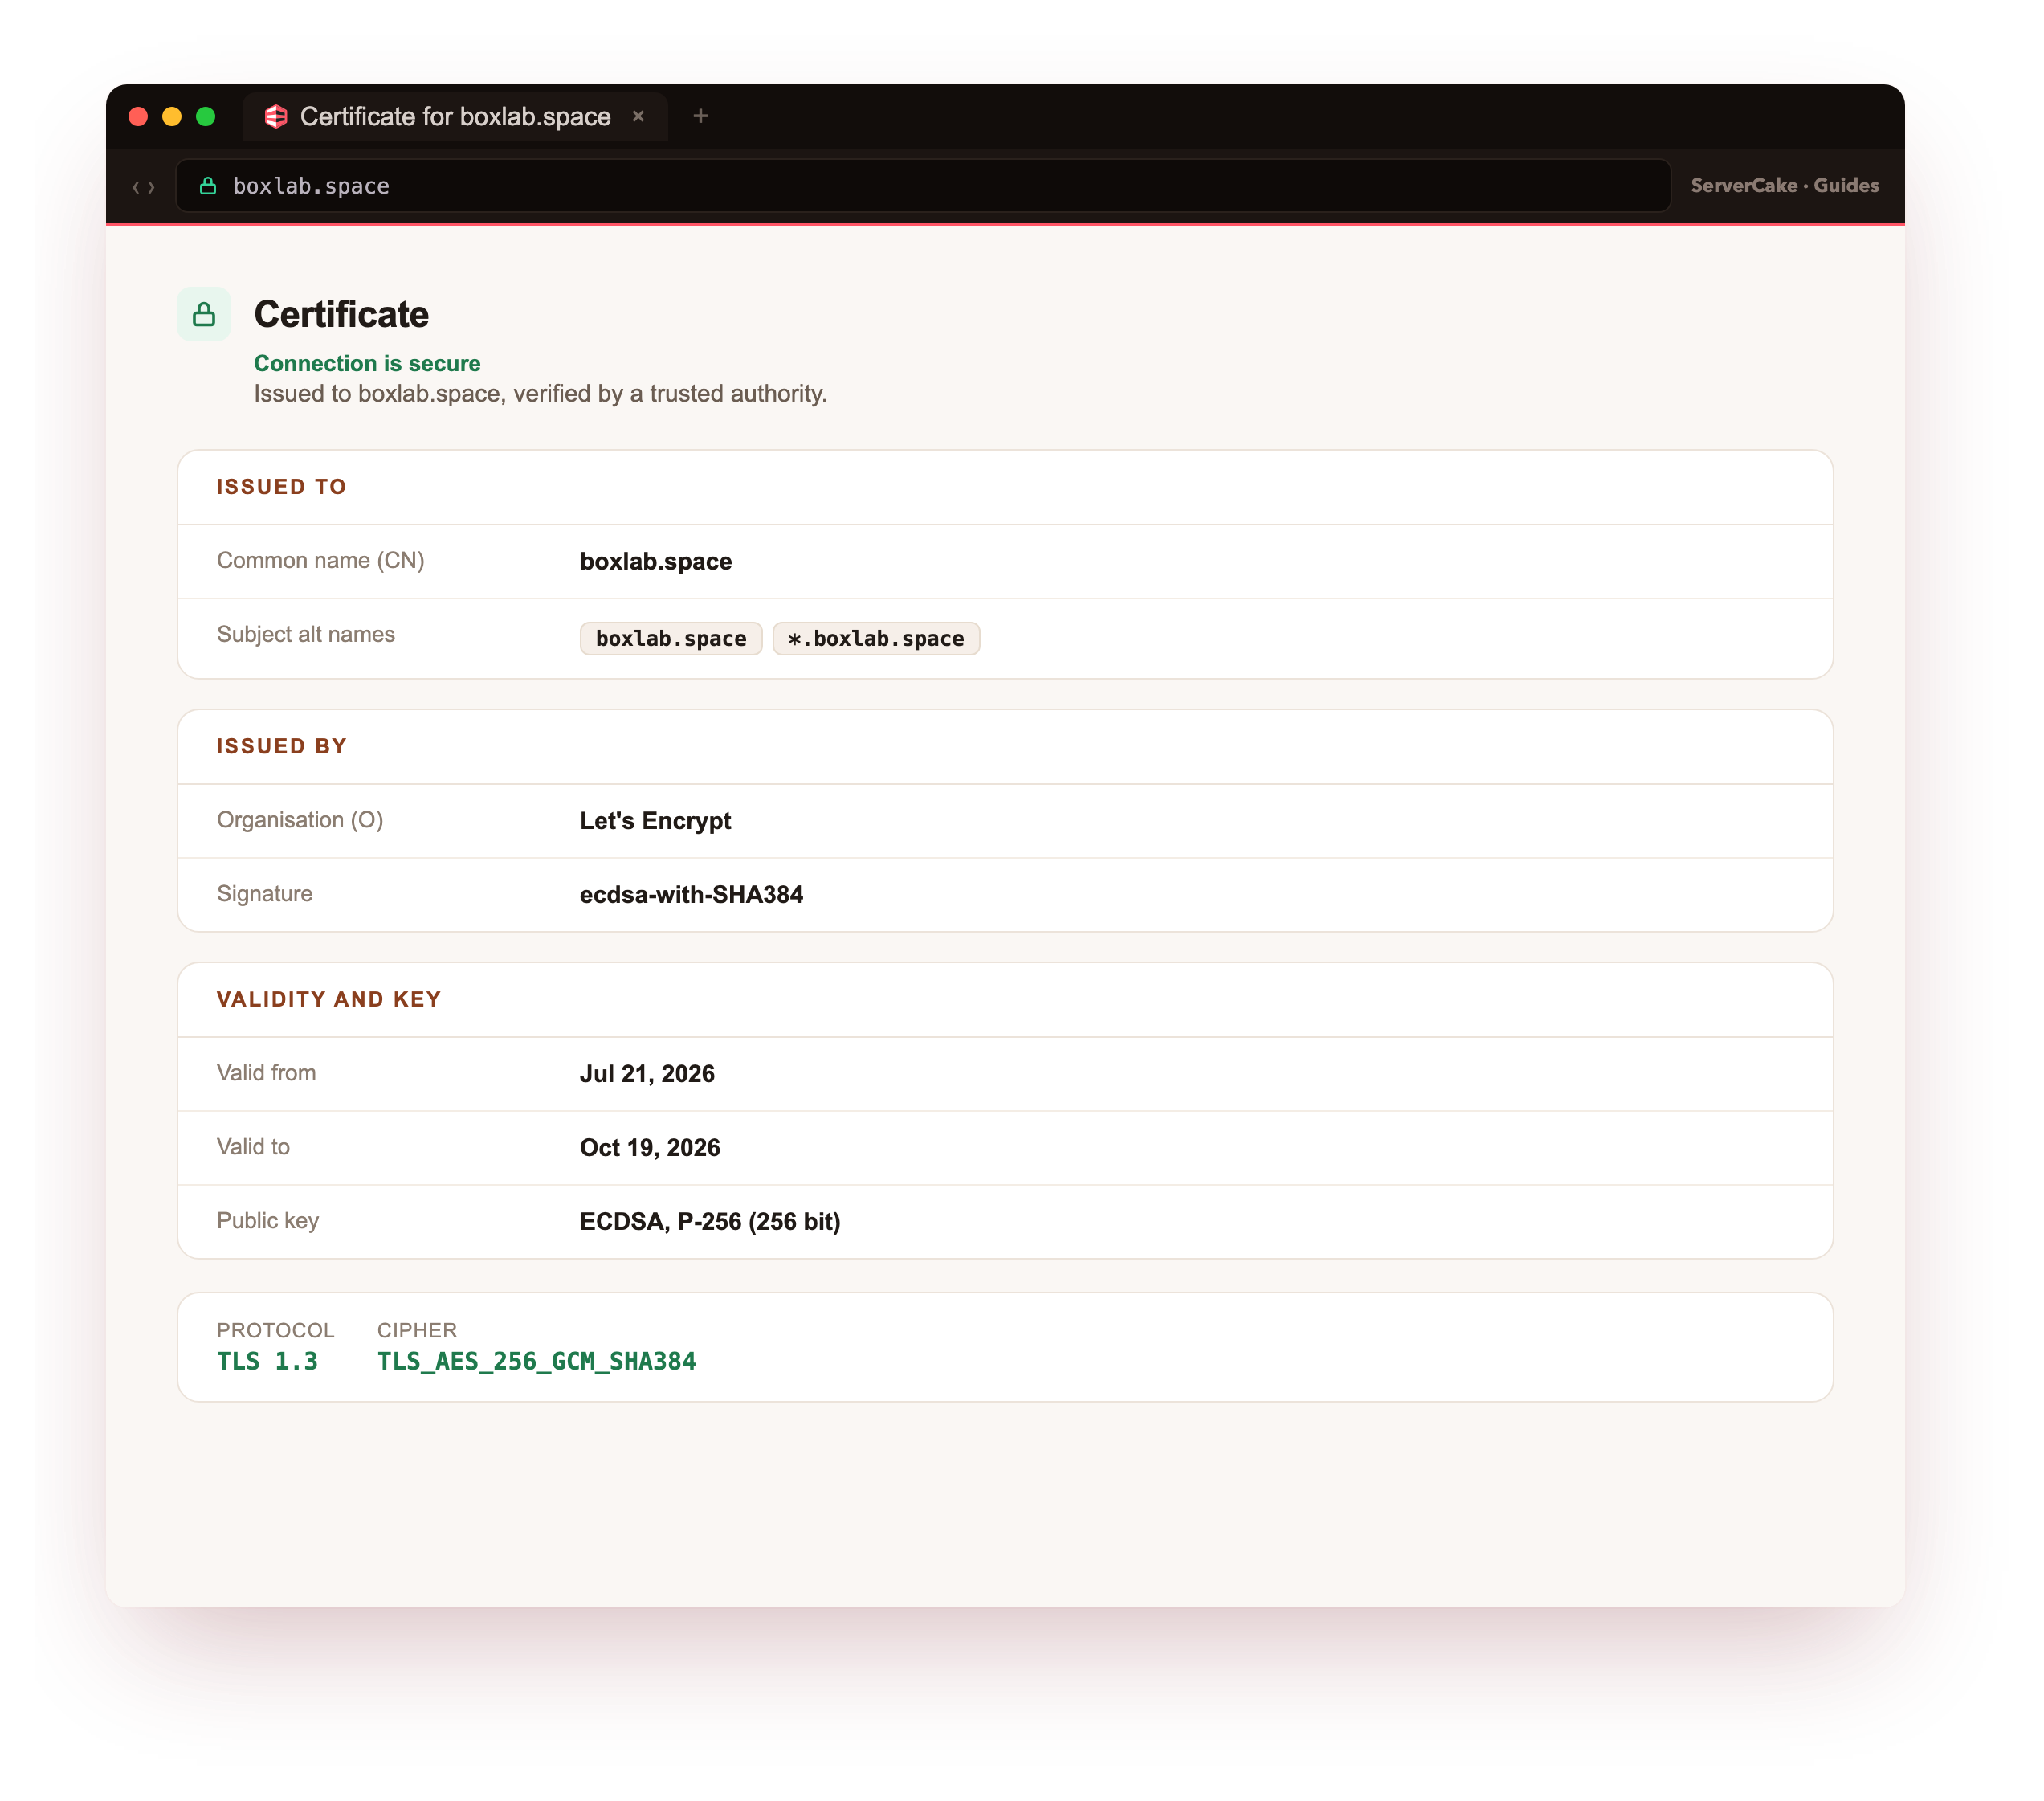
Four fields carry the weight. The Subject is the identity, here the common name boxlab.space. The Issuer is who signed it, the Let's Encrypt intermediate. Validity gives the not-before and not-after dates, and outside that window the certificate is refused. The Subject Alternative Name lists every hostname the certificate is valid for, and modern clients read the SAN, not the common name, to decide if the certificate matches the site.
On this origin the SAN reads DNS:*.boxlab.space, DNS:boxlab.space, so one certificate covers the bare domain and every direct subdomain. You can also see the key type, an elliptic-curve P-256 key here, and the extended key usage marking it for server authentication. A browser shows you the same fields when you click the padlock and open the certificate viewer.
Read the Not After date and the SAN off your own decode. The date is when the certificate expires, the number chapter three exists to keep ahead of. The SAN is the list of names the certificate is trusted for, and a name that is not in that list is the mismatch error chapter five debugs.
Going further: ciphers and the version that wins
Once identity is settled, the two sides still have to agree on how to encrypt. The handshake reports the negotiated protocol and cipher suite, and against this origin that is TLSv1.3 with TLS_AES_256_GCM_SHA384. You do not need this to issue a certificate, but it is worth understanding when you harden a server.
TLS 1.3 matters for two reasons. It removed the old, breakable ciphers that TLS 1.2 still allows if you misconfigure it, so a short vetted list is on offer instead of a long risky one. And it finishes the handshake in fewer round trips, so the connection sets up quicker. On a fresh server you want ssl_protocols TLSv1.2 TLSv1.3 and nothing older; TLS 1.0 and 1.1 are retired and current browsers reject them.
The cipher name itself is readable once you know the shape. TLS_AES_256_GCM_SHA384 means AES with a 256-bit key in GCM mode for the encryption, and SHA-384 for integrity. You do not choose this by hand on TLS 1.3; the protocol ships a short list of vetted suites and the two sides pick one, which takes a footgun away rather than handing you a knob to get wrong.
Frequently asked questions
What is the difference between TLS and SSL?
SSL is the old name. The protocol was renamed to TLS in 1999, and every version you should run today is TLS: 1.2 or 1.3. People still say SSL out of habit, and tools keep the name, but the SSL versions themselves are broken and disabled everywhere.
Do I have to install certbot to read a handshake?
No. openssl s_client is part of the openssl package and reads any HTTPS server without certbot. You install certbot in this chapter because the rest of the series uses it to issue and renew your own certificate, and installing it now also puts the renewal timer in place.
Why does my certificate need an intermediate?
Root keys are kept offline for safety, so they never sign leaf certificates directly. The root signs an intermediate, and the intermediate signs your certificate. Your server must send both the leaf and the intermediate so a client can build the path to a trusted root.
What does SNI do in the handshake?
SNI, sent with the -servername flag, tells the server which hostname the client wants before the certificate is chosen. Because one IP can serve many sites, the server needs the name up front to send the matching certificate instead of a default one.
What you can do now
You have certbot installed on a slice you started from nothing, with its renewal timer already enabled, and you can open any HTTPS server with openssl s_client, read the certificate chain from leaf to root, decode a certificate to see its subject, validity and SAN, and tell which protocol and cipher were negotiated. You have also seen the destination: a real Let's Encrypt wildcard certificate verifying with a return code of zero.
That certificate on the origin came from Let's Encrypt for free, including the wildcard that covered every subdomain. The next chapter uses the certbot you just installed to issue exactly that, and shows when the simple HTTP-01 method works and when a wildcard forces you to use DNS-01.