What you will build
By the end of this series your Node.js app runs like a real service: installed on a supported runtime, kept alive by systemd, served behind nginx, spread across every CPU core, deployed with no dropped requests, and watched by a health check. This first chapter shows you that destination, installs Node on a bare Ubuntu 24.04 slice, and gets your app answering through nginx and loaded live in a browser.
- The series goal: your app on a supported Node runtime, under systemd, behind nginx, clustered, deployed without downtime, and reporting its own health.
- On a fresh slice Node is not there, or the version is old. Installing the LTS from NodeSource is the real first step, and `node -v` proves which runtime will run your code.
- A production app binds to 127.0.0.1, never the public interface, so the only way in is through nginx as a reverse proxy.
- The payoff of this chapter: the same app answering JSON, a health check, and an HTML page, reached through nginx and loaded in a browser.
- An Ubuntu 24.04 slice with a public IP that stays on, reachable over SSH as a sudo user.
- nginx already installed and serving on the slice, since your app will sit behind it.
- An app you want to put online, or the small Express service written below, and roughly half an hour.
- Comfort with curl, because every claim here is checked against real command output.
See the destination first
Here is where you are heading. This is one request to the finished setup, and the response holds the point of the series in a few lines: your Node app answers through nginx with a 200, and its health route reports that the process is up and how it is doing.
curl -si http://127.0.0.1:8090/health
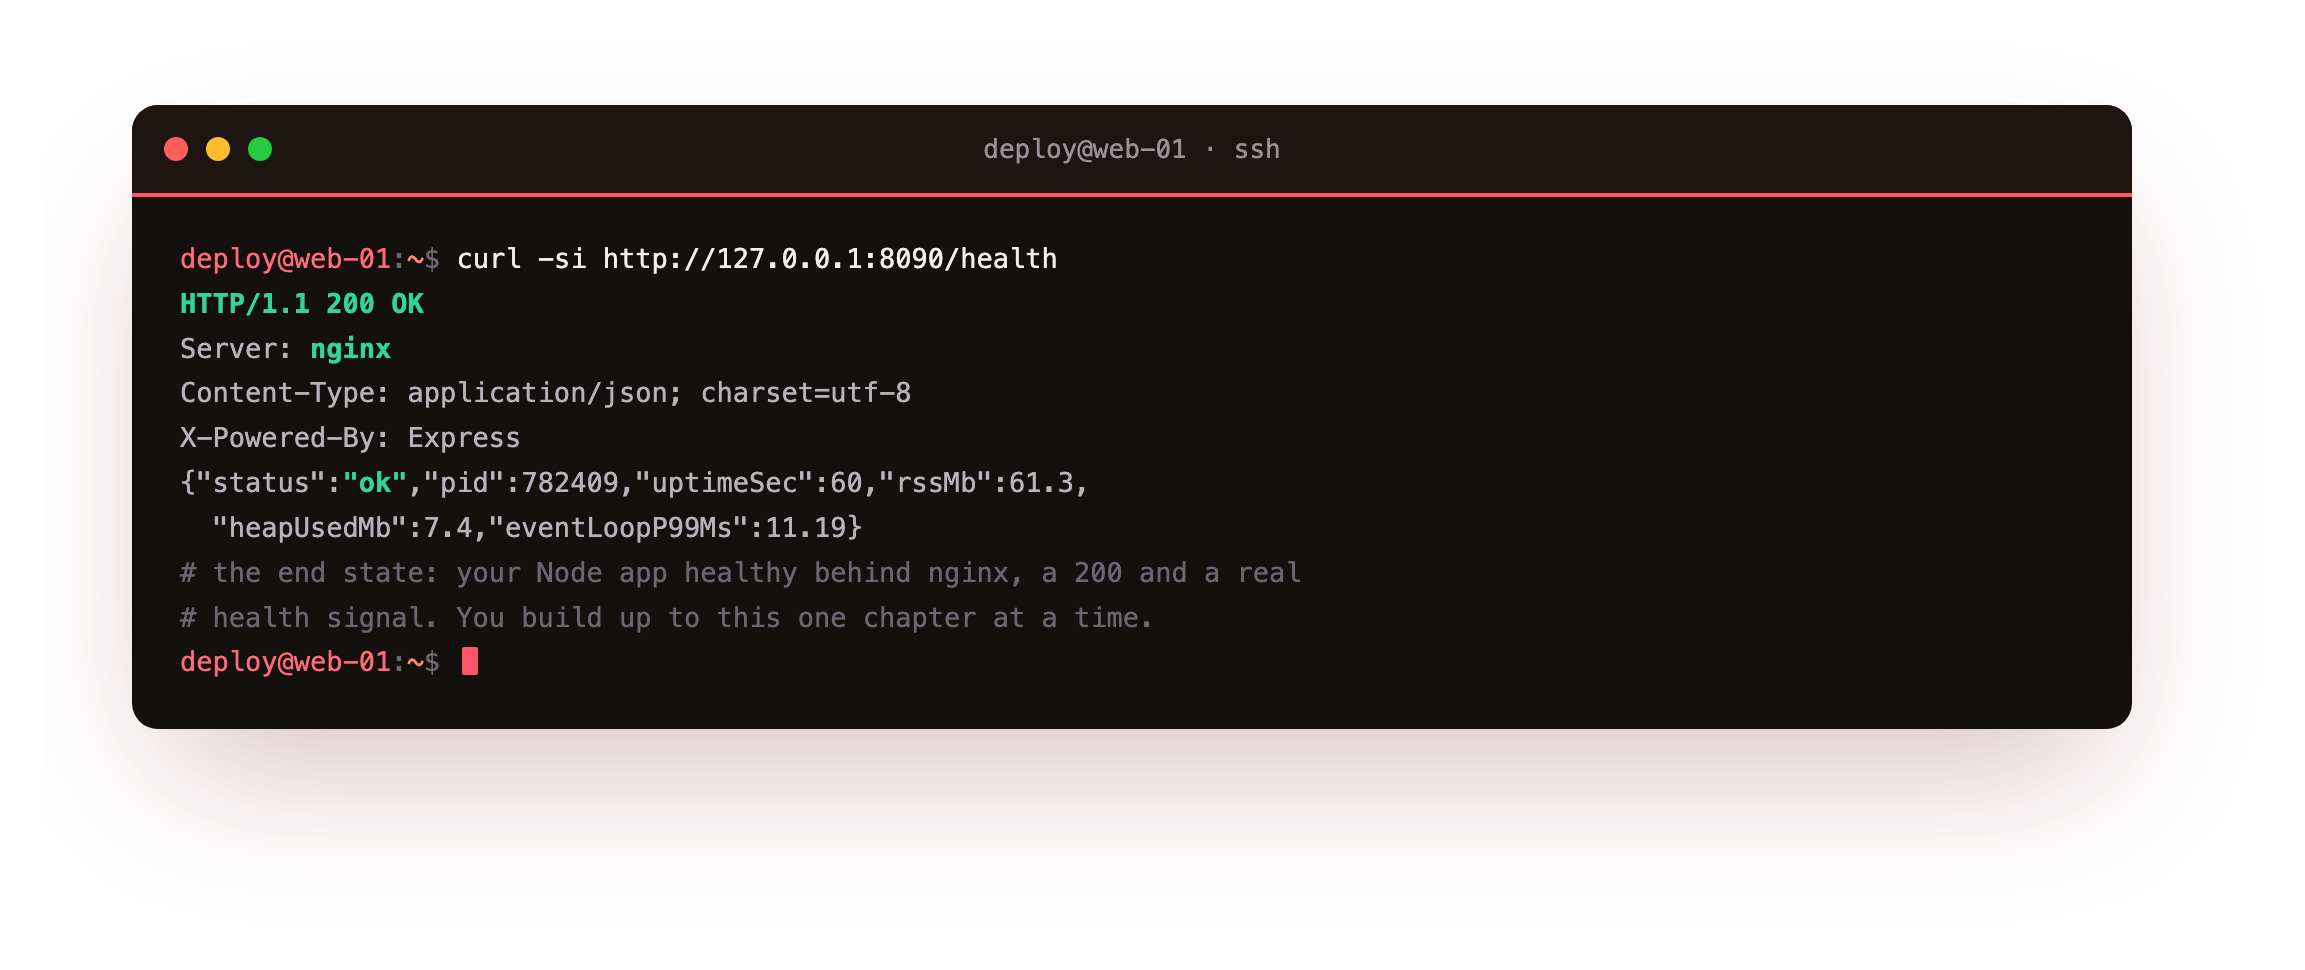
The HTTP/1.1 200 OK and Server: nginx mean the request reached your app through the proxy, not by hitting the runtime directly. The JSON body is the health signal you build in the last chapter: a status, the process id, uptime, resident memory, and the event-loop delay that tells you the app is actually keeping up. You assemble this one chapter at a time, and it all starts from a bare box.
Who this is for
This guide is for a developer whose app already works on their laptop with node server.js, but dies the moment the terminal closes. You want it to run like a real service instead: reachable over the internet, restarting on a crash, surviving a reboot, and shipping new code without an outage. You do not need to be a systems person. Each command appears in full, and a checkpoint after every step lets you confirm the result before you go on.
The one thing you do need is a box with a public IP that stays on, because a service has to be reachable when your laptop is asleep. A slice is exactly that fixed point, and from here this chapter builds on one from an empty install.
Install the Node.js LTS on a bare slice
On a fresh slice Node is either missing or the version Ubuntu ships is already behind the current lines, and language features and security fixes land in the newer releases. NodeSource publishes an apt repository for each active release line, so you add it, then install the runtime the normal way. Here the target is the 22.x line, the active long-term-support release.
curl -fsSL https://deb.nodesource.com/setup_22.x | sudo -E bash -
sudo apt install -y nodejs
node -v
npm -v
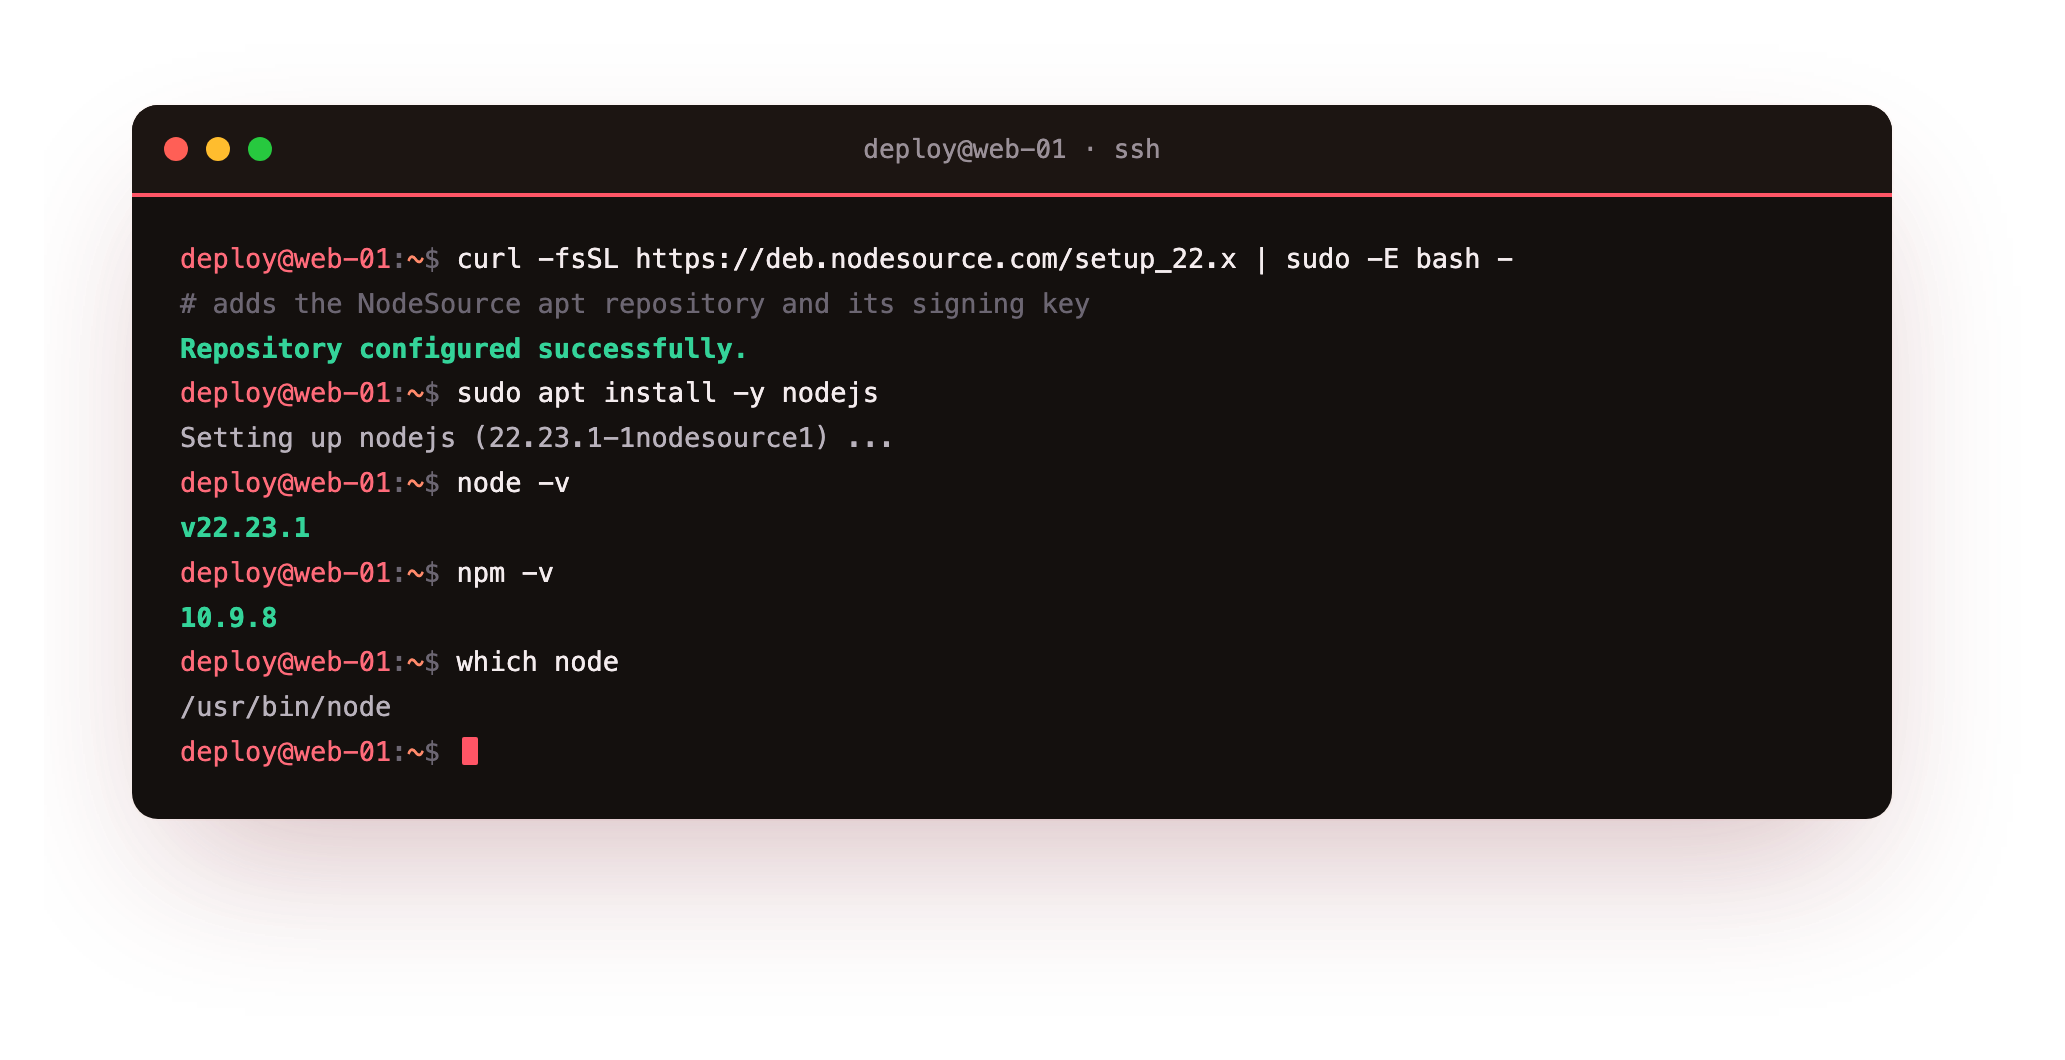
Reading the version back from node -v, rather than trusting the package name, confirms the runtime that will actually execute your code. On this slice that reports v22.23.1, with npm 10.9.8 alongside it, and one binary now lives at /usr/bin/node. There is no application server to configure and no module to enable, which is part of why Node fits a small slice well.
Run node -v and npm -v. You should see v22.23.1 and 10.9.8 (or a newer 22.x line). If node is not found, the install did not finish, so run it again before continuing.
Write and run your first Node.js app
A real service is more than a hello line: it answers a JSON API and serves a page from one process. Create a working directory, start a package file, add Express, and write the service below.
mkdir -p /srv/shopapp && cd /srv/shopapp
npm init -y
npm install express
const express = require('express');
const app = express();
const PORT = parseInt(process.env.PORT || '3000', 10);
const HOST = process.env.HOST || '127.0.0.1';

app.get('/api/status', (req, res) => {
  res.json({ app: 'shopapp', env: process.env.NODE_ENV || 'development', pid: process.pid, node: process.versions.node });
});
app.get('/', (req, res) => res.type('html').send(PAGE)); // PAGE is a small status page, omitted here

app.listen(PORT, HOST, () => console.log(`shopapp listening on ${HOST}:${PORT}`));
Two lines carry the whole chapter. The port comes from process.env.PORT, so the same code runs on any port a later chapter hands it. The listen call names HOST as 127.0.0.1, which is the line that keeps the app off the public interface. Start it and ask it a question from the same box.
node server.js
curl http://127.0.0.1:3000/api/status
curl -I http://127.0.0.1:3000/
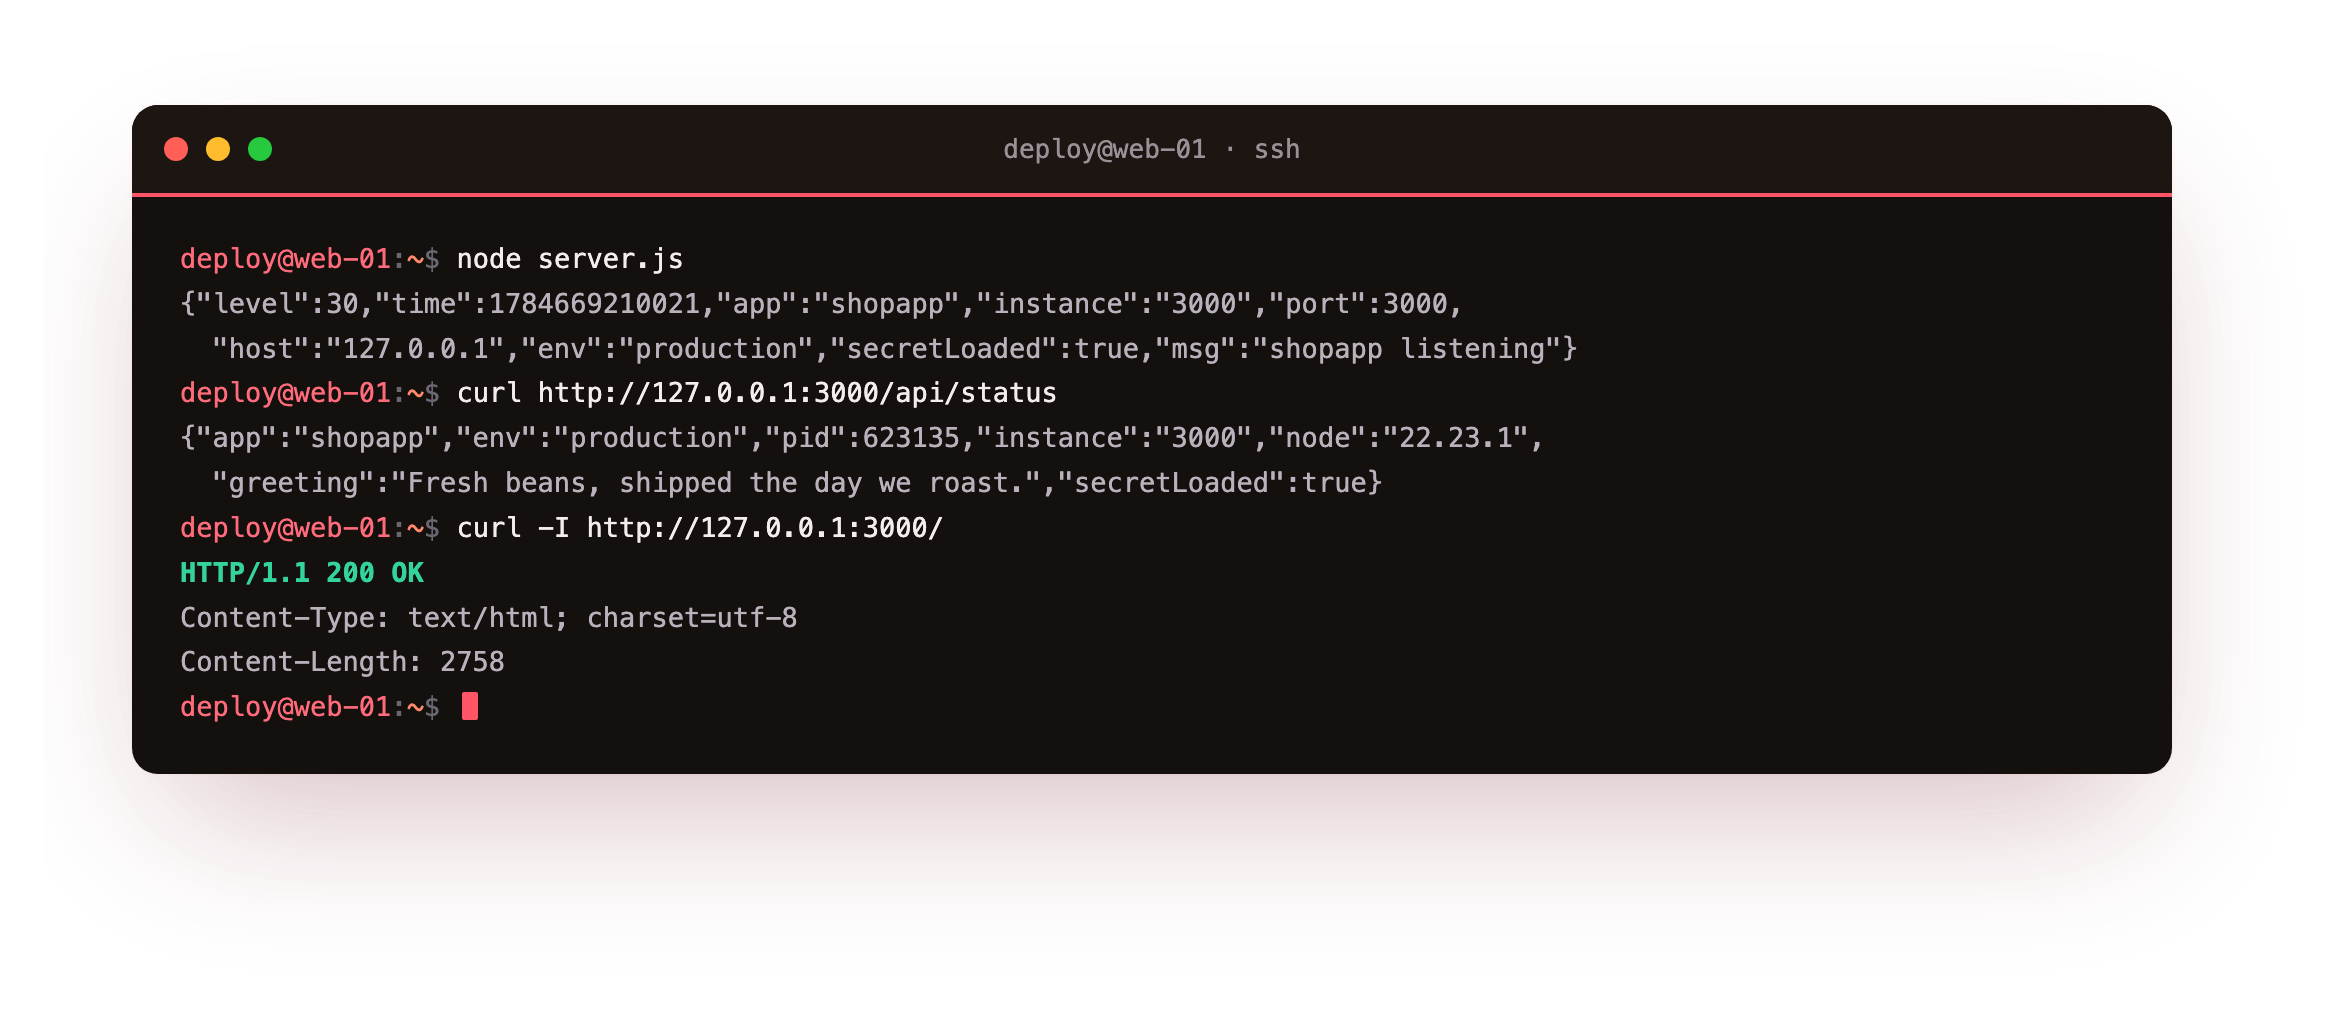
The status route returns a small JSON object with the process id, the environment, and the Node version, and the page returns 200 OK with a real Content-Length. This is a working service. It is not yet a production service, because it dies the moment you close the shell, which is the job of the next chapter.
curl http://127.0.0.1:3000/api/status should return JSON with a pid and "node":"22.23.1". If curl reports a refused connection, the app is not running, so start node server.js and try again.
Put nginx in front and see it live
Now the payoff. Check what the process is actually listening on, then reach it the way the public will: through nginx. The socket should show 127.0.0.1, not 0.0.0.0, which would mean the app was exposed to the open internet with nothing guarding it.
sudo ss -tlnp | grep node
curl -I http://127.0.0.1:8090/
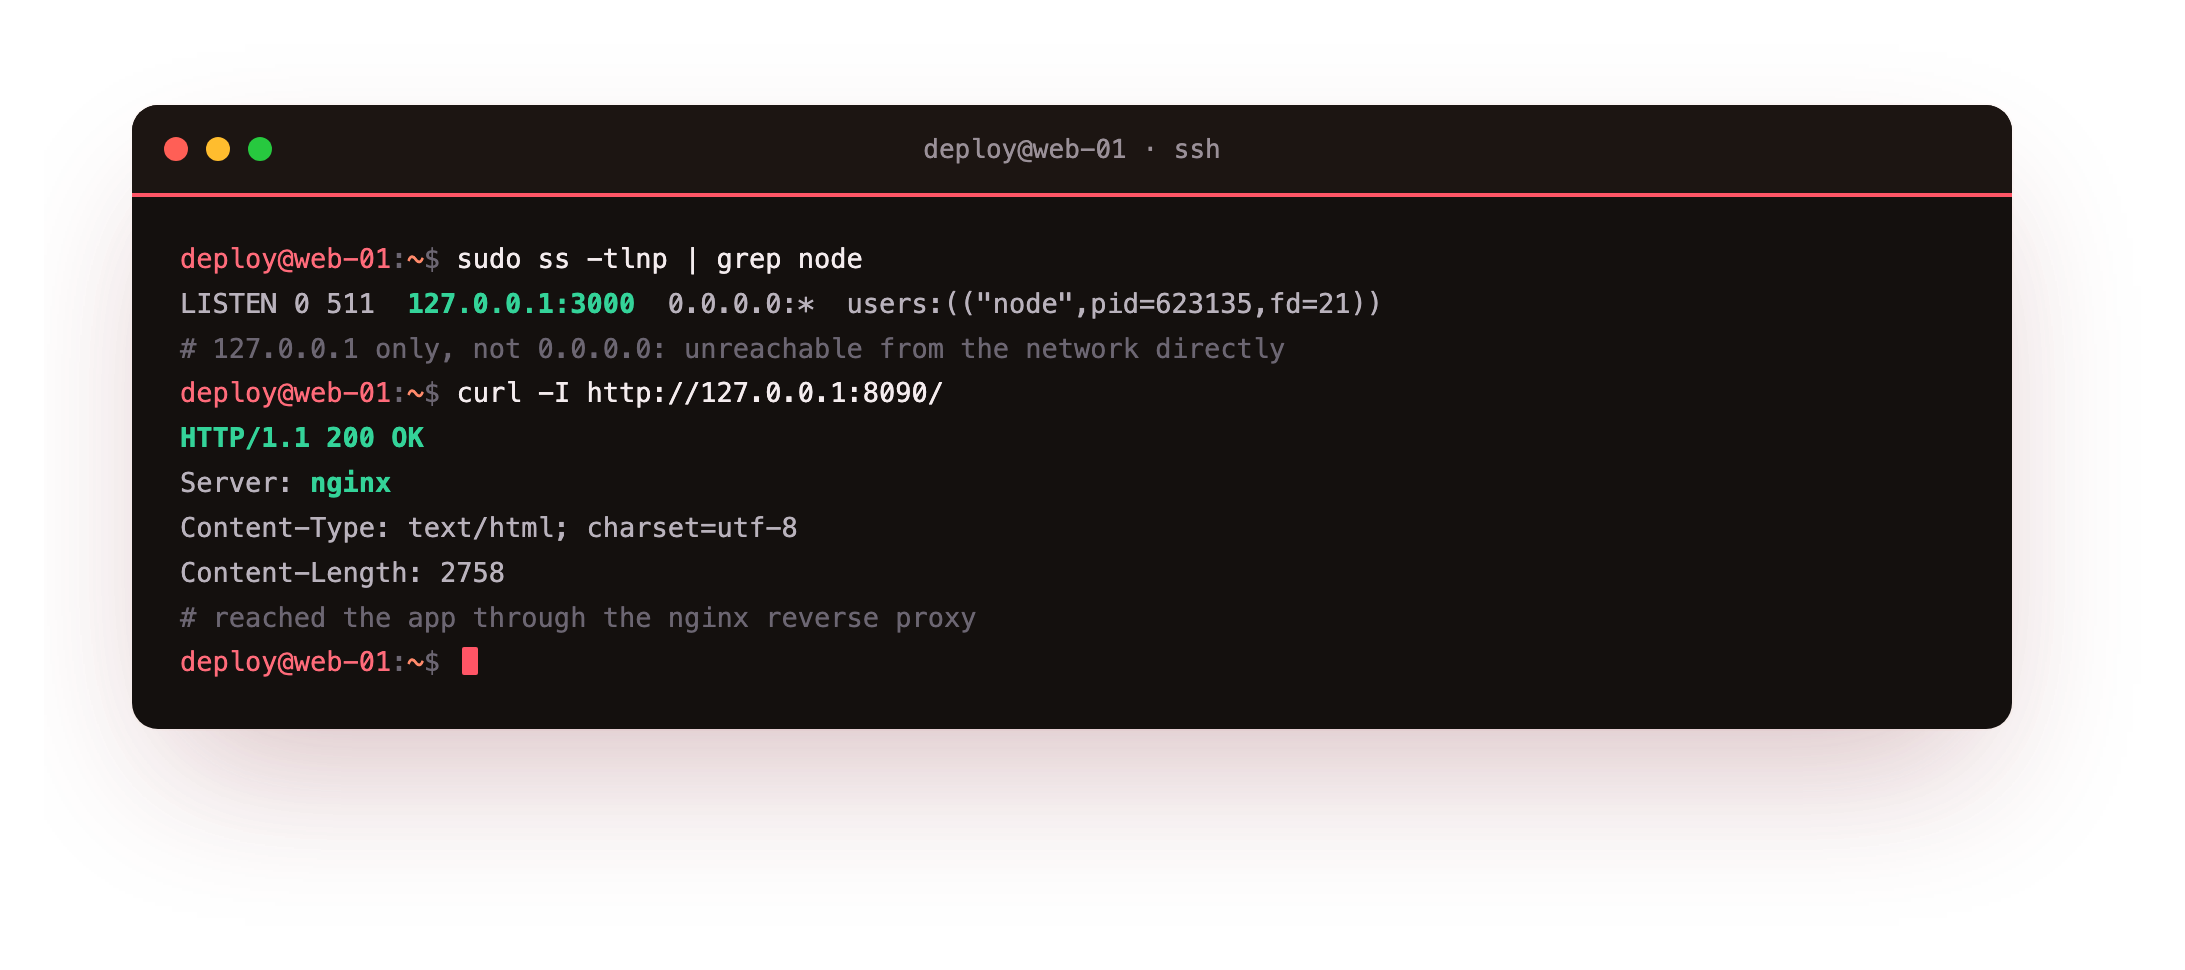
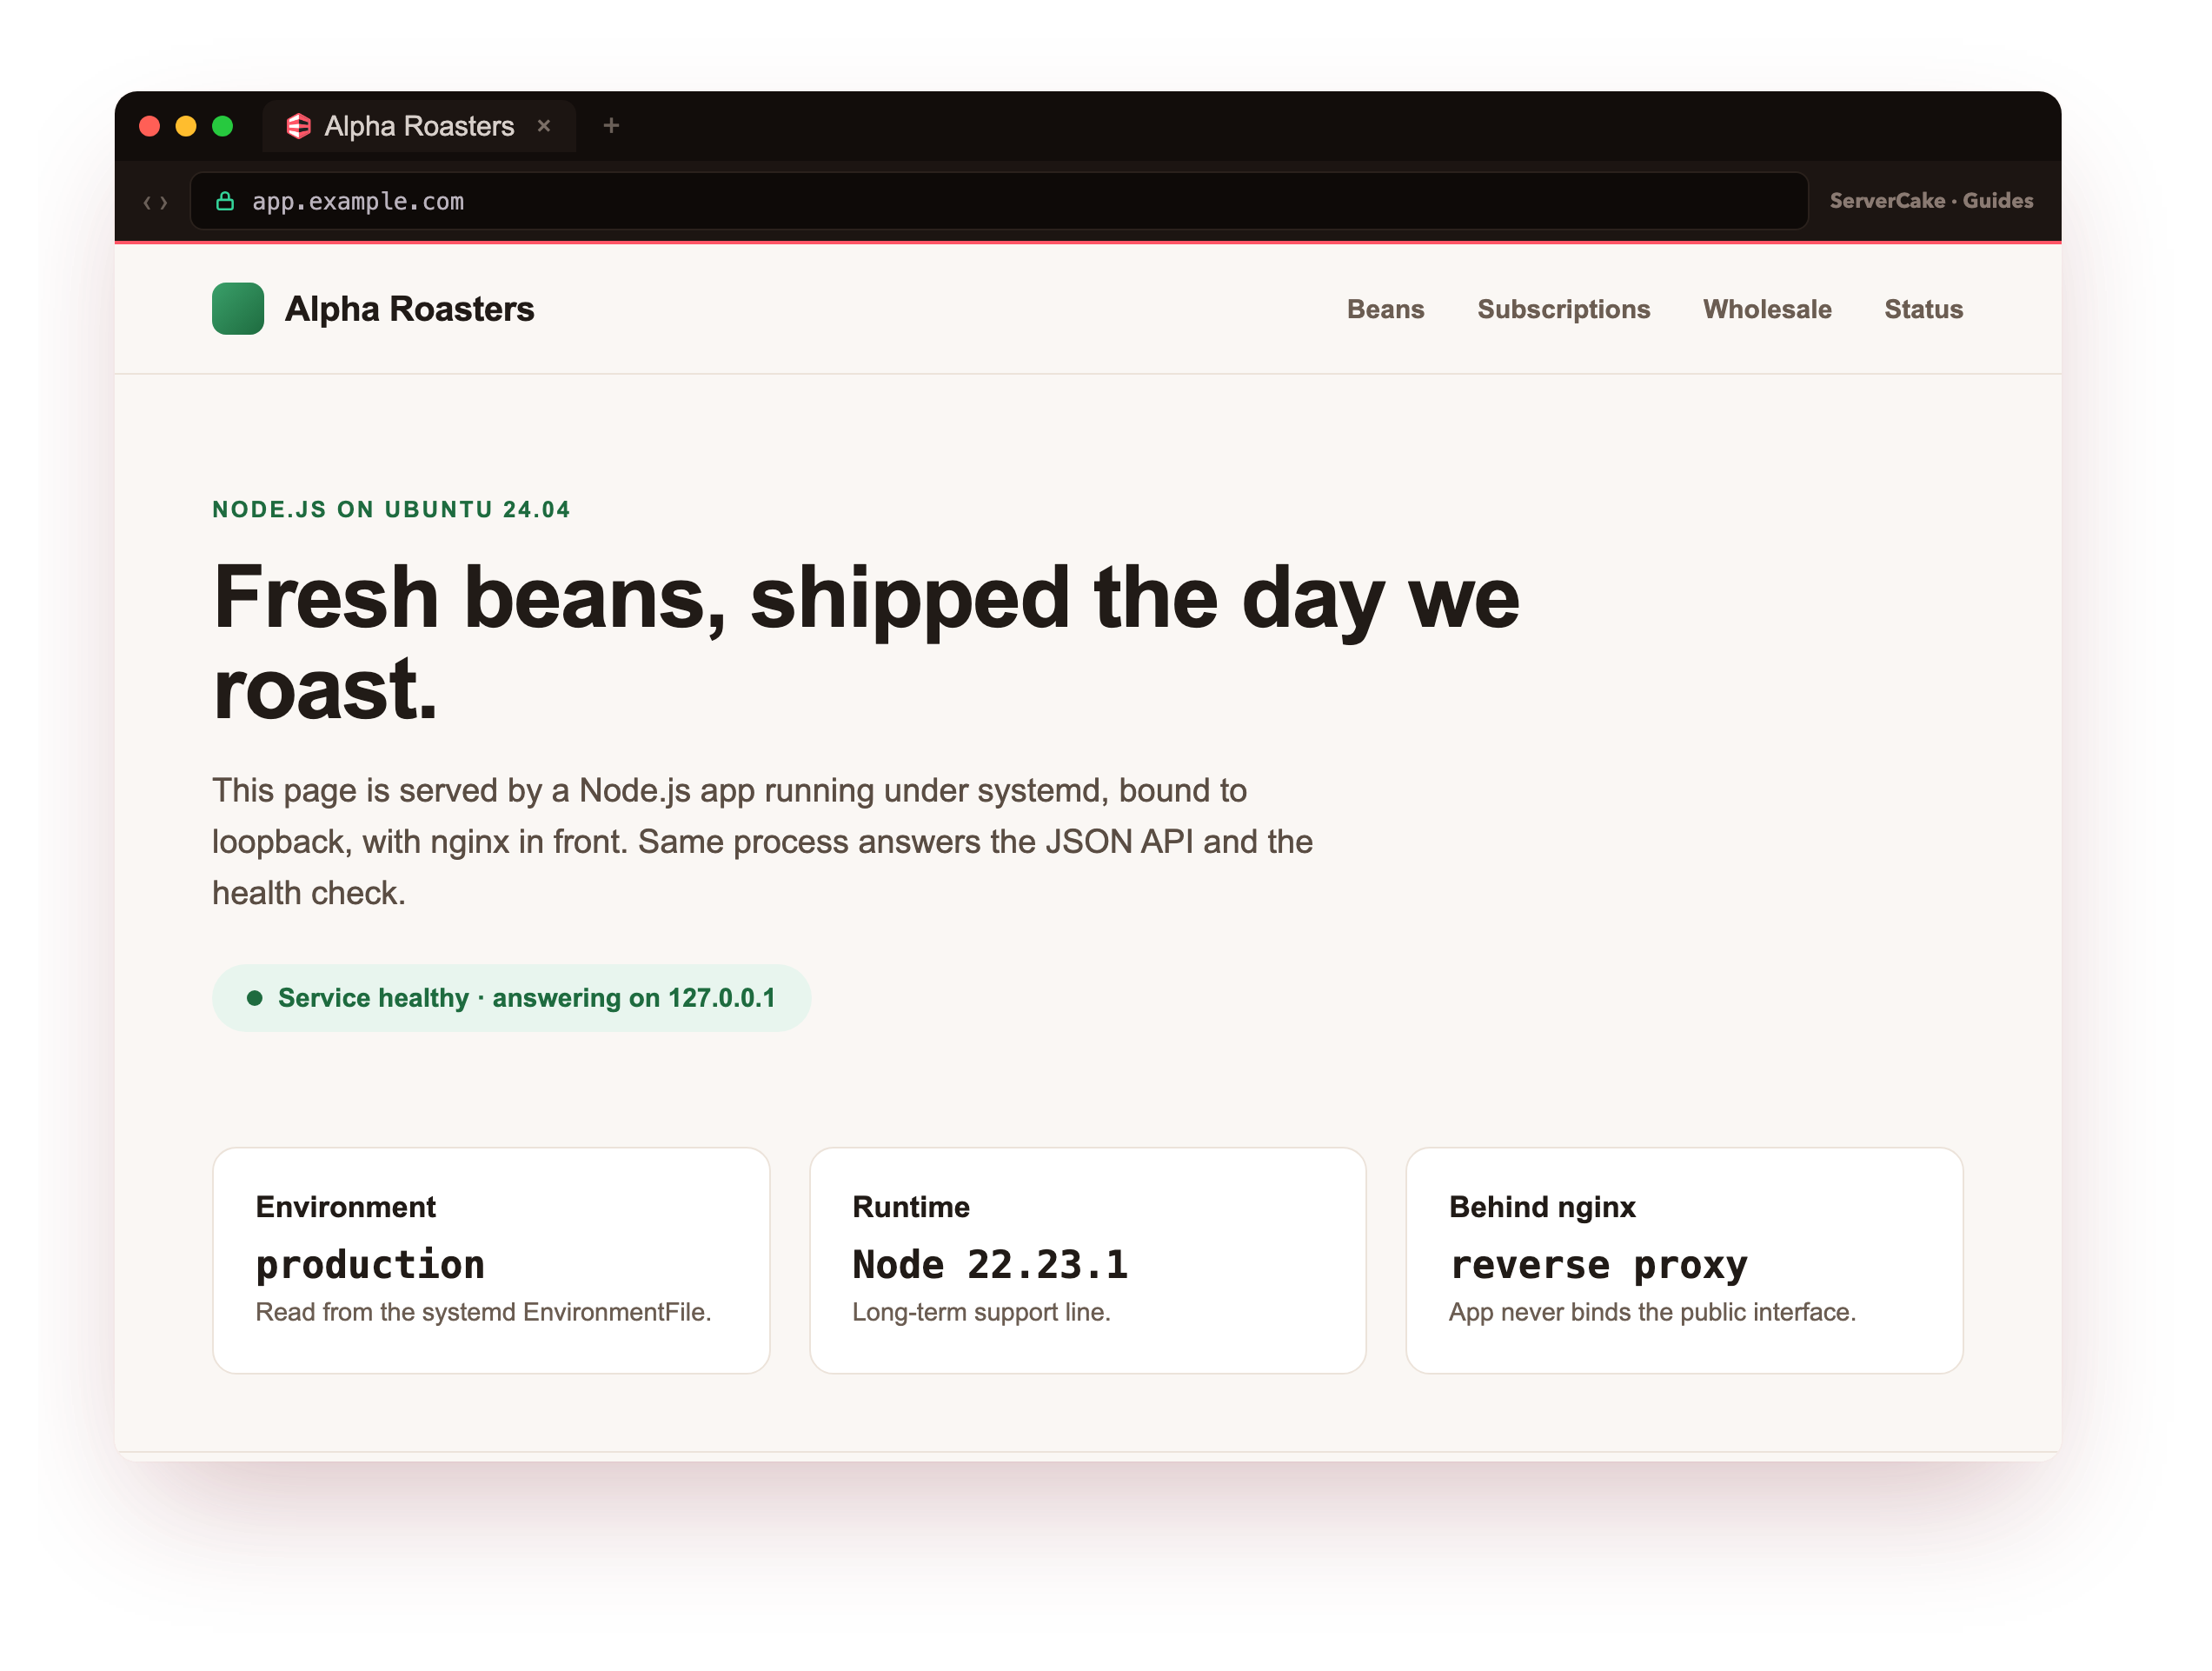
The listener is on loopback only. The second request goes through an nginx server block that proxies to 127.0.0.1:3000, and the Server: nginx header confirms it reached the app through the proxy. The nginx side is a short location block:
location / {
    proxy_pass http://127.0.0.1:3000;
    proxy_set_header Host $host;
    proxy_set_header X-Forwarded-For $proxy_add_x_forwarded_for;
    proxy_set_header X-Forwarded-Proto $scheme;
}
Now open the slice in a browser, by domain if you have one pointed at it, and the same app serves its HTML page over the public internet. That page, served by your own Node process on loopback with nginx terminating the connection in front of it, is the from-zero milestone of this chapter.
The app's page loading in your browser, and curl -I http://127.0.0.1:8090/ returning 200 with a Server: nginx header, together prove the shape you want: the app on loopback, nginx facing the network. Everything after this keeps that app alive and makes it production-grade.
Going further: why the app never binds the public interface
You do not have to take the loopback rule on faith. The ss output above is the proof: the socket is bound to 127.0.0.1, so a process on another machine cannot connect to the app directly at all. It has to come through nginx, which owns ports 80 and 443.
That split is the whole point. nginx terminates TLS, adds security headers, rate-limits abusive clients, and writes access logs, then forwards a clean request inward to 127.0.0.1:3000. Bind the app straight to a public port and you skip every one of those controls and put an application runtime on the open internet.
Loopback plus a reverse proxy is the default for good reason, and it costs one word in the listen call. The rest of this series assumes that shape: the app on loopback, nginx in front, systemd keeping the app alive.
Frequently asked questions
Why not use the Node.js version that comes with Ubuntu?
The version in the base repository is packaged when the Ubuntu release is cut and then held for stability, so it drifts behind the current supported lines, and it can arrive without npm. NodeSource tracks each active release line and ships security updates through apt. For a server you keep for a year or more, a supported LTS line is the sounder starting point, and it is one repository plus one apt install.
Should I use nvm instead of NodeSource on a server?
nvm is built for a developer laptop where you switch versions per project, and it installs into one user's home directory. On a server the runtime is shared infrastructure, so a system install at a fixed path is easier for a service to reference and for a second admin to find. Use nvm locally and a system package on the box.
Do I need Express, or is the built-in http module enough?
The built-in http module can serve requests, and for a single endpoint it is fine. Express adds routing, middleware, and body parsing that you would otherwise write yourself, which keeps a growing app readable. It is a thin layer, so the habits here carry over whether you use Express, Fastify, or plain http.
What port should the app listen on?
Any free high port on loopback works, and 3000 is a common default. The number does not matter because nothing external connects to it directly; nginx does. Read the port from an environment variable so the same build can run on 3000, or on two ports at once when you scale it across instances later in this series.
Recap and what is next
You have seen the destination, a healthy app answering through nginx, installed the Node.js 22 LTS on a bare Ubuntu 24.04 slice, run a small Express service, and reached it through nginx and loaded it live in a browser. That is a real app, reachable the right way, built from an empty box.
It has one flaw: it only runs while your shell is open. The next chapter fixes that by handing the process to systemd, so it starts on boot, restarts within seconds if it crashes, and writes its logs where the system keeps them.
A Node service needs a box with a public IP that stays on, and that is what a slice is. Launch a slice and follow along from the bare install to an app of your own, live behind nginx.