sshd hardening, and the one rule that protects you
sshd hardening is the set of daemon settings that turn off password login, block the root account, cap retries, and move the service off its default port. Done right, it delivers the destination from chapter one: a password attempt is refused while your key still works, so no one guesses their way in.
Done carelessly on the daemon you are connected through, though, a single bad line locks you out of the box. This chapter gets the payoff without the risk by doing every change on a second, throwaway sshd on port 2222, so your live session on port 22 is never at stake. It runs on Ubuntu 24.04 with OpenSSH 9.6.
- The payoff:
PasswordAuthentication nomakes a password login returnPermission denied (publickey), while a key login on the same port still succeeds. - Test every config with
sshd -t -fbefore anything reads it; a syntax error can otherwise strand you. PermitRootLogin noandAllowUsersremove the account scanners attack most and name exactly who may log in.MaxAuthTriescaps attempts per connection, and the whole change rides on a second daemon so your live session is never at risk.
- Your working key from chapter one installed for the demo account, because key login has to succeed before you dare turn passwords off.
- Root or sudo to write a config under
/etc/sshand to start a secondsshd, kept entirely separate from the daemon on port 22. - Two terminals open at once: the session you arrived on stays untouched, and a second one tests each change so a failed login never traps you.
- A spare high port, here 2222 bound to loopback, plus a throwaway host key for the demo daemon, so nothing you do reaches the real service.
Validate before anything runs
A second daemon needs its own config file, its own host key and a spare port. Before starting it, check the file for mistakes. sshd -t parses a config and exits silently when it is clean, or names the bad line when it is not. This is the gate you run after every single edit.
sudo sshd -t -f /etc/ssh/sshd_demo_config
sudo sshd -T -f /etc/ssh/sshd_demo_config | grep -E 'port|permitroot|password|maxauth|allowusers'
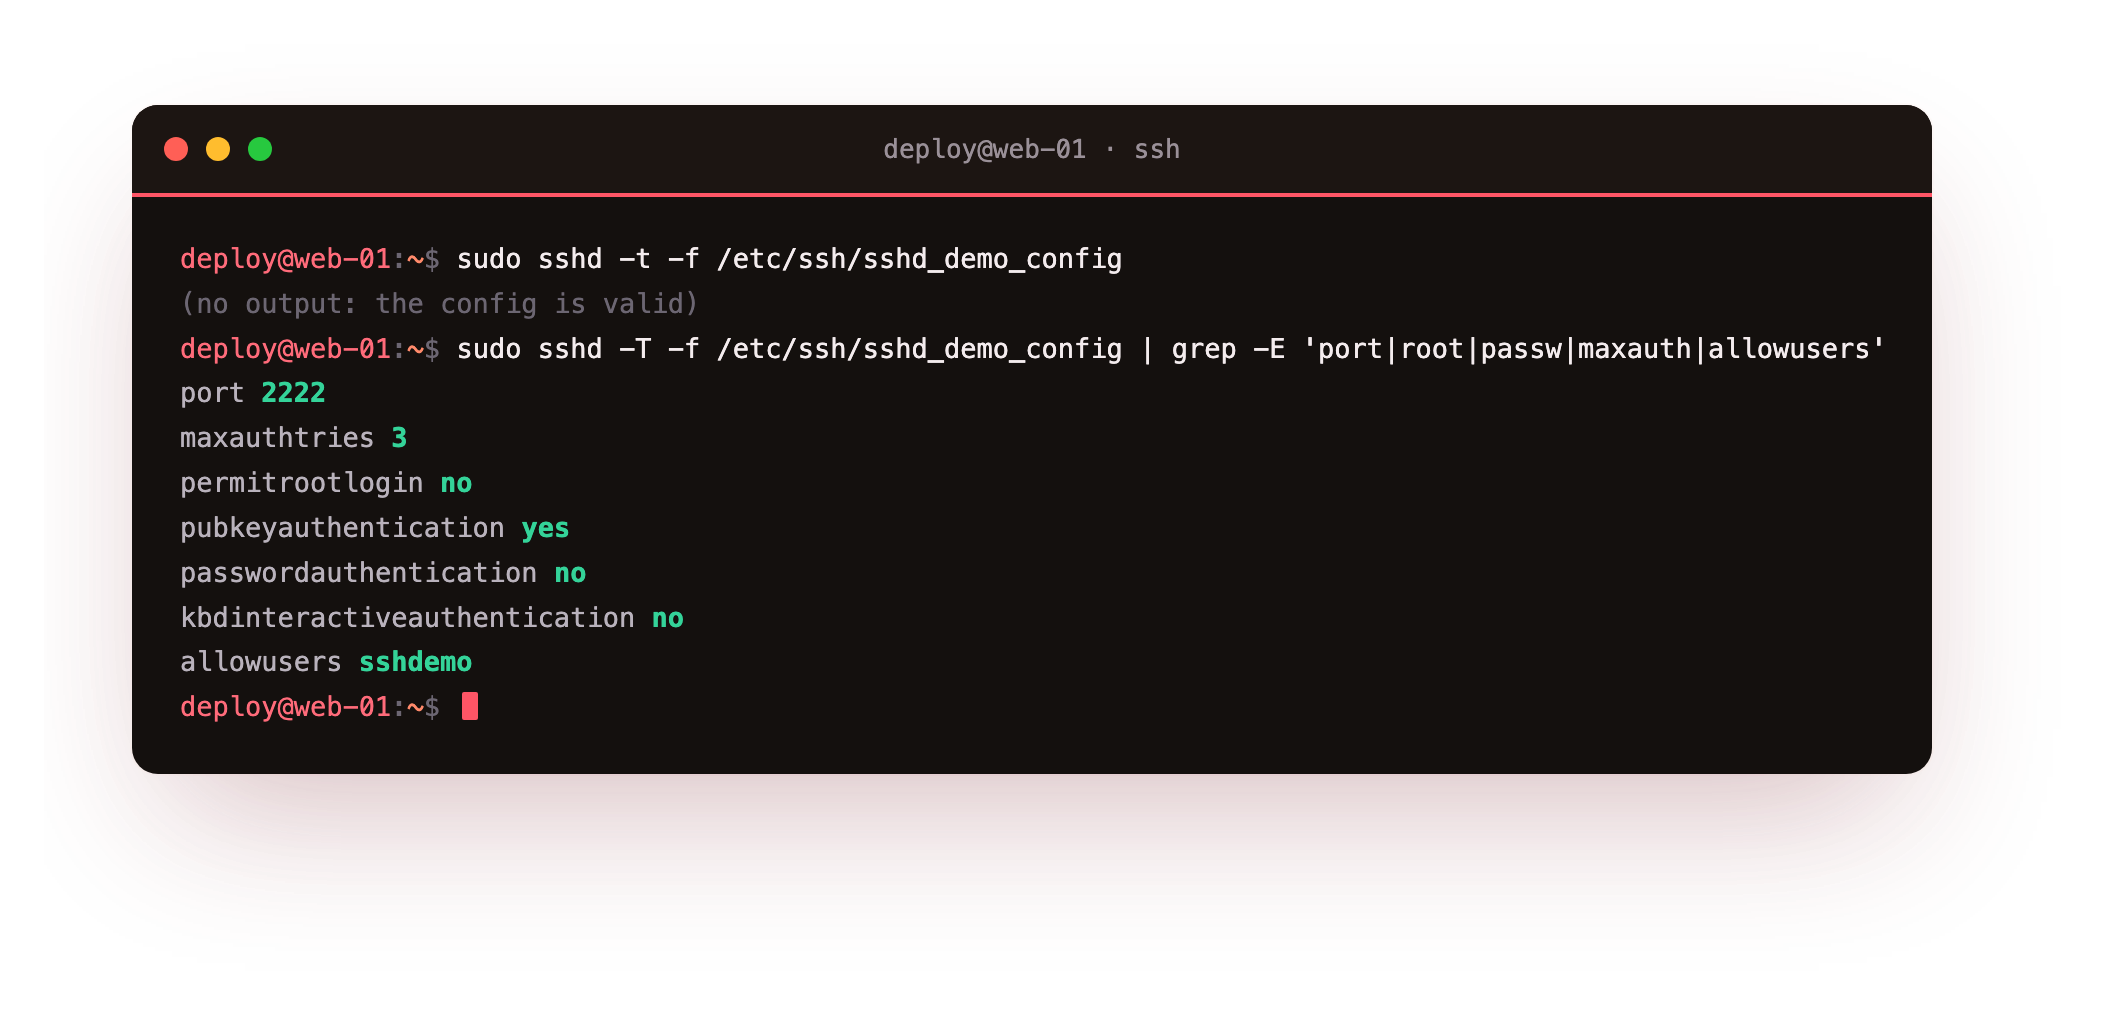
The -t line is the syntax check. The -T line prints the fully resolved settings the daemon would use, which is the honest way to confirm a directive took effect rather than assuming it did. The grep pulls out the lines that matter: port 2222, root login off, passwords off, retries capped at three, and a single allowed user.
Run the sshd -t -f line and confirm it prints nothing at all, which is what success looks like. If it names a line number, fix that line and rerun before you start the daemon. Never start or reload an sshd whose config has not passed -t; that single habit is what keeps a typo from becoming a lockout.
The payoff: passwords refused, key still works
Three directives carry most of the benefit. PasswordAuthentication no refuses every password attempt, so guessing stops working. PermitRootLogin no means an attacker cannot aim straight at the highest-privilege account. AllowUsers names the exact accounts that may log in, and everyone else is refused before authentication even starts.
With the hardened daemon running, prove it by trying to break in. A forced password attempt is turned away, a valid key still works, and offering too many keys trips the retry cap.
ssh -o PreferredAuthentications=password -o PubkeyAuthentication=no -p 2222 sshdemo@web-01
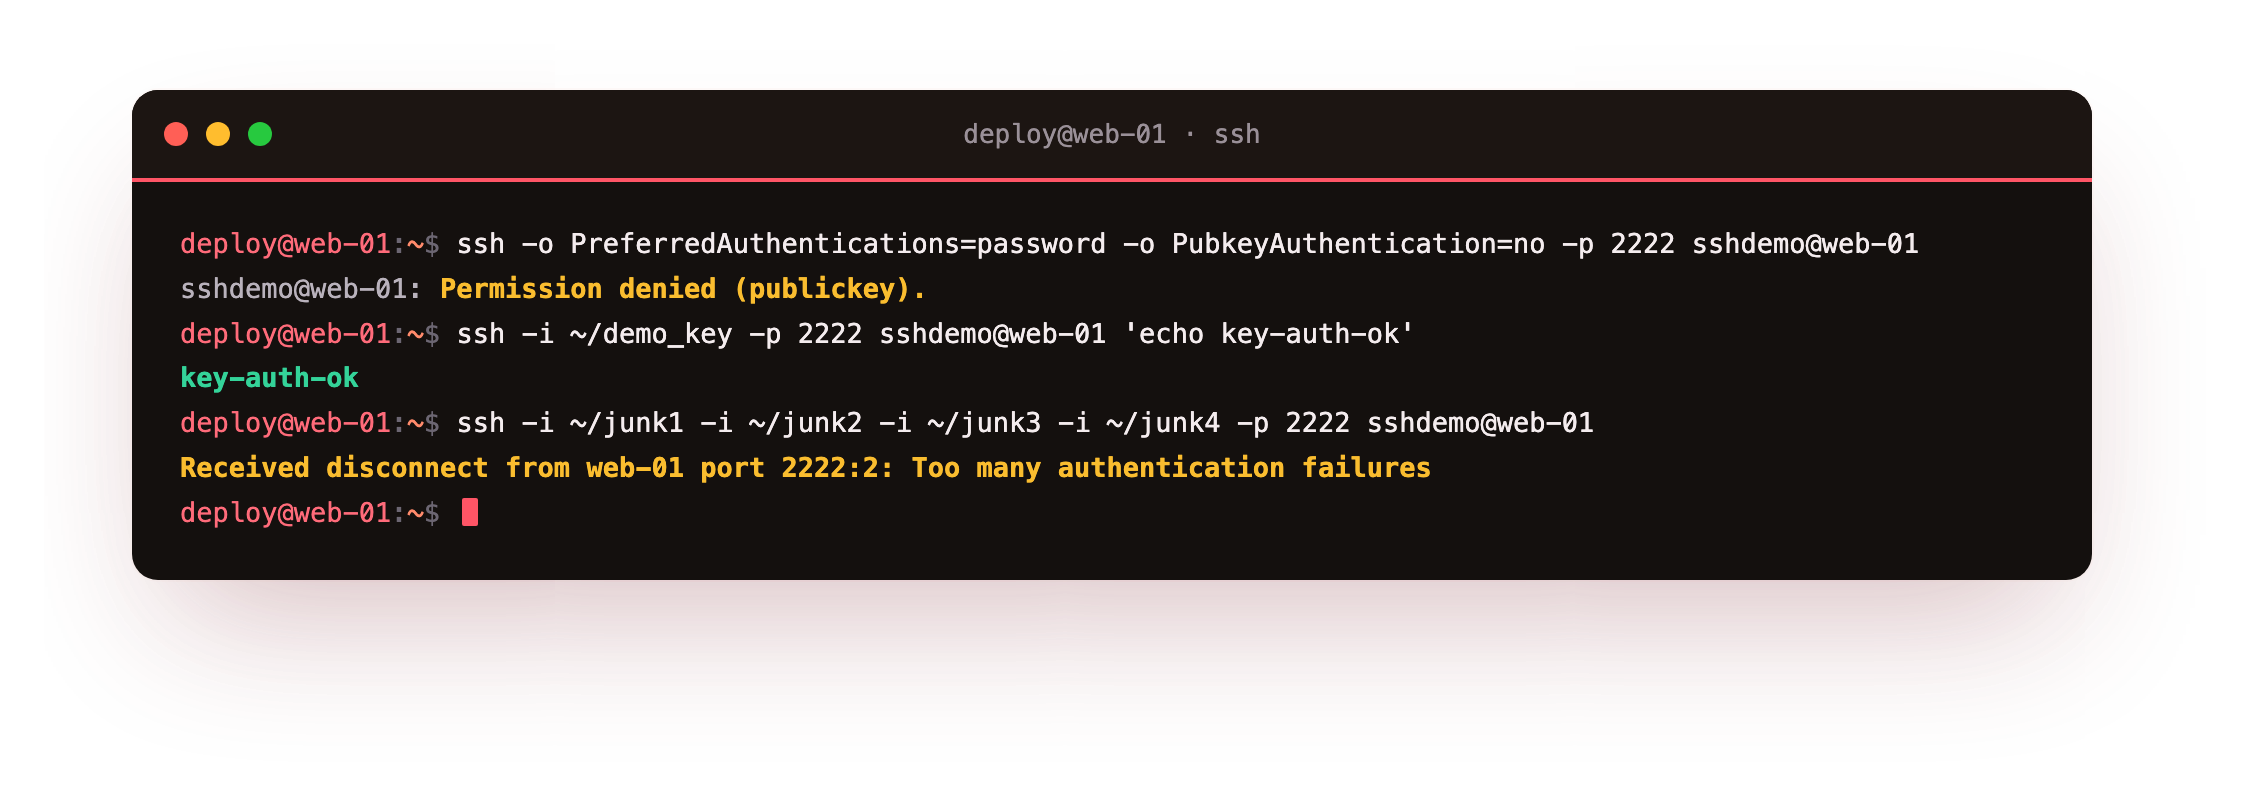
The server answers Permission denied (publickey), because passwords are off and only a key is accepted. That is the moment the whole series builds to: there is no password to guess, so the scanner hammering your logs gets nowhere. A normal key login on the same port succeeds and prints its shell command, so the change locked out guessers without locking out you. Push past MaxAuthTries by offering several unaccepted keys and the connection is dropped with Too many authentication failures, the cap doing its job.
From your second terminal, run the forced-password line above and confirm Permission denied (publickey), then ssh -i ~/demo_key -p 2222 sshdemo@web-01 'echo ok' and confirm ok. Passwords refused and key accepted, on the same daemon, is the proof the hardening worked. Only when you see both should you consider the change safe.
Going further: fail2ban, the port, and the order to apply changes
Moving off port 22 is not real security on its own, but it drops the volume of automated noise sharply, because most scanners only knock on 22. The demo daemon already listens on 2222 through its Port directive. Pair that with fail2ban, which watches the auth log and bans an address after a set number of failures. Ubuntu ships a ready sshd jail; you enable it and check its state.
sudo fail2ban-client status sshd
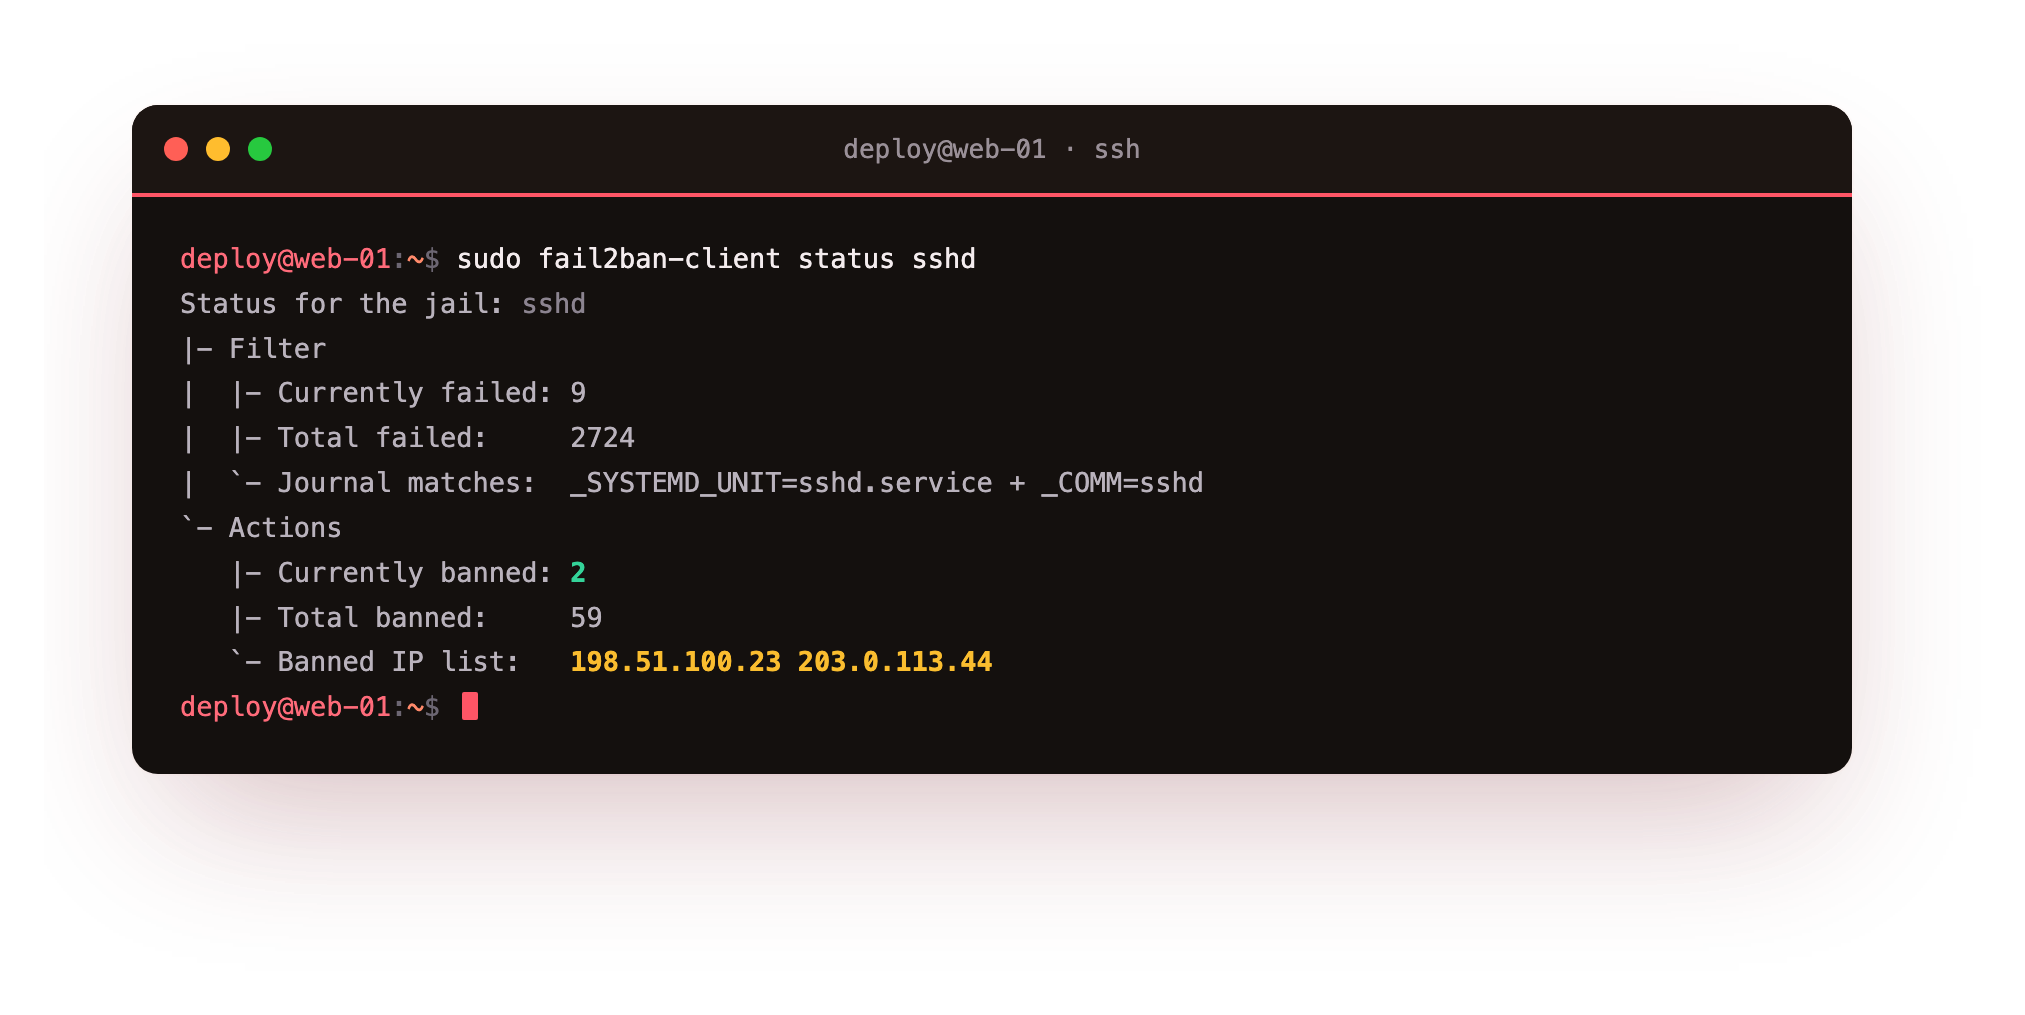
The status shows the filter's failure count and the list of currently banned addresses, each blocked for the jail's ban time. A jail is a filter plus an action: the filter recognises a failed login in the log, and the action drops the address at the firewall. Tune maxretry, findtime and bantime to taste, and keep your own address on the ignoreip list so a fat-fingered login never bans you.
Apply the real changes from safest to riskiest, always on something you can revert. Confirm key login works for every account first, because that is your lifeline once passwords go. Then set PasswordAuthentication no and PermitRootLogin no, validate with sshd -t, and reload. Add AllowUsers and MaxAuthTries next, and only move the port and add fail2ban once the rest is stable. On the real daemon, prefer a drop-in file under /etc/ssh/sshd_config.d/ so a revert is one deletion away.
Frequently asked questions
How do I avoid locking myself out during hardening?
Keep your current session open the whole time, change settings in a revertible drop-in, and open a second terminal to test a fresh login before you close the first. If the new login fails, the still-open session lets you undo the change.
Does moving off port 22 actually help?
It cuts noise, not risk. Blanket scanners target 22, so a different port quiets your logs, but a determined attacker scans all ports. Treat it as log hygiene layered on top of key-only login, not as a control by itself.
What is the difference between AllowUsers and DenyUsers?
AllowUsers is an allow list: only the named accounts may log in and all others are refused. DenyUsers is a block list. An allow list is the tighter default, since a new account is denied until you add it on purpose.
Is fail2ban enough on its own?
No, it is a layer. With passwords disabled there is nothing to brute force, so fail2ban mainly trims log noise and slows scanners. Keep key-only login as the real control and treat the jail as a helper.
What you can do now
You reached the destination on a daemon you could not be locked out of: a password login refused with Permission denied (publickey) while a key login on the same port still worked, retries capped, root and extra accounts shut out. You validated every config with sshd -t before it ran and read the resolved settings back with sshd -T instead of trusting the edit, all on a second sshd so port 22 was never touched.
With the daemon locked down, the same connection can do more than carry a shell. The next chapter puts it to work as a tunnel, reaching a private service and proxying traffic without opening a single firewall port: SSH tunnels and port forwarding.