Build your own Docker image from a Dockerfile
A Docker image is built from a Dockerfile, a short recipe of steps the engine runs top to bottom, each one adding a layer. This chapter builds a Docker image for a small app on Ubuntu 24.04 LTS, reads back the layers with docker history, and then rewrites the Dockerfile as a multi-stage build that drops the final image from 477 MB to under 20 MB. Every size and step below is what the live server reported.
- A Dockerfile is an ordered recipe; each instruction adds a cached layer, so the order of your steps decides rebuild speed.
docker build -t name:tag .turns the recipe into a tagged image you can run or push.docker historyshows every layer and its size, which is how you find the fat in an image.- A multi-stage build keeps the compiler in a throwaway stage and copies only the finished binary out, so the shipped image is a fraction of the size.
The app here is a small service written in Go called cadence, a stand-up board that later reads a counter from Redis. Go suits this chapter because a compiled binary needs a toolchain to build and nothing but itself to run, which is exactly the split a multi-stage build is designed for.
Prerequisites
- An Ubuntu 24.04 LTS server with Docker 29.1.3 and a sudo-capable user.
- A project directory holding your source and the Dockerfile.
- The container basics from the first chapter.
Write the Dockerfile
A first, honest attempt often builds inside the toolchain image and stops there. It works, and it is large, because the finished image carries the entire compiler. Here is the recipe done properly, in two stages.
# syntax=docker/dockerfile:1
FROM golang:1.23-alpine AS build
WORKDIR /src
COPY go.mod ./
COPY app.go ./
RUN CGO_ENABLED=0 go build -ldflags="-s -w" -o /out/cadence .

FROM alpine:3.20
RUN addgroup -S app && adduser -S -G app app
COPY --from=build /out/cadence /usr/local/bin/cadence
USER app
EXPOSE 3000
ENTRYPOINT ["/usr/local/bin/cadence"]
The first stage, named build, pulls the Go toolchain and compiles a static binary. The second stage starts fresh from a small Alpine base, creates a non-root user, and copies only the finished binary across with COPY --from=build. The compiler never reaches the final image. Copying go.mod before the source is deliberate: Docker caches each layer, so dependency steps only re-run when their inputs change.
Build it and read the layers
Build the image and tag it, then ask Docker to describe what it produced.
docker build -t cadence:1.0 .
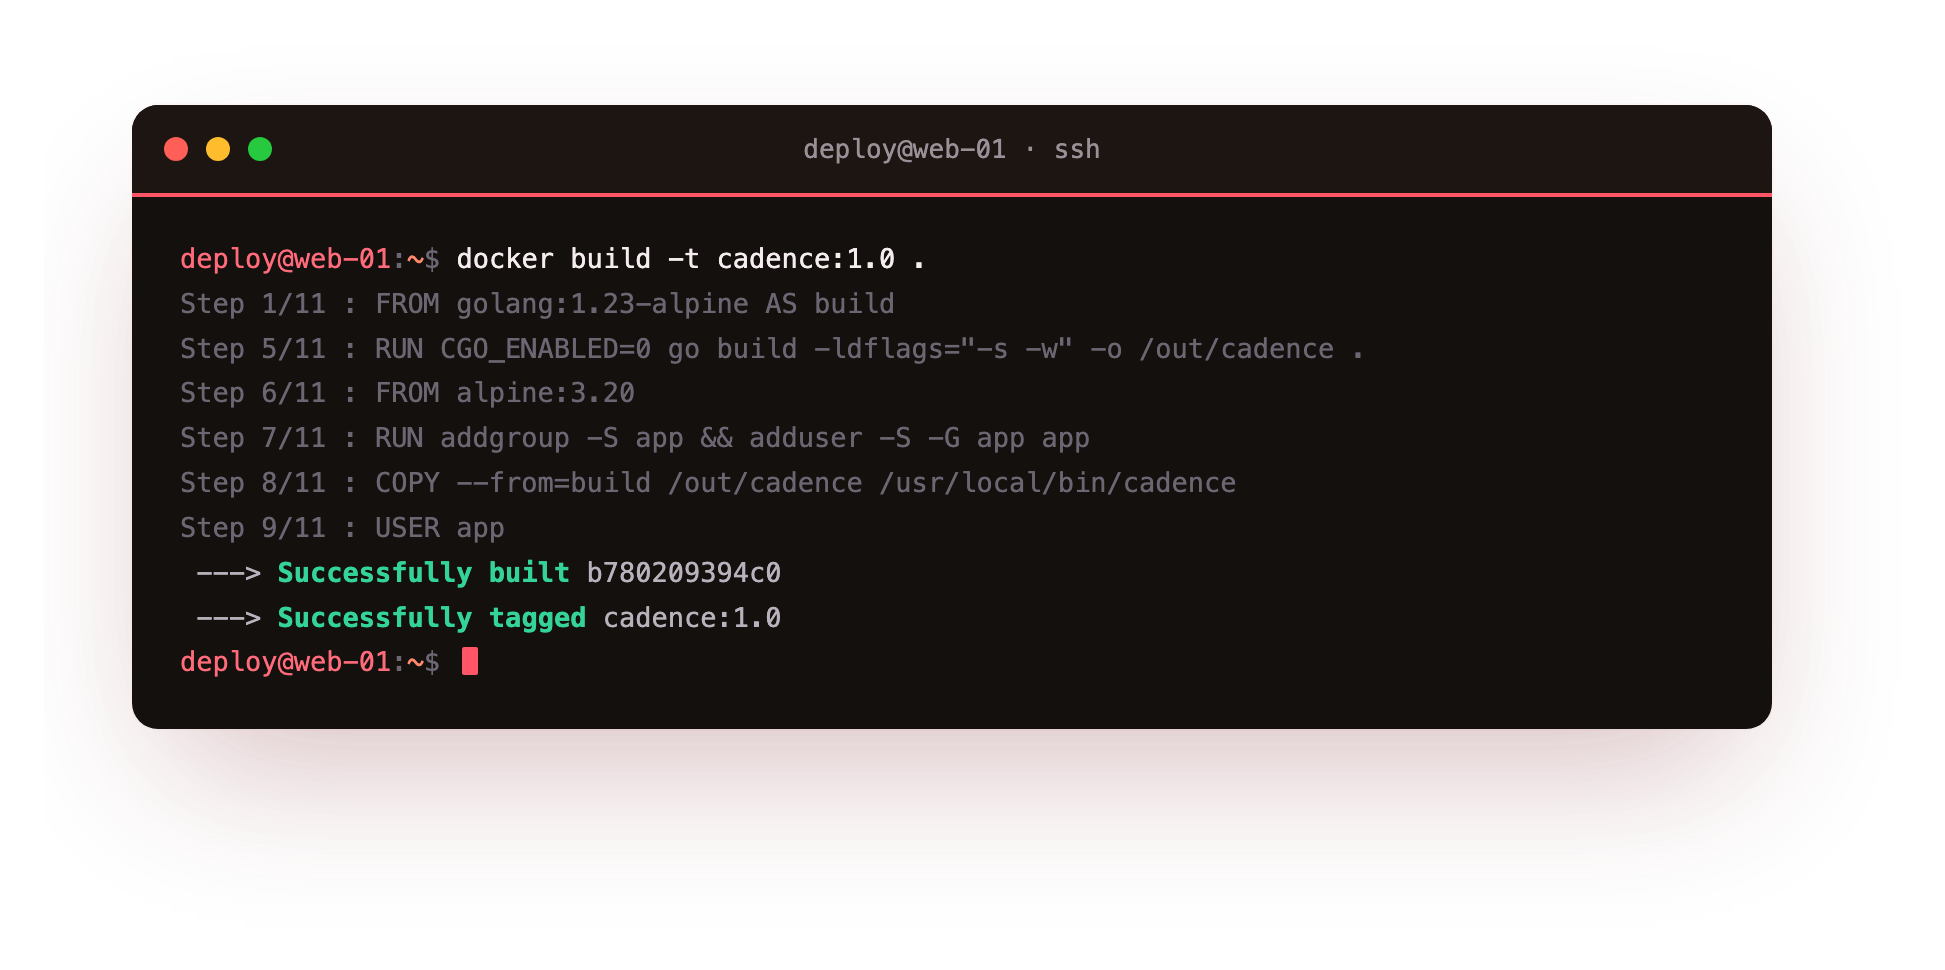
The build runs each instruction in order, reporting the stages and the final image ID. Now read the layers back.
docker history cadence:1.0
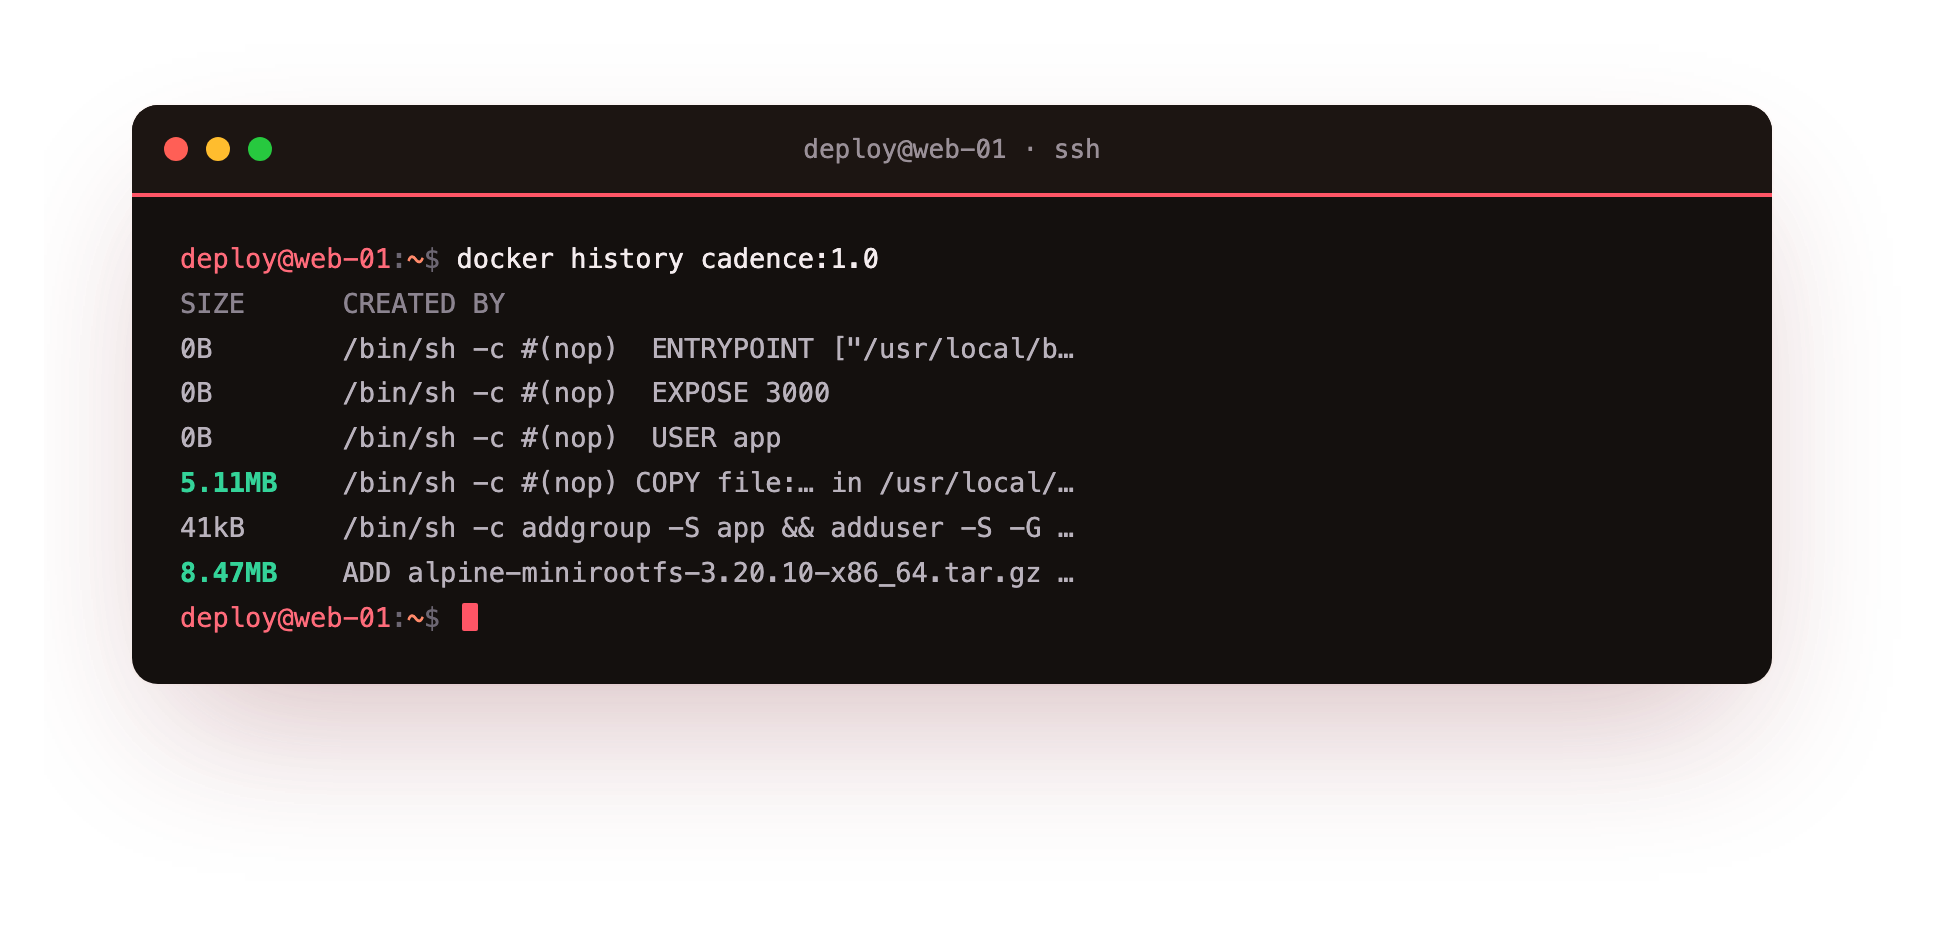
docker history lists every layer newest first, with the instruction that created it and its size. The bulk is the Alpine base and the copied binary; the metadata steps like USER and EXPOSE add zero bytes. This view is how you spot a needlessly large layer, for example a package install that was never cleaned up in the same step.
docker build should end with the image tagged cadence:1.0, and docker history cadence:1.0 should show the base and the binary carrying the size while the metadata steps read 0B. A build stops at the first instruction that fails, so if it errored, read that line, fix it, and build again before moving on.
Prove the multi-stage saving
The saving is easy to see when you build the naive single-stage version alongside it and compare. Build the fat variant, then list both.
docker build -f Dockerfile.fat -t cadence:fat .
docker images cadence
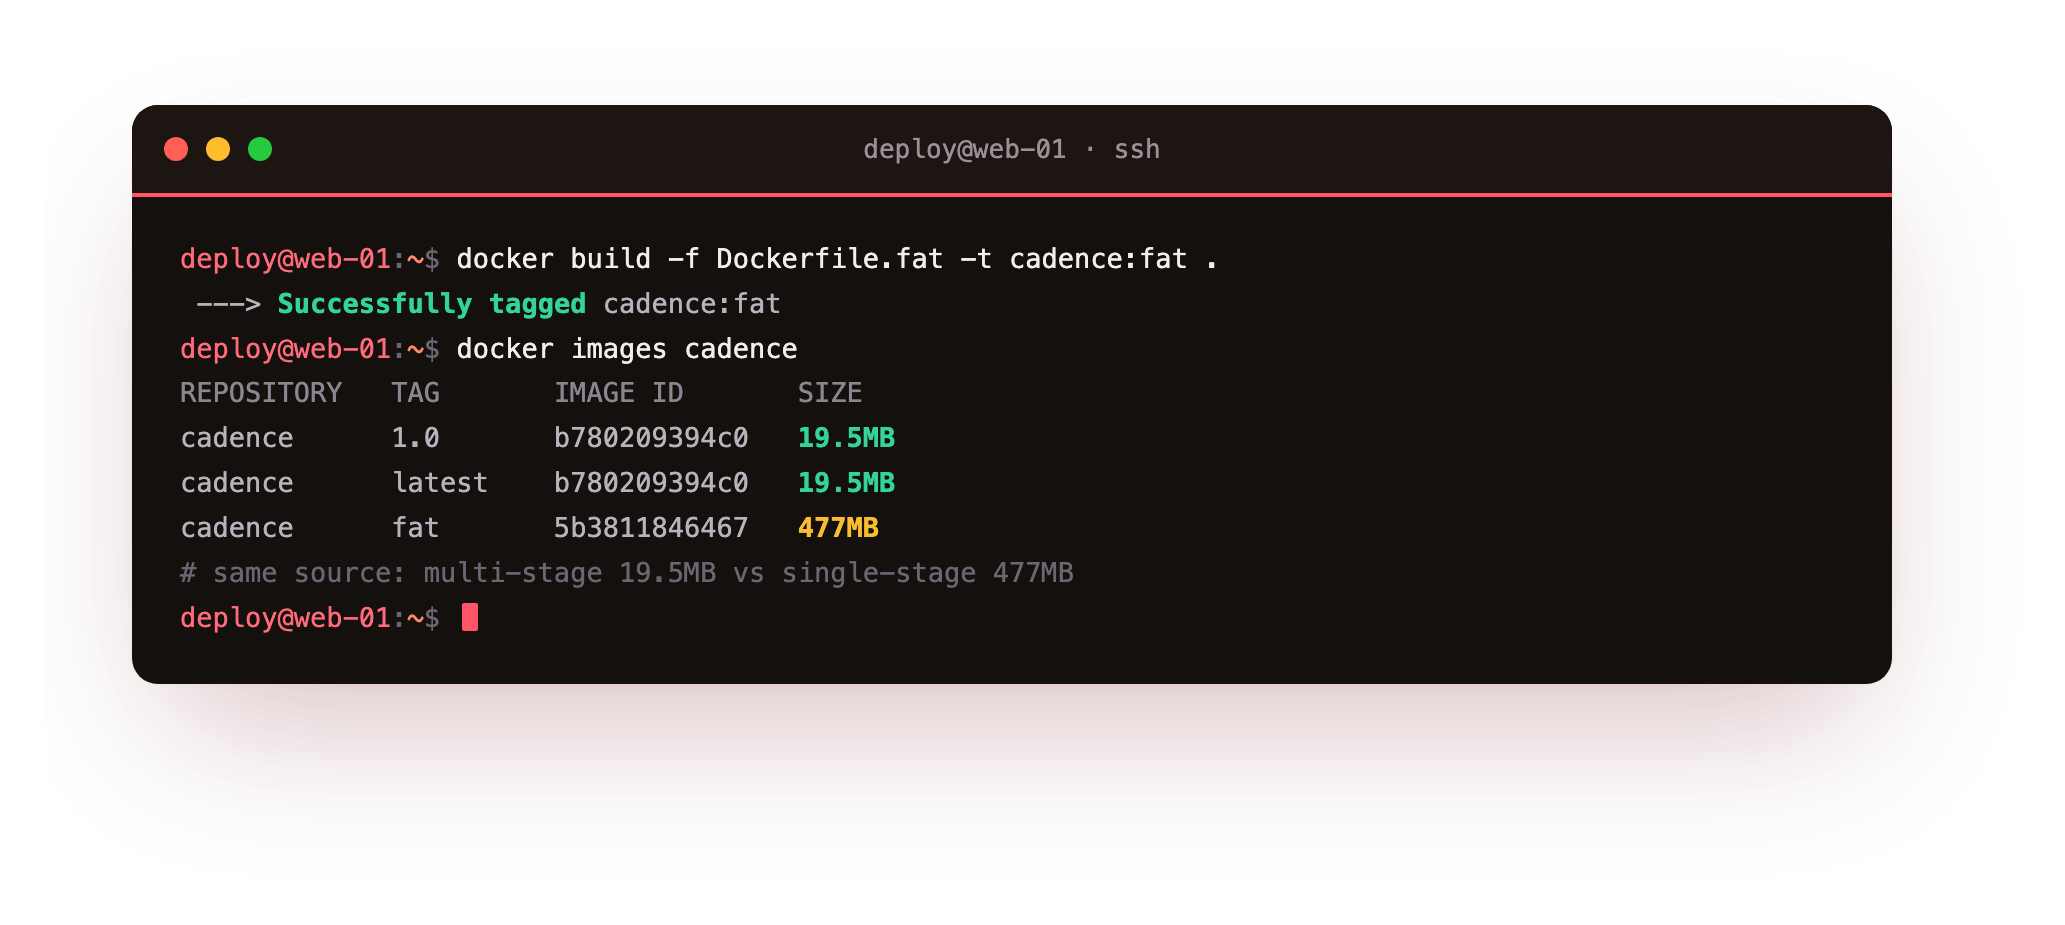
The single-stage cadence:fat image weighs 477 MB, because it keeps the whole Go toolchain and build cache. The multi-stage cadence:1.0 is 19.5 MB, since it holds only a small Alpine base and one stripped binary. That is roughly a twenty-fourfold reduction from the same source, for the price of one extra FROM line.
docker images cadence should list cadence:1.0 near 19.5 MB beside the fat build near 477 MB. If your final image is close to the fat number instead, the last stage is still carrying the toolchain, so confirm the second FROM starts from a clean base and only COPY --from=build brings the binary across.
- It pulls faster on every deploy and every new node, so rollouts are quicker.
- It carries less software, so there is less that a scanner can flag and less to patch.
- It starts sooner, because there is less to unpack onto the writable layer.
A smaller image is not a vanity metric. It is fewer bytes over the wire on every deploy and a smaller surface to keep patched, which the security chapter returns to.
Tag on purpose
The tag after the colon is a label you choose, and it is worth choosing well. Use a real version like cadence:1.0 for something you deploy, so you always know which build is running. Reserve latest for local convenience, never for production, because it is a moving pointer that turns a rollback into guesswork. You can attach several tags to one image ID, which is how a single build becomes both 1.0 and a release name.
Frequently asked questions
What does multi-stage actually save?
It keeps your build tools out of the shipped image. The compiler, headers, and package caches live in an early stage that is discarded, and only the finished artifact is copied into a clean final stage. On this app that took the image from 477 MB to 19.5 MB with no change to the source code.
Why copy go.mod before the rest of the source?
Docker caches layers by their inputs. If dependency files are copied and resolved before your application code, then editing a source file does not invalidate the dependency layer, so rebuilds reuse it and finish faster. Copying everything at once would re-resolve dependencies on every code change.
Should I always use an Alpine base?
Alpine is small and works for statically linked binaries like this Go app, which is why the final image is tiny. Some language runtimes need glibc and are happier on a slim Debian base. Pick the smallest base your app actually runs on, and confirm it starts before you commit to it.
Where do the layers go on disk?
Under /var/lib/docker, stored by the overlay storage driver and shared between images that use the same base. That sharing is why pulling a second Alpine-based image is quick: the base layers are already present, and only the layers unique to the new image are downloaded.
What you have, and what comes next
You wrote a Dockerfile, built a tagged Docker image, read its layers with docker history, and cut the shipped image from 477 MB to 19.5 MB with a multi-stage build. You now have a small, reproducible image of your own app.
One image on its own is not an application, though. Real apps have a datastore beside them. The next chapter describes the whole stack, the app plus Redis, in a single Compose file and brings it up with one command.