Persistent storage that outlives a pod
Persistent storage in Kubernetes is a volume whose lifetime is separate from any pod, so data written to it survives a pod being deleted and recreated. This chapter, run on the live k3s node, claims a volume from the bundled local-path provisioner, proves the data outlives a pod, then adds resource limits and health probes so the cluster can guard the workload.
So far Beacon has been stateless: kill a pod, a fresh one serves the same page. The day it grows a database or an uploads folder, that data must not vanish with the pod. Persistent storage is how the disposable parts keep the data that must not be.
- A PersistentVolumeClaim asks for storage, and on k3s the local-path provisioner fulfils it from the node's own disk.
- Data on a claim survives when the pod using it is deleted and recreated, because the volume is a separate object.
- Resource requests reserve CPU and memory for a pod, while limits cap what it can take from the node.
- Liveness and readiness probes let the kubelet restart an unhealthy pod and hold traffic back until it is ready.
Three separate ideas share this chapter because they answer the same question: how does a single node run a workload safely. Storage keeps the data, limits keep one pod from starving the others, and probes keep a broken pod from pretending it is fine. On one small slice all three matter more, not less, because there is no second machine to absorb a mistake.
Prerequisites
- The k3s node with its default
local-pathStorageClass, which the installer set up in chapter one. kubectlworking, and thebusybox:1.36image for the writer and probe demo pods.
Claim a volume and bind it
A PersistentVolumeClaim describes the storage you want. The local-path provisioner watches for claims and carves out a directory on the node to back each one.
apiVersion: v1
kind: PersistentVolumeClaim
metadata: { name: beacon-data }
spec:
  accessModes: ["ReadWriteOnce"]
  storageClassName: local-path
  resources:
    requests: { storage: 128Mi }
Apply it together with a pod that mounts it at /data, then check the claim.
kubectl apply -f pvc.yaml
kubectl get storageclass
kubectl get pvc beacon-data
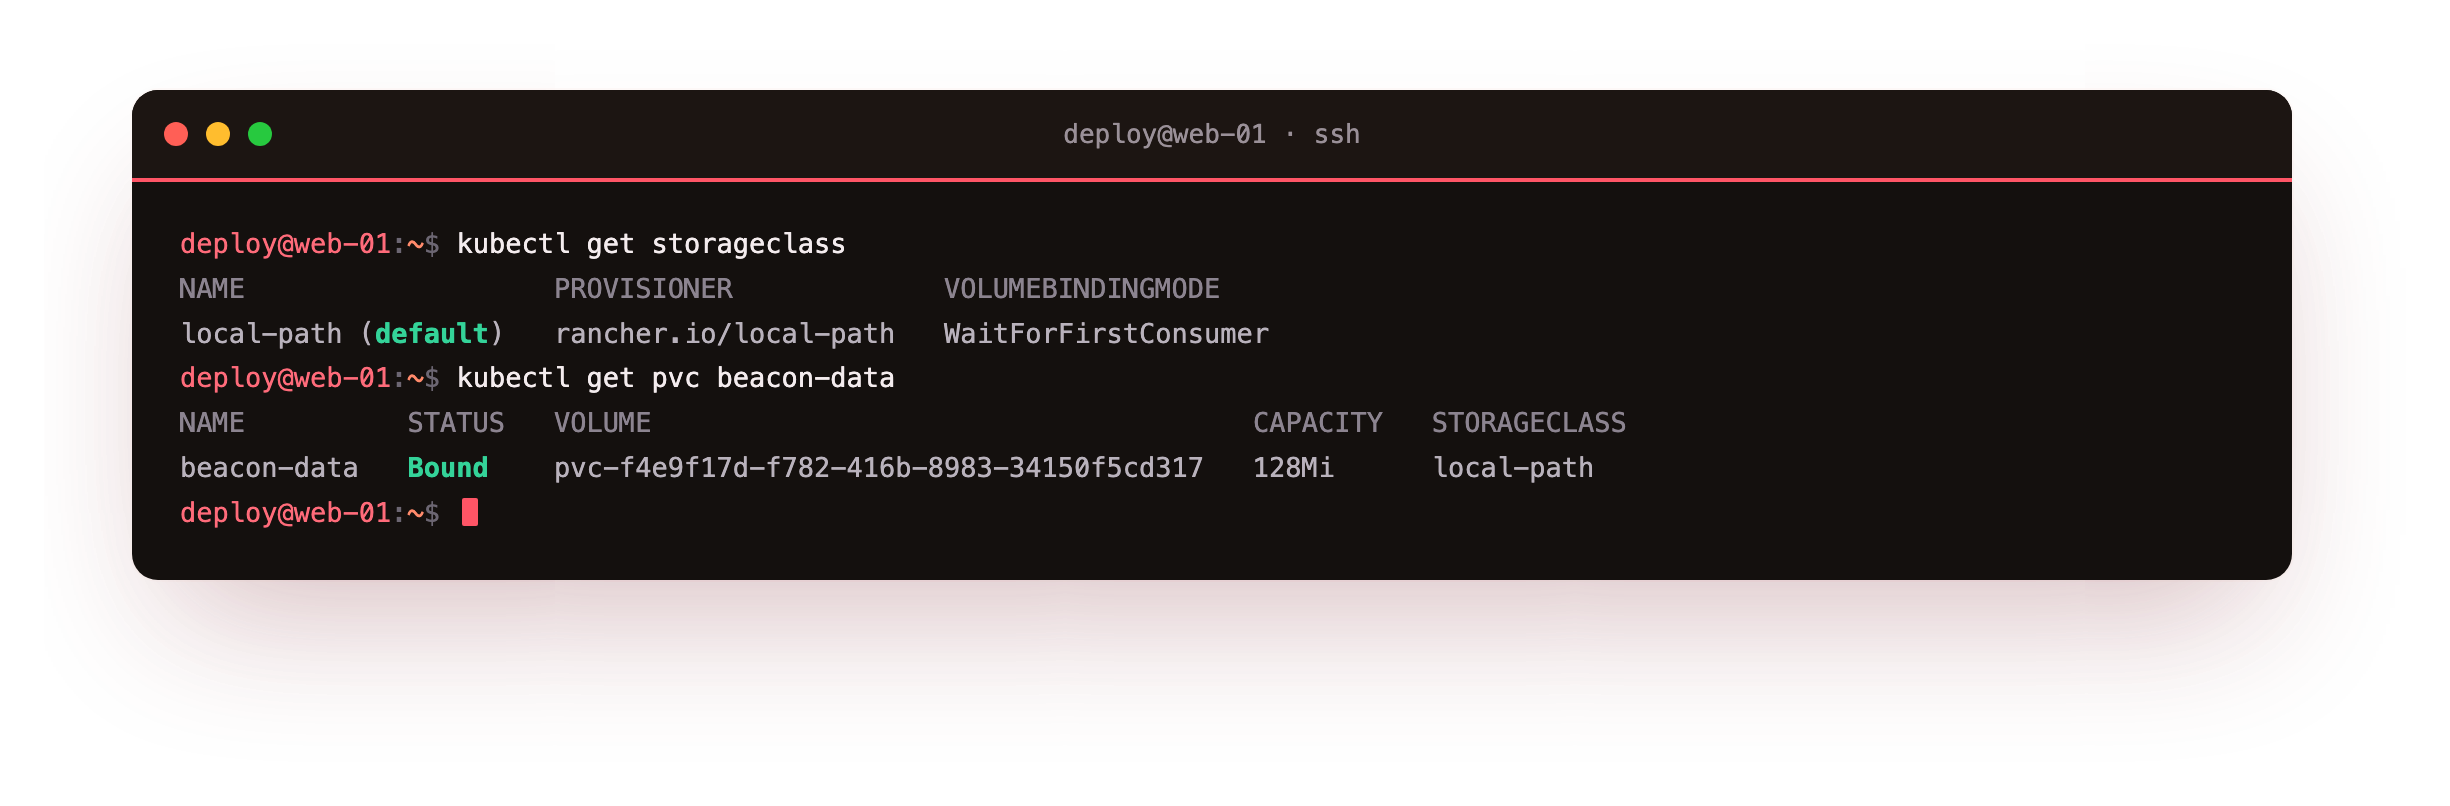
kubectl get storageclass shows local-path as the default, with a binding mode of WaitForFirstConsumer. That mode means the claim stays Pending until a pod actually needs it, so the volume lands on the node that runs the pod. Once the writer pod is scheduled, kubectl get pvc beacon-data reports the claim Bound to an automatically provisioned volume of 128Mi. You asked for storage by describing it, and the provisioner created the real thing.
You should see beacon-data move from Pending to Bound once the writer pod is scheduled. A Bound claim means real disk on the node is now reserved for this workload and waiting for data.
Prove the data survives a pod
This is the test that matters. Write a file to the volume, destroy the pod, bring it back, and read the file.
kubectl exec writer -- sh -c 'echo "deploy 2026-07-22: first cluster note" > /data/notes.txt'
kubectl delete pod writer --now
kubectl apply -f pvc.yaml
kubectl exec writer -- cat /data/notes.txt
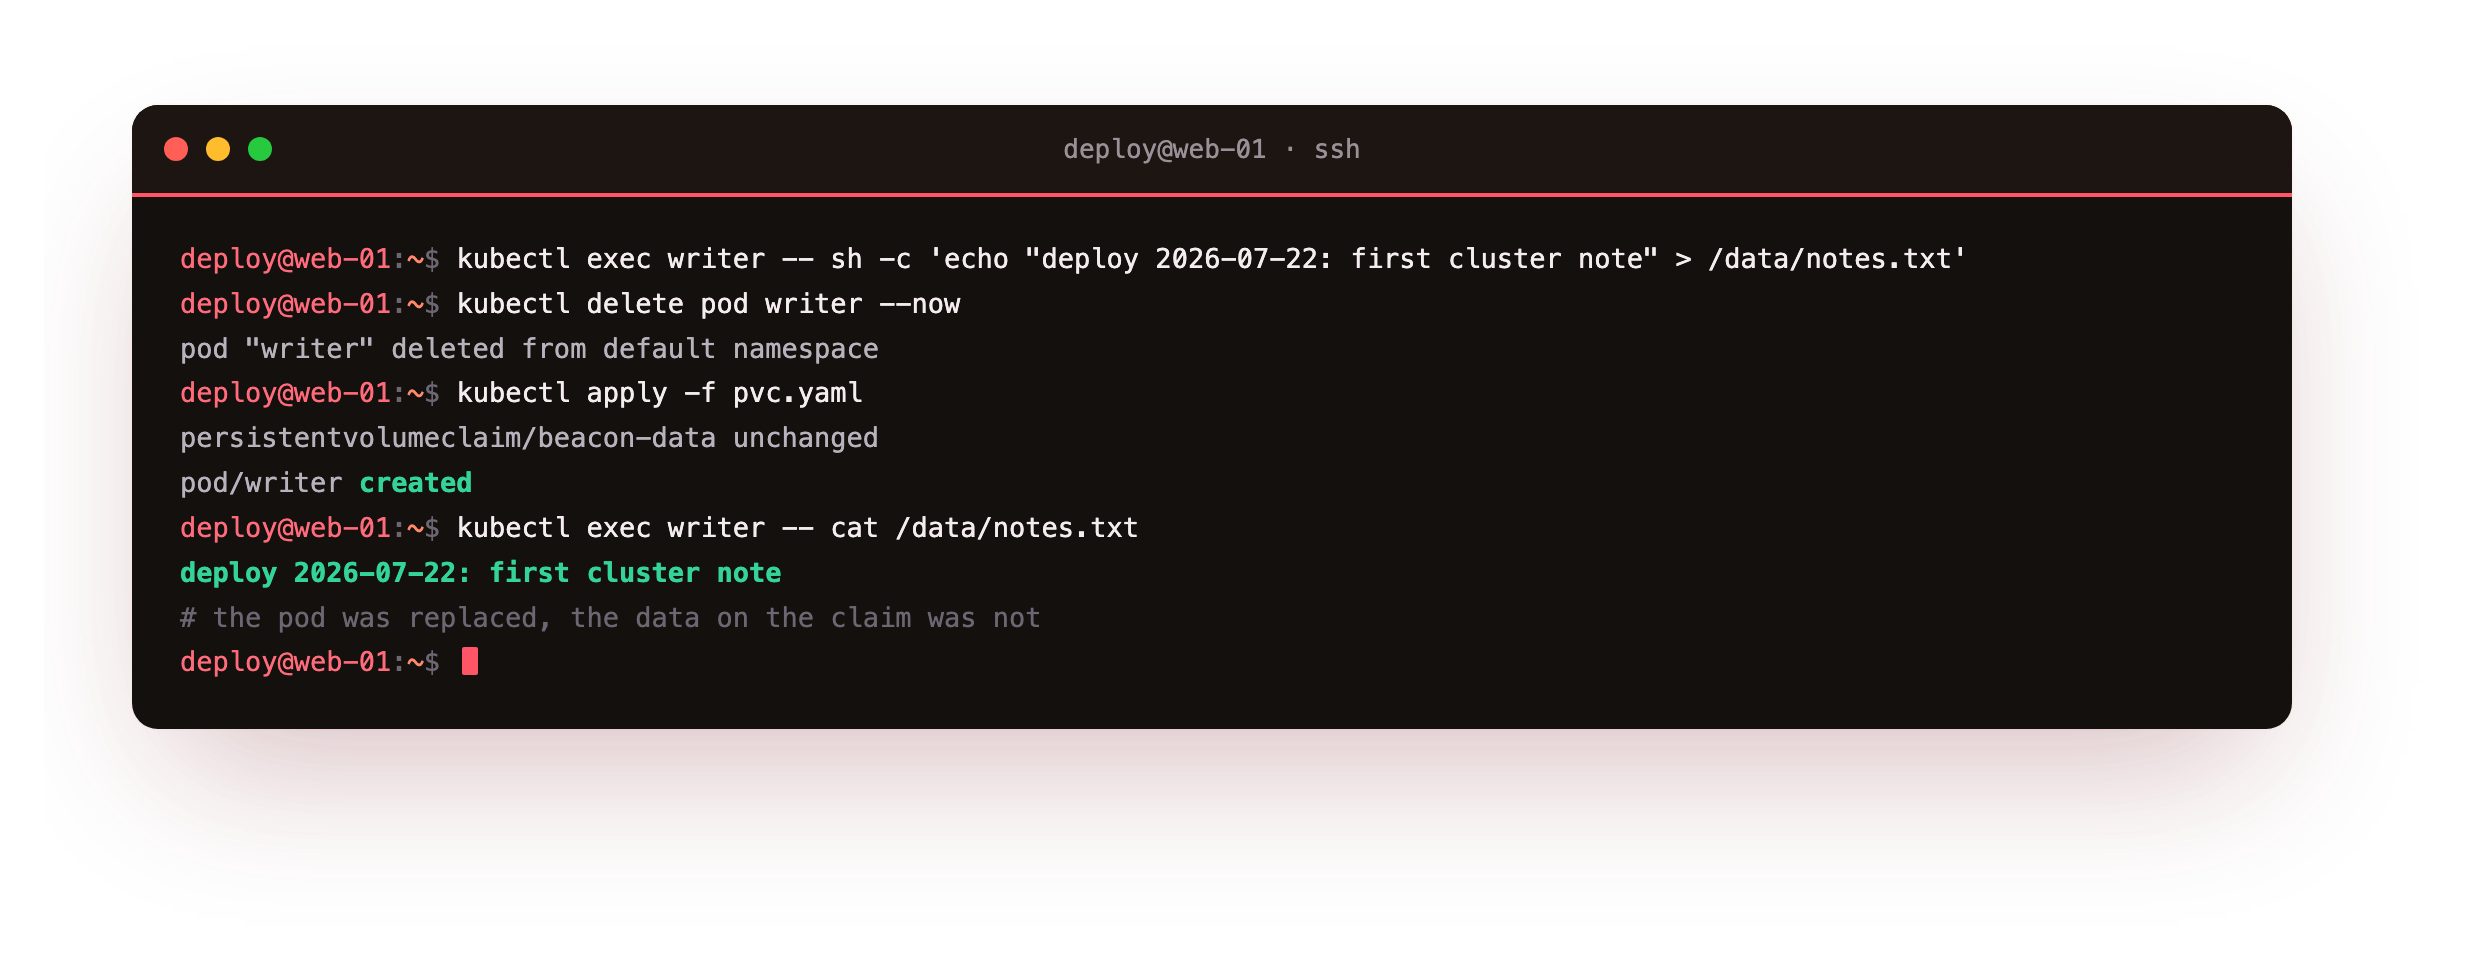
The note goes onto the mounted volume, the pod is deleted outright, and a fresh pod comes up against the same claim. kubectl exec writer -- cat /data/notes.txt returns the exact line written before the delete. The pod was replaced; the data was not. That separation is the whole reason PersistentVolumeClaims exist. A database pod can be rescheduled or upgraded and still open the same files, because the files live on the claim, not inside the pod.
You should read back the exact note you wrote, from a pod that did not exist when you wrote it. That is the guarantee any stateful app on the cluster leans on: the pod is cattle, the claim is the pasture.
Set limits and add probes
A workload should declare what it needs and prove it is healthy. This container reserves a little CPU and memory, caps its ceiling, and exposes two probes.
resources:
  requests: { cpu: "50m", memory: "32Mi" }
  limits: { cpu: "200m", memory: "64Mi" }
livenessProbe:
  exec: { command: ["cat", "/tmp/healthy"] }
  periodSeconds: 5
  failureThreshold: 2
readinessProbe:
  exec: { command: ["cat", "/tmp/healthy"] }
  periodSeconds: 5
The demo container writes a health file, deletes it after twenty seconds, and then sits idle, so the liveness probe begins to fail on purpose. Watch what the cluster does.
kubectl get pods -l app=probe
kubectl describe pod -l app=probe
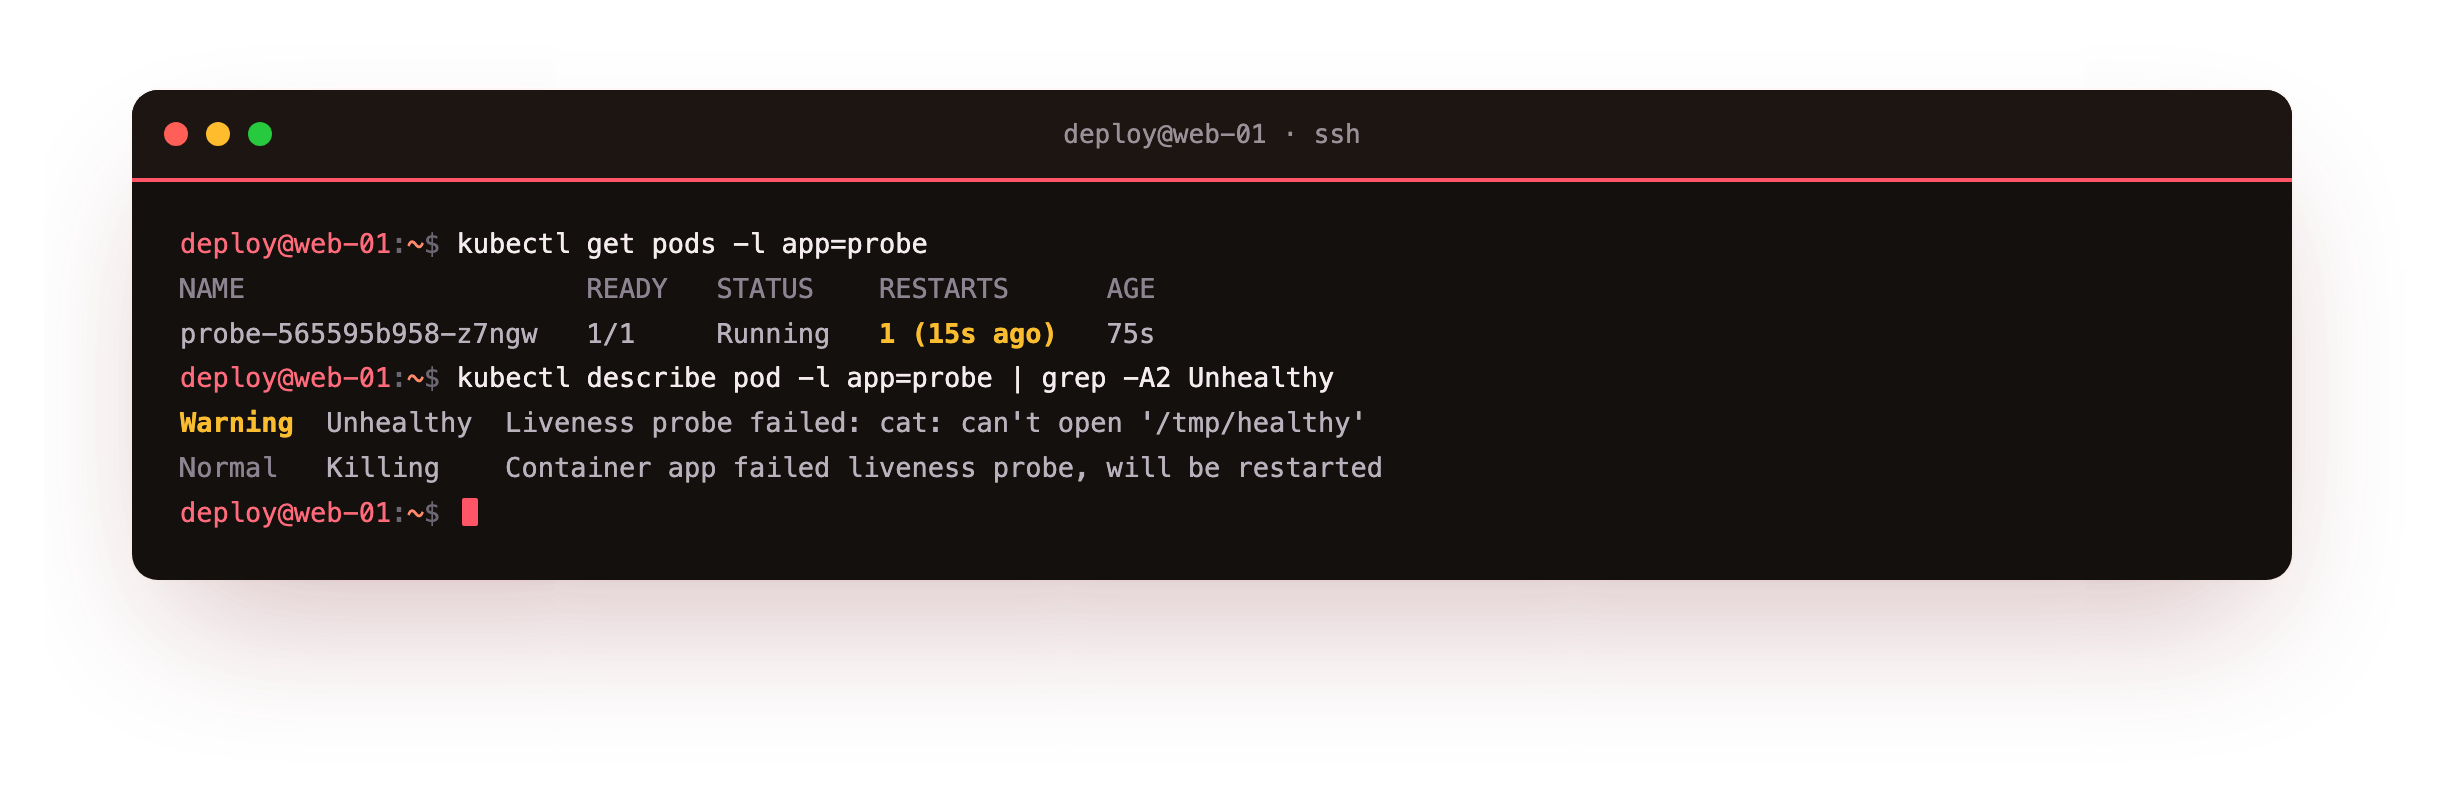
After the health file vanishes, kubectl get pods -l app=probe shows the restart counter climb to one, then keep climbing on each cycle. kubectl describe lists the events: Liveness probe failed followed by Container app failed liveness probe, will be restarted. The kubelet caught a container that was up but not healthy and restarted it, which a bare process manager would never do.
The readiness probe plays the other side: while the file is missing the pod is marked not ready, and a Service would stop sending it traffic until it recovers.
You should watch the restart count tick up on its own once the health file disappears. That is the kubelet enforcing health, not just liveness of the process. A crashed process is easy to spot; a hung one that still holds its port is exactly what a probe catches.
Going further: requests, limits and a single node
Requests and limits round this out. The request tells the scheduler how much to reserve, so the pod only lands where there is room. The limit caps usage, so a memory leak in one pod cannot drag down everything else on the node.
If a container tries to exceed its memory limit, the kernel kills it and the kubelet restarts it, which shows as an OOMKilled status: deliberate containment rather than a crash you have to chase. On a single slice that ceiling is the difference between one sick pod and a wedged server, so set requests and limits on anything you expect to keep running.
Frequently asked questions
What happens to a local-path volume if the node is lost?
The local-path provisioner stores data on the node's own disk, so a claim is tied to that node. On a single-node cluster that is fine, but the data is only as safe as the node. Back it up separately, and for multi-node clusters use networked storage if pods must move between nodes.
What is the difference between a liveness and a readiness probe?
A liveness probe decides whether to restart a container that has gone bad. A readiness probe decides whether a pod should receive traffic right now. A pod can be alive but not ready, for example while it warms a cache. Use both: one for recovery, one for routing.
What happens when a pod hits its memory limit?
If a container tries to use more memory than its limit, the kernel kills it and the kubelet restarts it, which shows as an OOMKilled status. That is deliberate containment. Set limits high enough for normal work but low enough that a runaway pod cannot exhaust the node.
Do I need requests and limits on every pod?
They are optional but strongly worth setting. Without a request the scheduler assumes the pod needs nothing and may overpack the node. Without a limit one pod can consume everything. On a small server, requests and limits are what keep workloads from interfering with each other.
What you have, and what comes next
You claimed a volume, proved a written note survived deleting and recreating its pod, then set resource limits and watched a failing liveness probe restart a container on its own. Storage, limits, and probes together make one node a safe place to run something real.
The cluster is doing real work now, which means it needs looking after. The final chapter covers day-two operations: reading metrics, planning an upgrade, backing up the datastore and restoring it, then the clean uninstall.