What you will have at the end
By the end of this series you can turn anything you run into a real service: one that restarts when it crashes, logs where you can find it, runs on a schedule, and is sandboxed so a bug cannot take the box with it. It all rests on systemd unit files, the small text files that tell systemd what to run and how to treat it.
This first chapter shows you a service surviving a crash on a live Ubuntu 24.04 slice, turns a bare script into that service from nothing, then teaches you to read the unit model so you can write your own.
- The series destination: a script you used to babysit in a terminal becomes a managed service that systemd keeps alive, so killing its process just makes it come back with a new PID.
- There is nothing to install. systemd is already PID 1 on Ubuntu, so the from-zero step is writing your first
.servicefile and runningsystemctl enable --now. - A unit file is plain text in one of a few types:
.service,.socket,.timer,.target,.mount. A service groups its keys under[Unit],[Service], and[Install]. systemctl catprints the unit systemd loaded andsystemctl showprints every resolved property, so you never have to guess what a service is actually running.
- One Ubuntu 24.04 slice reached over SSH where you hold sudo, with any long-running script of your own to promote into a service. A five-line bash loop is enough to follow along.
- No package to add. systemd ships as the init system, so
systemctlandjournalctlare already on the box; you write unit files under/etc/systemd/systemand reload. - Every demo here is a throwaway named
sc-demo-*, kept separate from the units your slice already runs, so nothing you practise on touches nginx, SSH, or the system's own services. - Enough shell to write a file with
sudo teeor an editor and to read asystemctl statusblock, which is the one screen the whole series comes back to.
See a service survive a crash first
Here is where this chapter lands, on one screen. This is a small worker running as a systemd service, and it is about to be killed the hard way. Note the Main PID in the status, send that process a SIGKILL, and ask for the status again.
systemctl status sc-demo-web.service
sudo kill -9 876416
systemctl status sc-demo-web.service
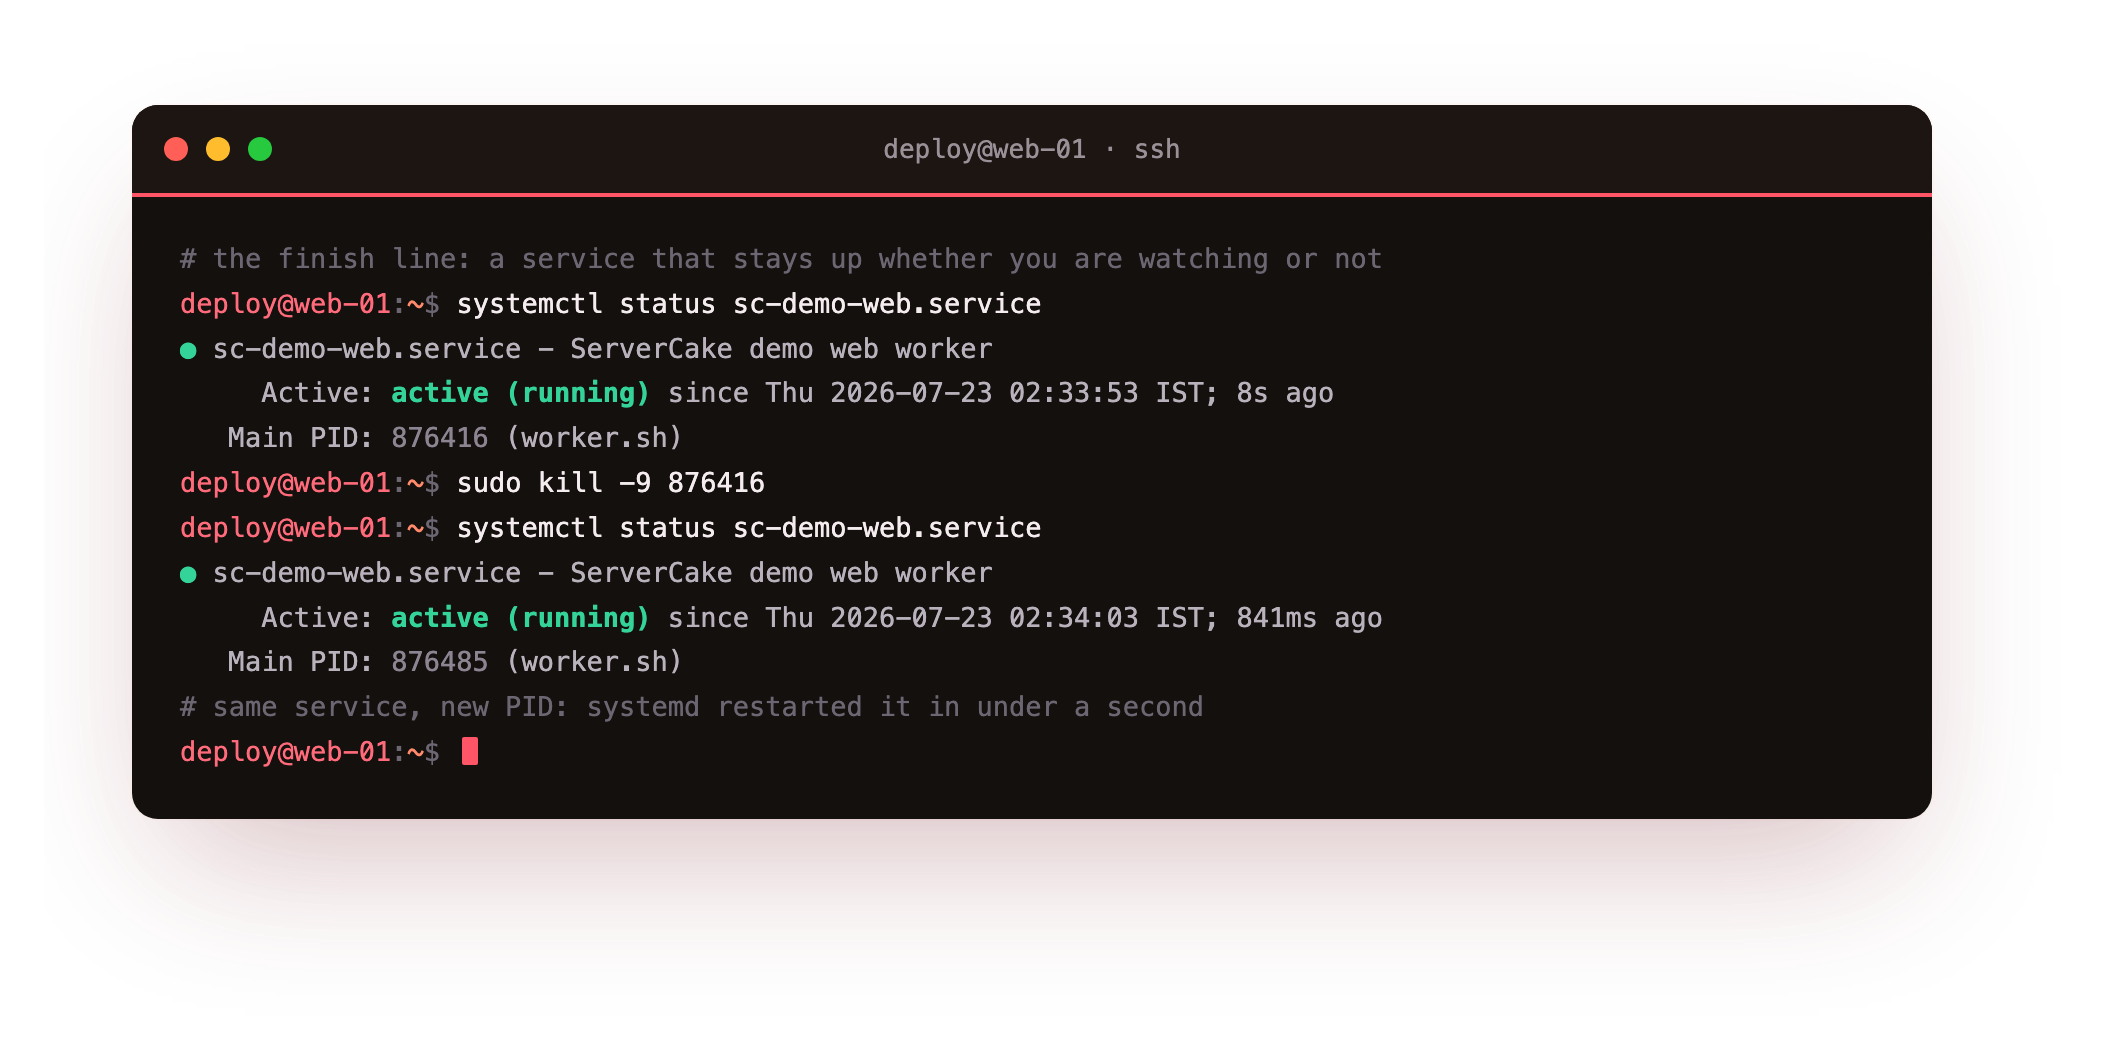
The service was active (running) on PID 876416. A kill -9 cannot be caught or ignored, so that process is gone instantly. Yet the second status is active (running) again, this time on PID 876485, started less than a second ago. systemd noticed the process die and started it straight back.
That is the whole point of a service: it stays up whether or not anyone is watching the terminal. Right now you have none of this; your script runs only as long as your shell stays open. The rest of this chapter builds exactly this service from a bare script.
Turn a bare script into your first service
A service starts as something plainer: a script you run by hand and hope stays up. Here is the worker this series uses, a loop that does a unit of work every few seconds. On a fresh slice it lives at /opt/sc-demo/worker.sh and runs only while you sit in the terminal.
#!/bin/bash
# a plain worker you have been running by hand
n=0
while true; do
  n=$((n+1))
  echo "worker: processed job $n"
  sleep 5
done
To hand it to systemd, describe it in a unit file. Write this to /etc/systemd/system/sc-demo-web.service, the directory where units you own live.
[Unit]
Description=ServerCake demo web worker
After=network-online.target
Wants=network-online.target

[Service]
Type=simple
ExecStart=/opt/sc-demo/worker.sh
Restart=on-failure
RestartSec=1

[Install]
WantedBy=multi-user.target
Now reload systemd so it reads the new file, then enable and start it in one step. enable wires it to start at boot; --now also starts it immediately.
sudo systemctl daemon-reload
sudo systemctl enable --now sc-demo-web.service
systemctl is-active sc-demo-web.service
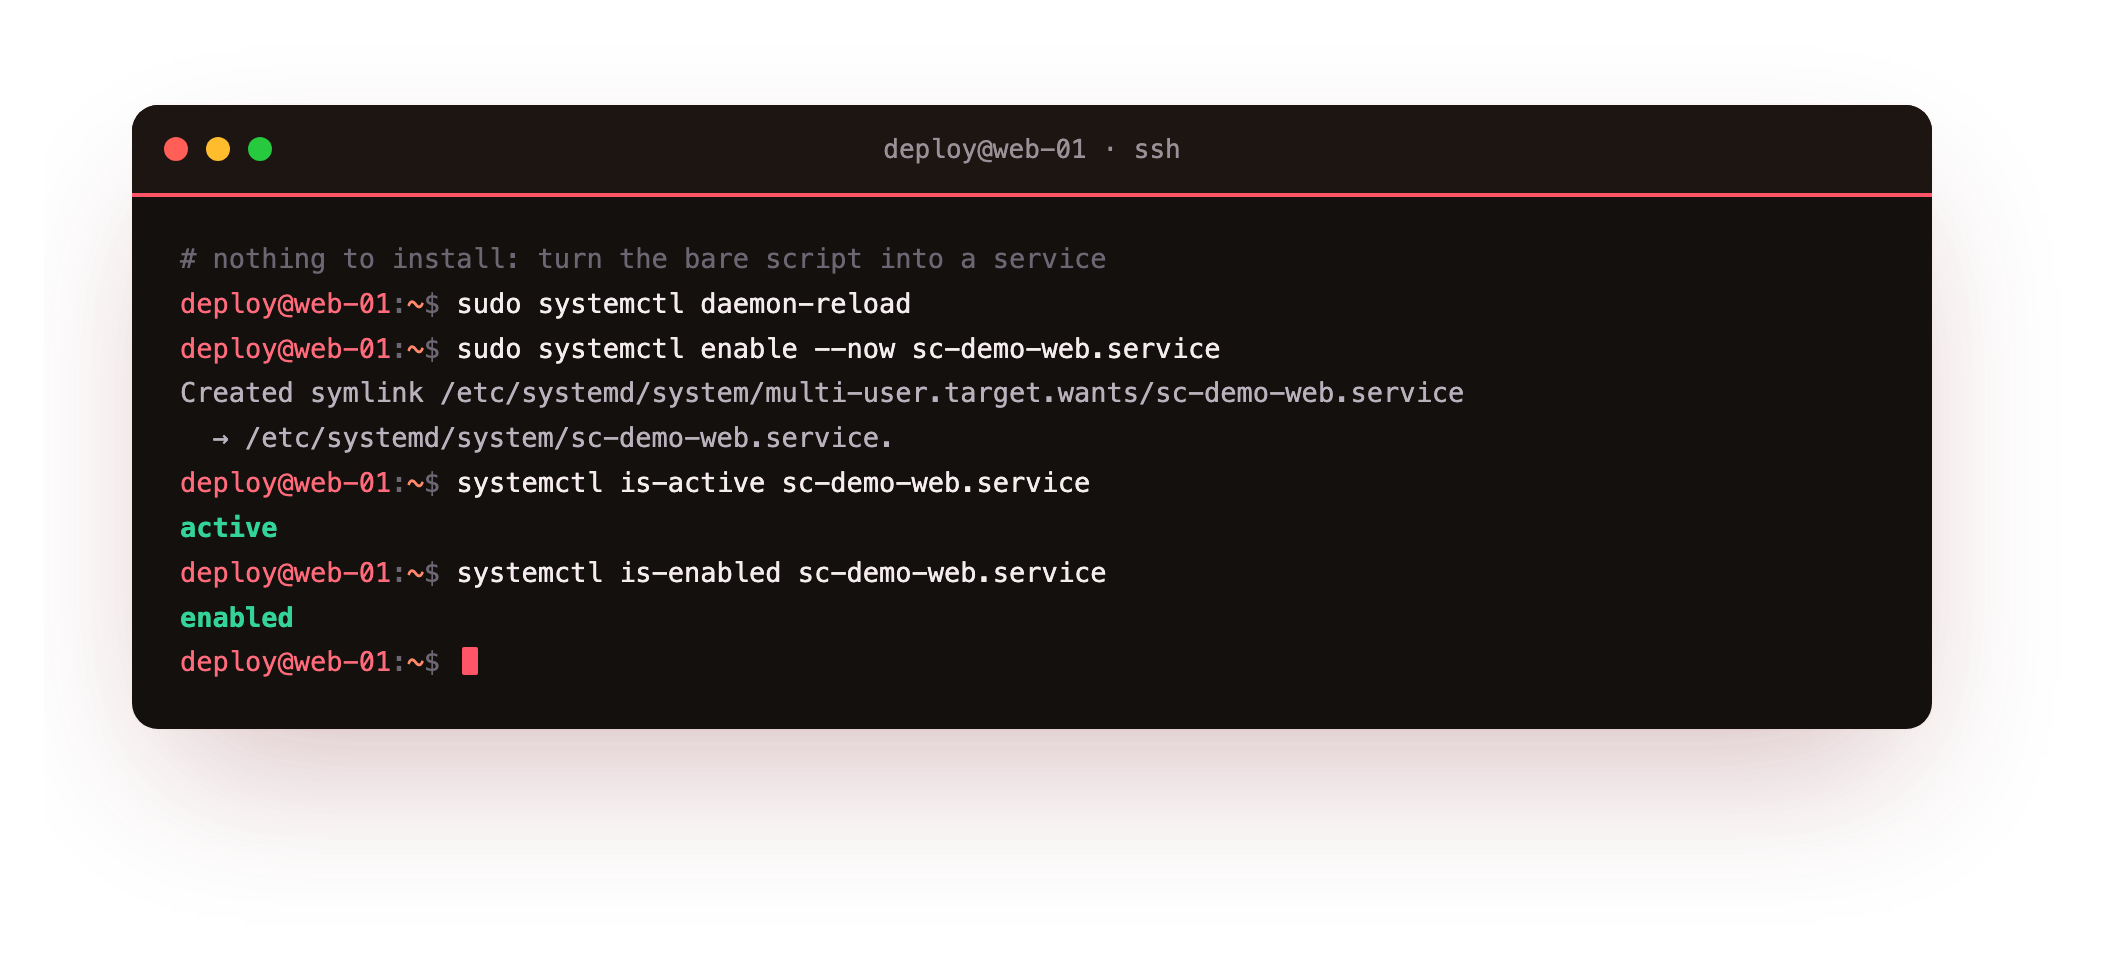
enable creates a symlink under multi-user.target.wants, which is how the service gets pulled in at every boot, and is-active prints active. Your script is now a managed service. That Restart=on-failure line is what made the crash demo above work: a process killed by a signal counts as a failure, so systemd revives it. Chapter two takes the restart policy apart properly.
Run systemctl is-active sc-demo-web.service and confirm it prints active, then systemctl is-enabled and confirm enabled. Your bare script is now a service that starts at boot and comes back from a crash, which is the destination you saw at the top of this chapter.
What systemd unit files contain
You just wrote a unit, so now read the model behind it. Everything systemd manages is a unit, and the suffix names its kind. A .service is a process to supervise. A .socket is a listening socket that can start a service on demand. A .timer is a schedule. A .target is a named group of units used to reach a boot state, and a .mount is a filesystem mount. You will spend most of your time on services, and meet the rest later in this series.
A service unit groups its keys into three sections. [Unit] holds the description and the ordering keys such as After and Wants. [Service] describes the process itself: its Type, its ExecStart command, and its restart behaviour. [Install] is read only by systemctl enable, and it records which target should pull the unit in at boot. You never have to guess what systemd actually loaded, because it will print the file back to you.
systemctl cat sc-demo-web.service
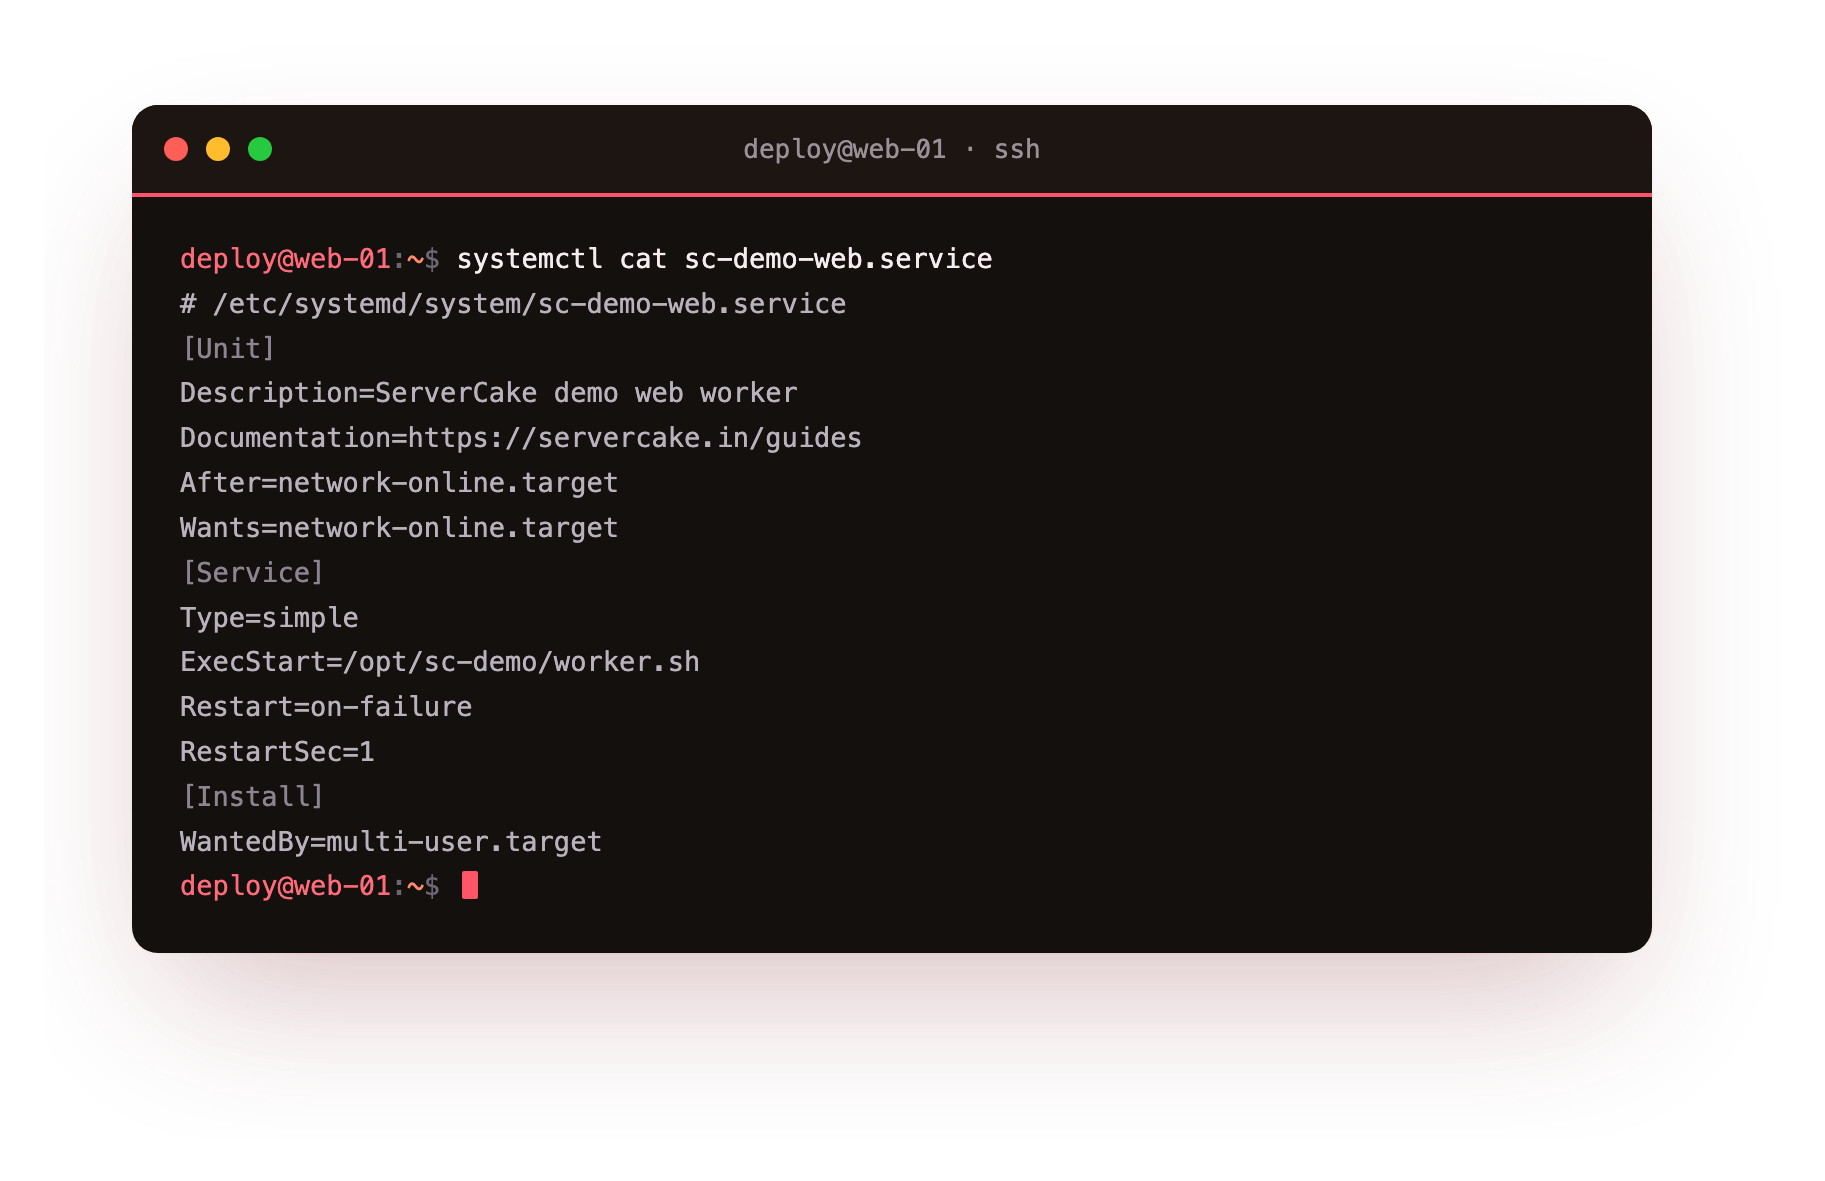
The header line shows the file lives under /etc/systemd/system, so it is one you own rather than a vendor copy. When a unit name exists both there and under /lib/systemd/system, the copy under /etc wins, which is why your version takes effect without editing a packaged file. systemctl cat prints the file as written; systemctl show sc-demo-web.service -p Restart goes further and prints the effective value of a single property after systemd applies its defaults.
Overriding a unit with a drop-in
You rarely edit a packaged unit directly, because the next package update would overwrite your change. Instead you write a drop-in: a small file under /etc/systemd/system/name.service.d/ that carries only the keys you want to change, which systemd merges on top of the vendor unit. Running sudo systemctl edit sc-demo-web.service creates one for you and reloads the daemon when you save. This matters because systemctl cat prints the base unit and every drop-in in the order they apply, so when a setting is not what you expect, cat shows you the last file that touched it.
Going further: how systemd resolves and orders units
Boot is not a script that runs top to bottom. systemd reads every unit, builds a dependency graph, and starts units in parallel wherever their ordering allows. Two ideas control this, and they are separate on purpose. Wants and Requires create a dependency, meaning one unit pulls another in. After and Before create ordering, meaning one unit waits for another to start first. You can want a unit without caring when it starts, or order around a unit you did not pull in.
You can measure the result of all that parallelism.
systemd-analyze
systemd-analyze blame
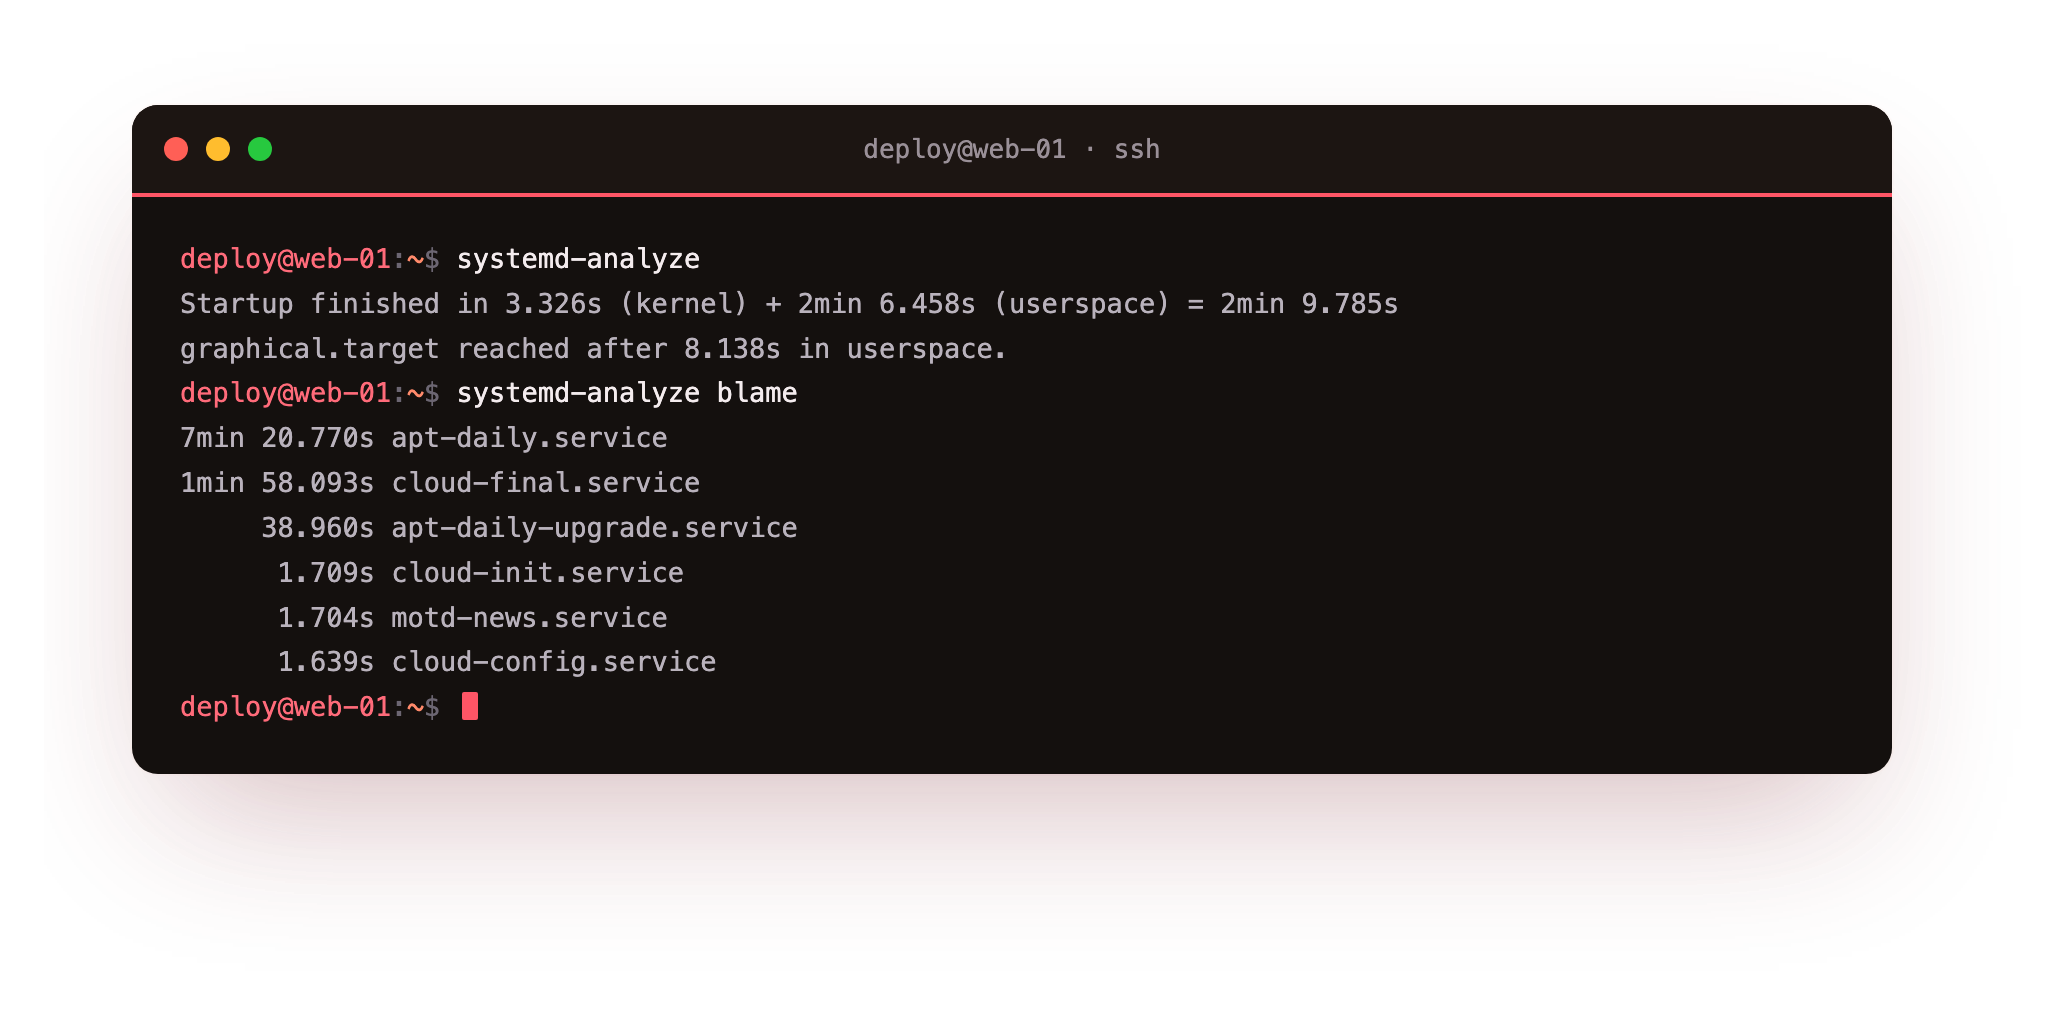
The first line reports how long the last boot took, split between the kernel and userspace. systemd-analyze blame then ranks units by how long each took to start. On a cloud image the top of the list is usually a first-boot or background maintenance job rather than anything you configured, so read the list to find where boot time actually went before blaming your own service.
Frequently asked questions
Do I need to install systemd first?
No. systemd is the init system on Ubuntu 24.04, running as PID 1 from the moment the machine boots, so systemctl and journalctl are already present. The from-zero step for systemd is not an install; it is writing your first unit file under /etc/systemd/system and running systemctl daemon-reload.
Where do I put a unit file I write myself?
Put it in /etc/systemd/system and run sudo systemctl daemon-reload. Files there override same-named vendor units in /lib/systemd/system, so your version wins without editing a packaged file.
What is the difference between systemctl cat and systemctl show?
cat prints the unit file as written, including any drop-ins. show prints every property after systemd applies its defaults, so it reveals settings the file never lists. Reach for cat to read intent and show to read the effective value.
What does enable do that start does not?
start runs the service now, until the next reboot. enable wires it into a target so it comes back at every boot, by creating a symlink under that target's .wants directory. enable --now does both at once, which is what you almost always want for a service meant to stay running.
What you can do now
You can take a bare script and make it a systemd service: write the unit under /etc/systemd/system, reload, and enable --now it so it starts at boot. You can read the model behind that unit with systemctl cat and systemctl show, override a packaged unit safely with a drop-in, and read systemd-analyze blame to see where boot time went. You have also seen the destination, a service that shrugs off a kill -9 and comes back on a new PID.
That restart was one line, Restart=on-failure, and there is more to getting it right: which Type to pick, how to order a service after its dependencies, and how to stop a crash loop from spinning the CPU. The next chapter writes a service that behaves and breaks it on purpose to watch systemd recover it: writing systemd services well.